Using the API Documentation
Using the API documentation involves:
The following sections describe how to accomplish these tasks, and also
offer API reference information.
Granting the REST API
Permission
You need the REST API permission to start using the
ECM REST API. You can grant the permission to:
Granting the
REST API Permission to a Role
To grant the REST API permission to a role:
Click the Configuration tab and then click
Manage Permissions in the Users and Authentication
section, as shown below:
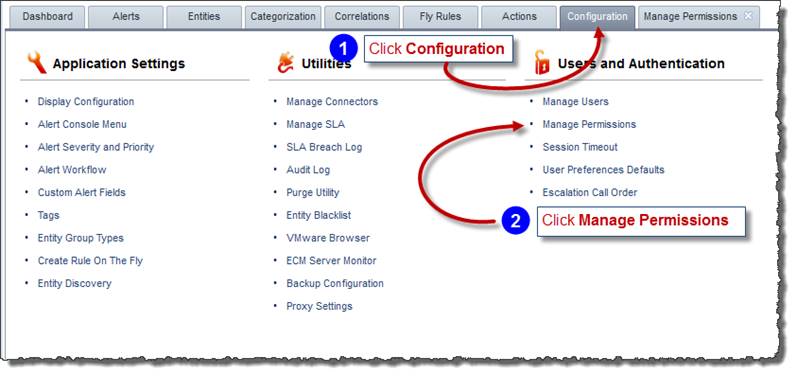
The Manage Permissions tab appears to the right of
the Configuration tab and contains a matrix of functional
permissions for each role.
Select the REST API permission for the desired
role. In this example below, the user has granted the Administrator
role the REST API permission.

Granting the
REST API Permission to a User
To grant the REST API permission to a user:
Select Manage Users from the Users
and Authentication settings, as illustrated below:
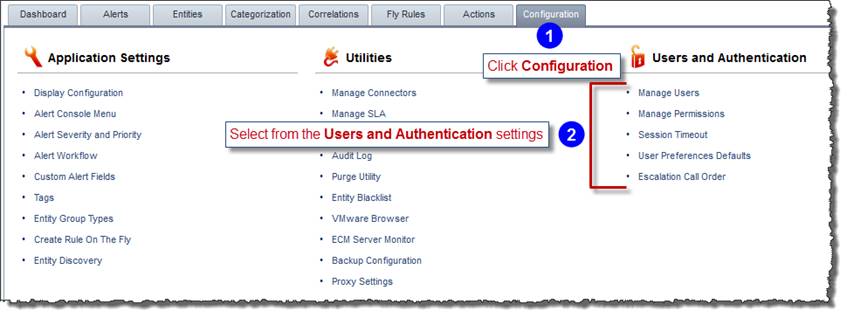
The Manage Users tab appears.
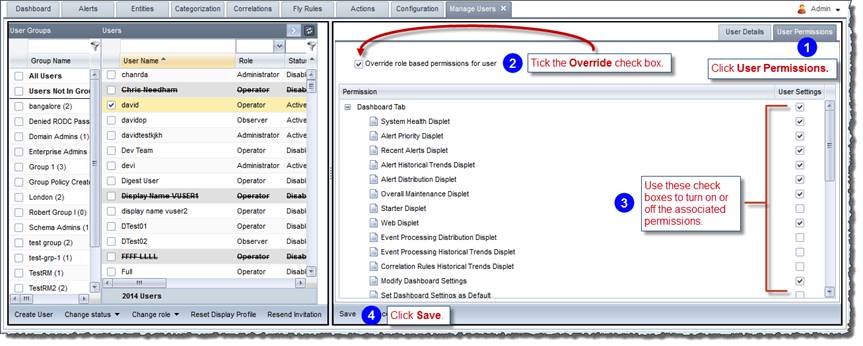
Select a user and expand the user details, as shown below:

Configure the REST API permission as shown
below, selecting the REST API permission:
Generating the ECM
REST API Token
Once you have the REST API permission, generate the
REST API token for use in your calls as illustrated below:

Event Token Mapping Examples
Example 1: PagerDuty
Webhook JSON
Sample mapping would be as follows:
message=event.data.message,entity=event.agent,tag=event.data.type
For the following JSON Payload
{
"event": {
"id": "01CH754SM17TWPE2V2H4VPBRO7",
"event_type": "pagey.ping",
"resource_type": "pagey",
"occurred_at": "2021-12-08T22:58:53.510Z",
"agent": "SAM-34",
"client": null,
"data": {
"message":
"Hello from your friend Pagey!",
"type": "ping"
}
}
}
Example 2:
Grafana Payload (multi events)
Sample mapping would be as follows:
message=alerts.annotations.summary,entity_group=alerts.labels.zone,severity=state,entity=alerts.labels.team
For the following JSON Payload:
{
"receiver":"My Super Webhook",
"alerts":[
{
"status":"firing",
"labels":{
"alertname":"High
memory usage",
"team":"blue",
"zone":"us-1"
},
"annotations":{
"summary":"This
alert was triggered for zone us-1"
}
},
{
"status":"firing",
"labels":{
"alertname":"High
CPU usage",
"team":"red",
"zone":"eu-1"
},
"annotations":{
"summary":"This
alert was triggered for zone eu-1"
}
}
],
"state":"critical"
}
The JSON payload can have one or multiple events. In the case where
there are multiple events listed, the structure that contains the description
(in the above example, 'alerts.annotations.summary') can be an array and
will be mined for other event data (for example, Entity group could be
mapped to 'alerts.labels.zone') after which data encompassing the event
structure, that is, outside the alerts[] is checked for tokens to be extracted.
For example, Severity could be mapped to just "state."
If the JSON payload contains arrays, only the array that contains the
event message is processed. All other arrays are ignored. Information
that is not present within the structure that contains the event description
will be read from the main structure as long as these attributes are not
in the form of an array.
Example 3: Dynatrace
webhook payload
Sample mapping would be as follows:
message=ProblemTitle,entity=ImpactedEntity,severity=State,tag=Tags
For the following JSON Payload
"ImpactedEntities": [
{"type": "HOST",
"name": "MyHost1", "entity": "HOST-XXXXXXXXXXXXX"
},
{"type": "SERVICE",
"name": "MyService1", "entity": "SERVICE-XXXXXXXXXXXXX"}
],
"ImpactedEntity": "MyHost1,
MyService1",
"PID": "99999",
"ProblemDetailsHTML": "<h1>Dynatrace
problem notification test run details</h1>",
"ProblemDetailsJSON":
{"ID" : "99999" }
,
"ProblemID": "999",
"ProblemImpact": "INFRASTRUCTURE",
"ProblemTitle": "Dynatrace problem
notification test run",
"Problem URL": "https://example.com",
"State": "OPEN",
"Tags": "testtag1, testtag2"
}
Accessing the API Documentation
RightITnow ECM offers online API documentation that you can use to learn
about the ECM REST API and make calls against it.
To use the API Documentation:
Have the API token you created in Generating
the ECM REST API Token handy.
Click your User menu.
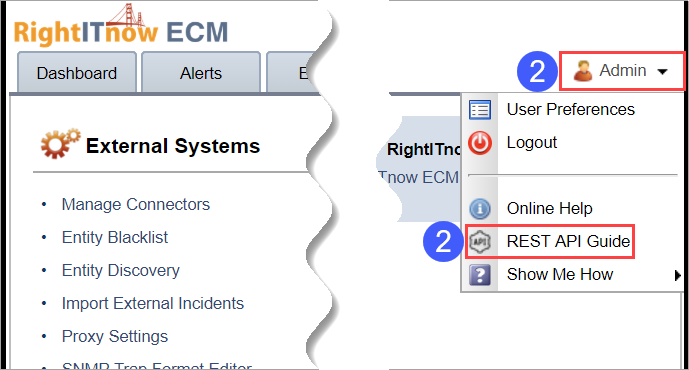
Select REST API Guide. The API Guide appears.

To enable using making API calls directly from the API documentation,
click Authorize.
Enter your user name.
For the password, enter the token you created in Generating
the ECM REST API Token.
Click Authorize within the popup window.
API Reference
When using the API, it is useful to know:
Alert Fields Used in Filters
The table below gives the list of Alert Fields to be used in filters.
Field Name |
Description |
Value |
ID |
Alert
ID |
An
valid alert ID |
CONNECTOR |
Connector
source |
Name
of the connector as it appears on the Manage Connectors tab |
CONNECTOR_ENTITY |
Entity
associated with the connector |
Any
text |
CONNECTOR_TYPE |
Type
of Connector |
See
List
of Valid Connector Types |
COUNT |
Number
of Events |
A
number |
DESCRIPTION |
Message
of the alert |
Any
text |
ENTITY |
Alert’s
entity |
Any
text |
ENTITY_GROUP |
The
groups that the alert’s entity belongs to |
Name
of the entity group as it appears on the Entities tab |
FIRST_OCCURRED |
The
date the alert first occurred |
LAST_OCCURRED,
LAST_RESET or LAST_TOUCHED |
INCIDENT_ID |
The
external Ticket ID |
Any
text |
INCIDENT_STATUS |
The
status of the Ticket |
Any
text |
LAST_COMMENT |
Last
Comment made |
Any
text |
LAST_OCCURRED |
Last
Occurred date |
FIRST_OCCURRED,
LAST_RESET or LAST_TOUCHED |
LAST_RESET |
Last
Reset Date |
FIRST_OCCURRED,
LAST_OCCURRED or LAST_TOUCHED |
LAST_RESET_COUNT |
Date
when the count was reset |
A
number |
LAST_TOUCHED |
The
most recent date when the alert was modified |
FIRST_OCCURRED,
LAST_OCCURRED or LAST_RESET |
OWNER |
Alert
owner |
Username |
PRIORITY |
Alert
priority |
A
number corresponding to a valid priority |
SEVERITY |
Alert
Severity |
See
List
of Valid Connector Types |
STATE |
Alert
state |
See
List
of Valid Connector Types |
TAG |
Tags
of the alert |
Tag
name |
ENTITY_OWNER |
Owner
of the entity associated with the alert |
Username |
MINUTES_SINCE_CREATED |
Minutes
since alert created |
A
number |
MINUTES_SINCE_INCIDENT_OPENED |
Minutes
since ticket created |
A
number |
MINUTES_SINCE_INCIDENT_CLOSED |
Minutes
since ticket closed |
A
number |
MINUTES_SINCE_LAST_OCCURRED |
Minutes
since alert last occurred |
A
number |
MINUTES_SINCE_LAST_RESET |
Minutes
since alert was last reset |
A
number |
MINUTES_SINCE_LAST_TOUCHED |
Minutes
since alert was last modified |
A
number |
MINUTES_SINCE_LAST_STATE_TOUCHED |
Minutes
since alert’s state was last modified |
A
number |
MINUTES_SINCE_LAST_OWNER_TOUCHED |
Minutes
since alert’s owner was changed |
A
number |
HOURS_SINCE_CREATED |
Hours
since alert was created |
A
number |
HOURS_SINCE_INCIDENT_OPENED |
Hours
since ticket was created |
A
number |
HOURS_SINCE_INCIDENT_CLOSED |
Hours
since ticket was closed |
A
number |
HOURS_SINCE_LAST_OCCURRED |
Hours
since alert last occurred |
A
number |
HOURS_SINCE_LAST_RESET |
Hours
since alert was last reset |
A
number |
HOURS_SINCE_LAST_TOUCHED |
Hours
since alert was last modified |
A
number |
HOURS_SINCE_LAST_STATE_TOUCHED |
Hours
since alert state was last modified |
A
number |
HOURS_SINCE_LAST_OWNER_TOUCHED |
Hours since alert owner was last changed |
A
number |
For custom fields, the field name is the name of the custom field as
configured in the Custom Alert Fields tab, and the value can be any text
or number (this should depend on the type of the field you are filtering
against).
Entity Fields Used in Filters
The tables below give the list of Entity Fields and applicable operators.
Field Name |
NAME |
TYPE |
CLASS |
DESCRIPTION |
SOURCES |
IP_ADDRESS |
MAC_ADDRESS |
ALIASES |
OWNER |
EXTERNAL_ID |
MTC_WINDOW_STATUS |
Entity Custom
Field Names |
Entity Group Fields
Used in Filters
The table below gives the list of Entity Group Fields.
Applicable Filter Operators
Possible Values for fieldOperator |
Possible
values for topOperator |
EQUALS
NOT_EQUAL
IS_NULL
NOT_NULL
CONTAINS
NOT_CONTAINS
STARTS_WITH
NOT_STARTS_WITH
ENDS_WITH
NOT_ENDS_WITH
|
AND
OR |
List of Valid Connector
Types
List of valid connector types: SOAP, VMWARE,
JDBC, SOLARWINDS, SYSLOG, SYSTEM, SNMP, MANAGEENGINE_APM, JMS, CLOUDWATCH,
ZENOSS, INFOVISTA
List of valid severities: CRITICAL, MAJOR,
MINOR, WARNING, INFO, CLEAR
List of valid alert states: OPEN, ASSIGNED,
ACKNOWLEDGED, CLOSED