To configure Users and Authentication:
You can create local users in addition to importing them from your LDAP directory server.
To configure a user:
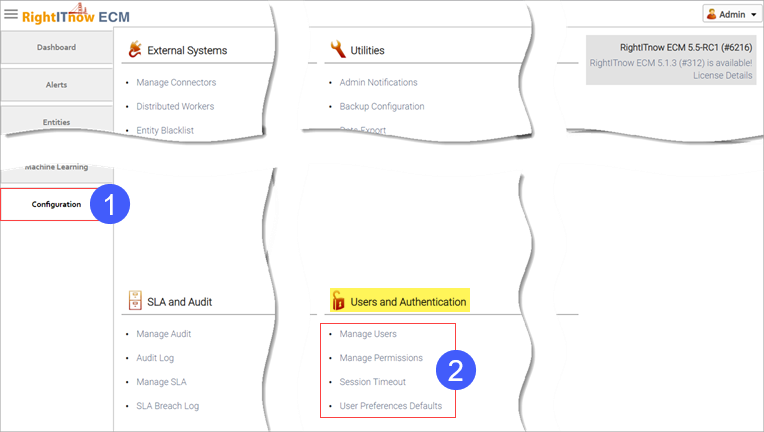
Access the users settings by clicking the Configuration tab and then selecting Manage Users from the Users and Authentication area, as shown above.
The Manage Users tab appears to the right of the Configuration tab.
Complete the steps illustrated below:
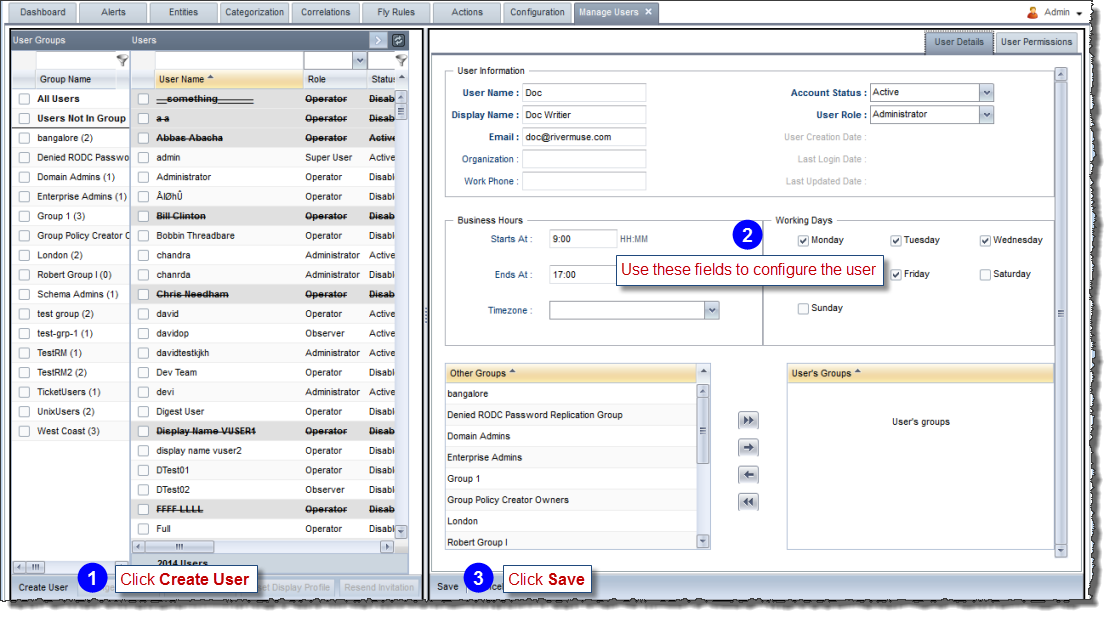
Once you have a created a user, RightITnow ECM sends an invitation by email to the new user containing an URL to the RightITnow ECM login screen where the new user must enter valid credentials.
Note that for User Role, the options are:
Operator
Supervisor
Administrator
Observer
Note that you can assign users to groups. See Adding_Users_to_User_Groups.
User time zone settings work as follows:
User group time zone settings honor the following order of precedence:
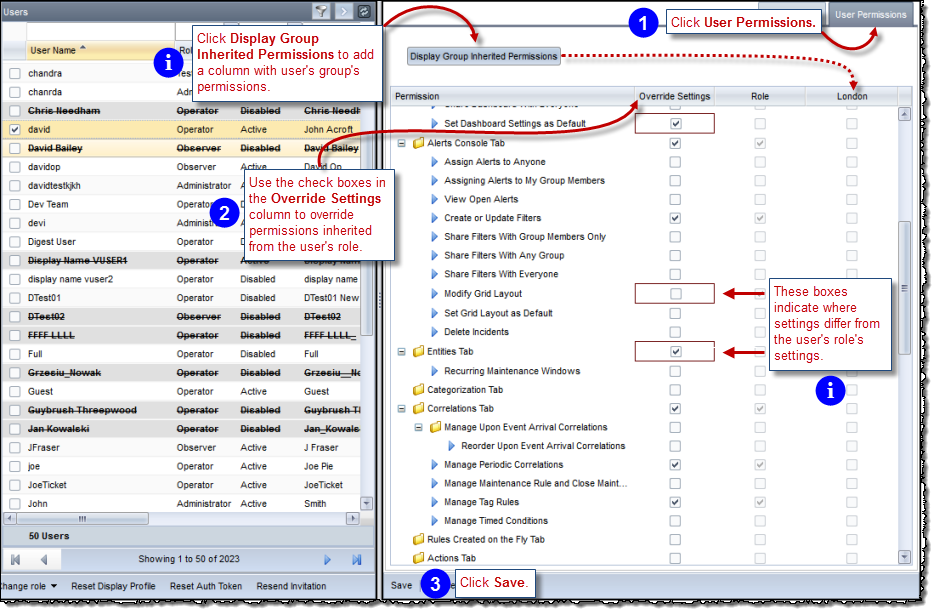
By default, users inherit the permissions associated with their assigned role of Operator, Supervisor, Administrator, or Observer. See Managing Permissions for details on the permissions for each role. You can also override these permissions and configure permissions specific to a selected user.
To set user permissions:

Configure the permissions as shown below:
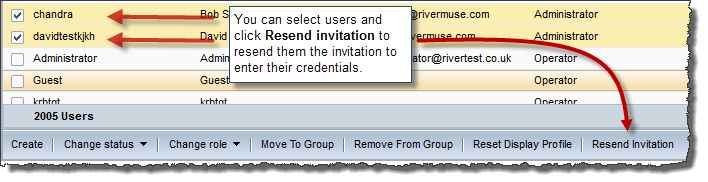
To change or reset a password, resend an invitation to the desired user, as described above in Resending_the_Membership_Invitation.
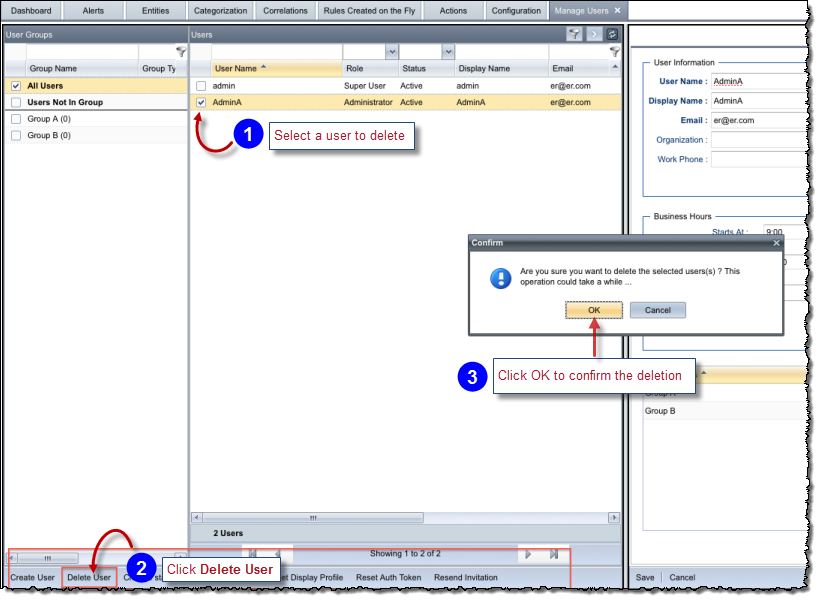
To delete a user, select the user and then click Delete User:
User Groups are a very powerful feature of RightITnow ECM that allow you to:
Users can belong to multiple groups and groups do not have owners.
To create a group:
Access the users settings by clicking the Configuration tab and then selecting Manage Users from the Users and Authentication area, as shown above.
The Manage
Users tab appears to the right of the Configuration
tab.
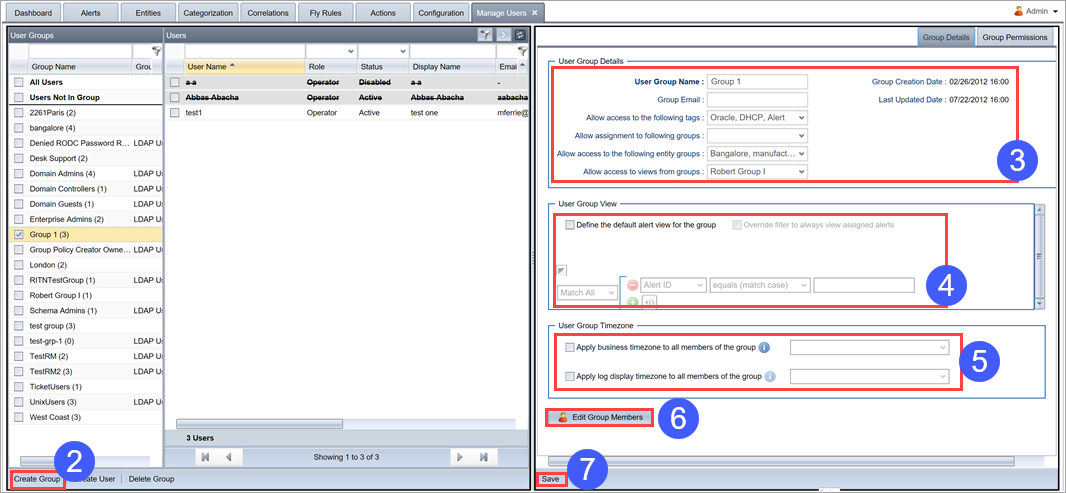
Click Create Groups.
Supply values for the fields that appear in the User Group Details pane.
User Group Name: Provide a name for the group. Use a unique name.
Group email: Provide an email address for the group.
Allow access to the following tags and Allow access to the following entity groups: By default, Tags and Entity Groups are visible to all users in the system, group membership notwithstanding. You can select the tags and entity groups that members of the group can see. When a tag/entity group is created, like with filters, the user will be presented with the option to share the tag/entity group with a list of user groups.
Unlike alert filters, the user that created a tag or an entity group cannot be the only one that can view them. Using the action Add Tags to Alert, users can add only the tags they can see according their user group configuration in the alerts console.
Allow assignment to the following groups: Specify which groups members of this group may join.
Allow access to views from groups: You can select a list of user groups alert views to which the current user group has access. The resulting view for the group will be the union of the views of the selected included groups and the one defined by the alert filter. This means that members of the group will see the alerts in their restricted view, plus the ones in the views of the selected groups. By doing this, user group members will be able to, if their permissions allow, assign alerts to users in the selected user groups.
Configure the User Group View settings:
Define the following alert view for the group: You can define an alert filter to create the default view of the alerts in RightITnow ECM for the members of the group. The filter can be on one or multiple alert fields. If no filter exists, then the members will be able to see all the alerts in RightITnow ECM.
Configure the User
Group Timezone settings. The Business Timezone defines
the time zone of the group members' work hours.
This is not to be confused with Log Display Timezone which allows
the group members to view the Alert timestamps in the chosen time
zone. See Understanding
User and User Group Business Hours Time Zone Settings for how
the settings interrelate.
Click Edit Group Members and use the resultant controls to move users in and out of the group.
Click Save.
To add users to user groups, use the Edit Group Members button as described in Creating Groups
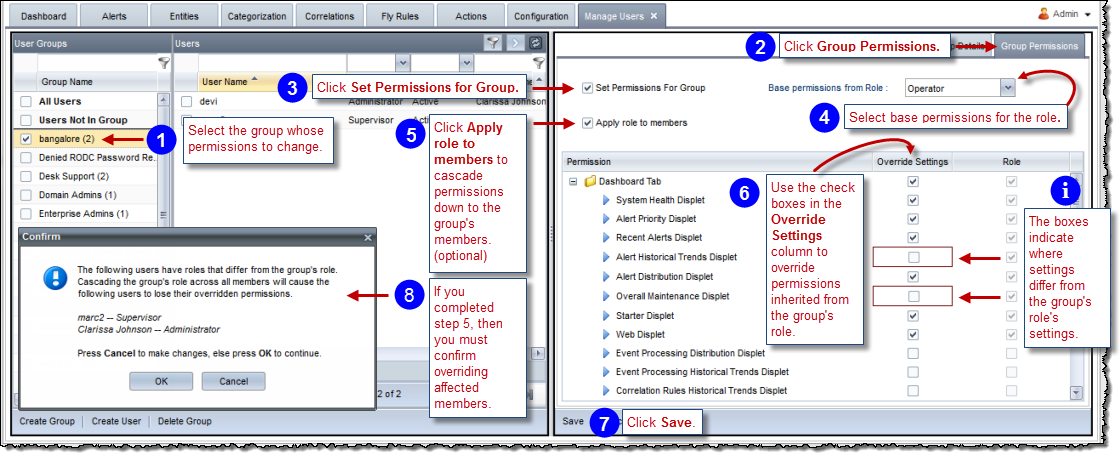
To set group permissions and role:
You can export user group filters for importation later.
To export filters:
Access the users settings by clicking the Configuration
tab and then selecting Manage Users
from the Users and Authentication
area, as shown above.
The Manage Users tab appears.
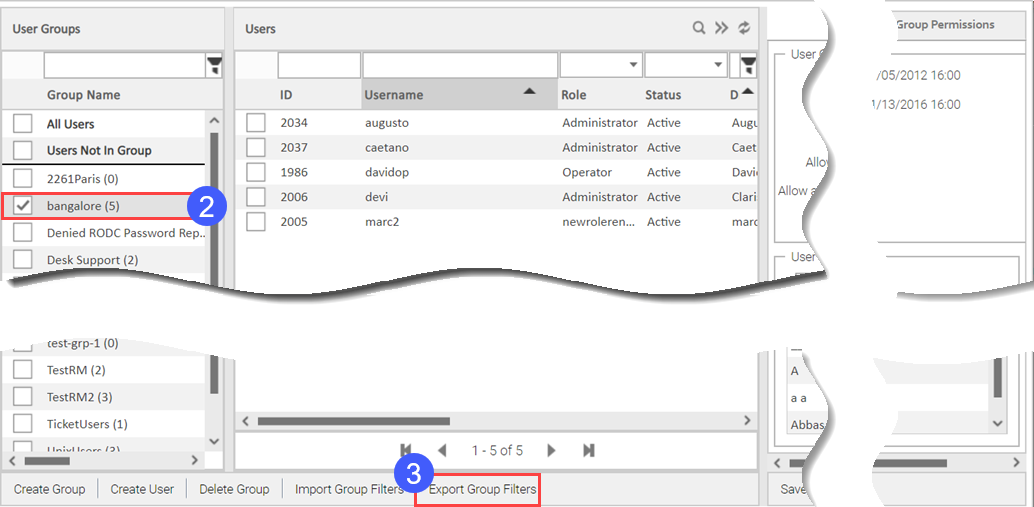
Select the group whose filters to export.
Click Export Group Filters.
You can import user group filters.
To import filters:
Access the users settings by clicking the Configuration
tab and then selecting Manage Users
from the Users and Authentication
area, as shown above.
The Manage Users tab appears.
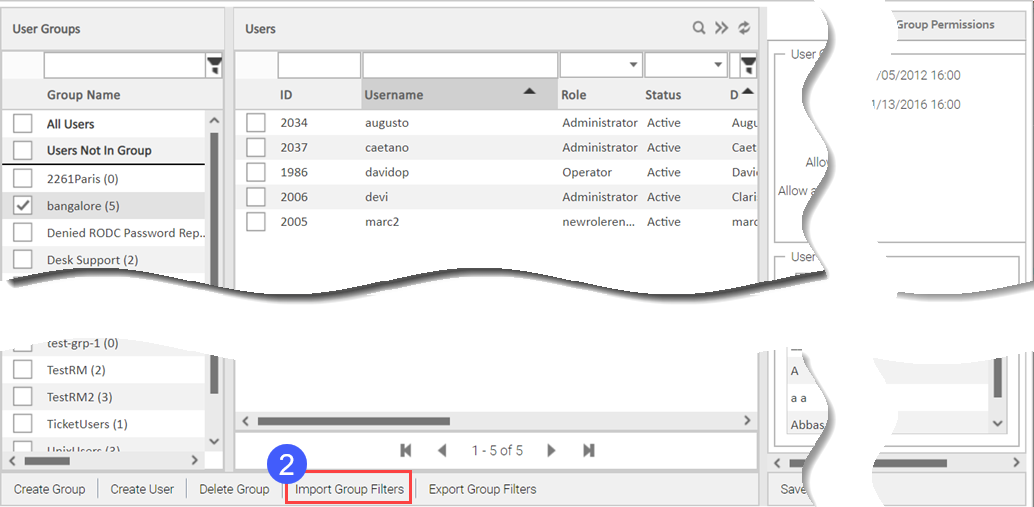
Click Import Group Filters.
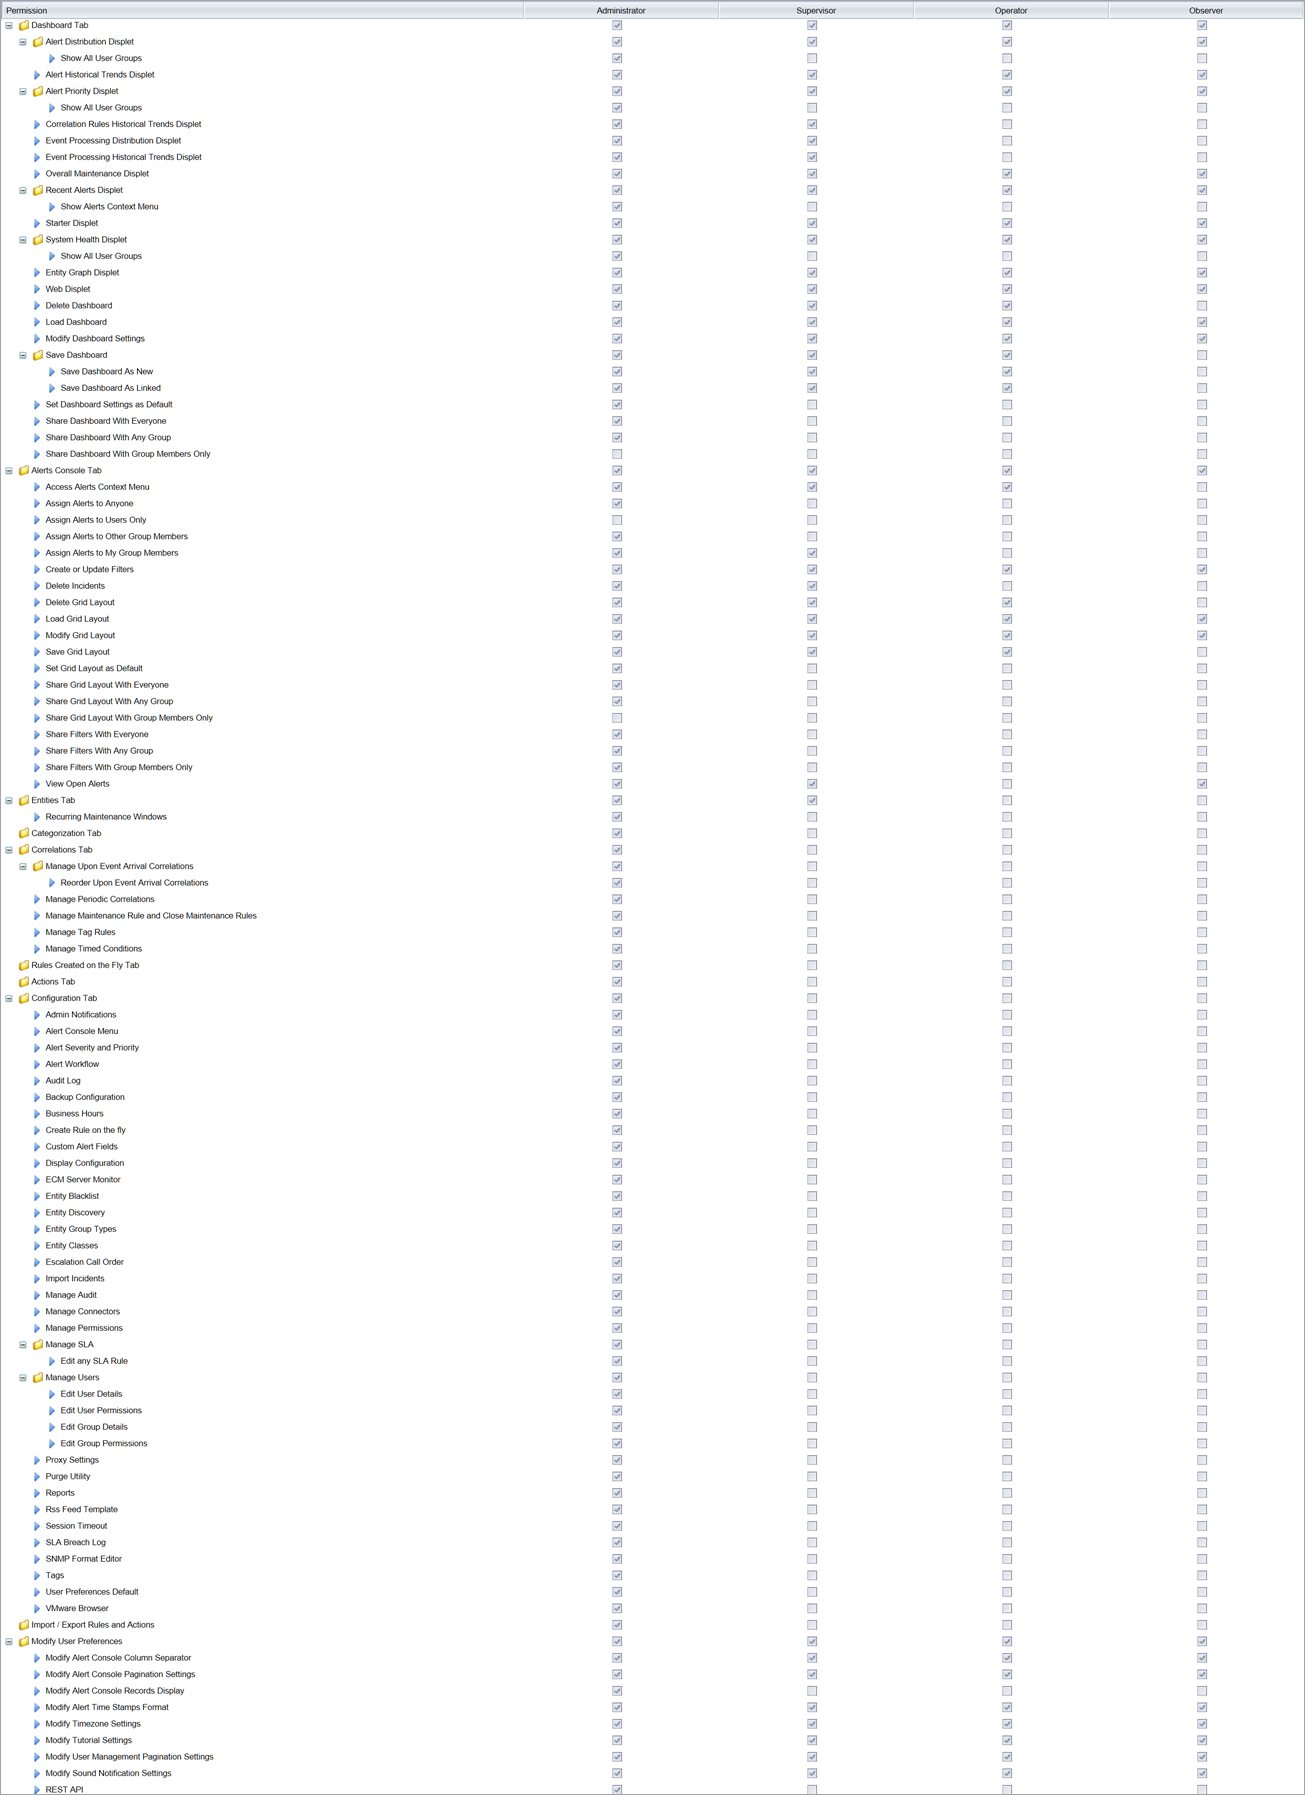
There are four types of users: Administrator, Supervisor, Operator, and Observer, and each type has different functional and data access permissions in the system. You can also add roles. You can view and manage functional permissions using the Manage Permissions setting in the Users and Authentication section of the Configuration tab.
The default functional permissions for Administrators, Supervisors, Operators, and Observers are as follows:
Data access permissions are as follows:
Administrators have access to the entire data set; they can see everything on the Alerts Console.
Supervisors can see alerts that are assigned to them, to the operators in their groups, and unassigned alerts.
Operators can only see alerts assigned to them and unassigned alerts.
Observers can see all alerts.
To view and manage functional permissions:
Access the permissions settings by clicking the Configuration tab and then selecting Manage Permissions from the Users and Authentication area, as shown above.
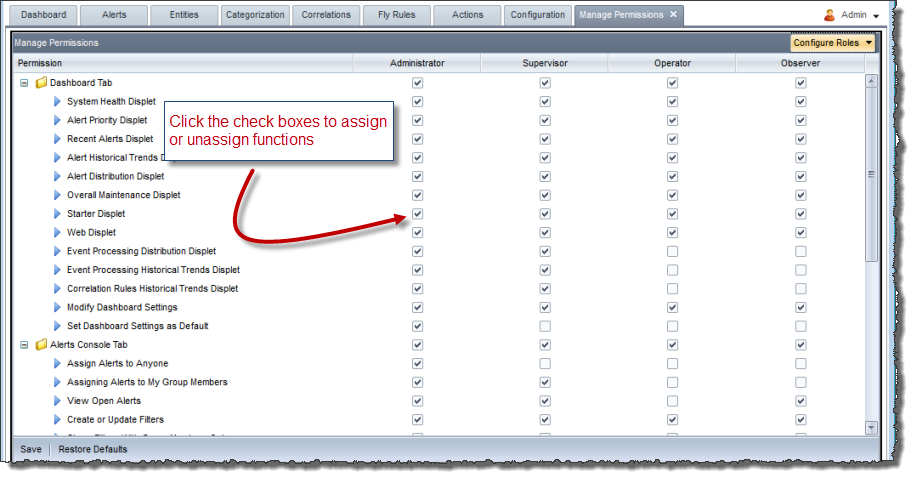
The Manage Permissions tab appears to the right of the Configuration tab and contains a matrix of functional permissions for each type of account.
Use the check boxes to assign or unassign permissions for each type of user:
RightITnow ECM has five default roles pre-defined – Super User, Administrator, Supervisor, Operator and Observer. Keeping aside the Super user role, which is reserved for the admin user, all other users can be assigned to any of the other four roles. You can create new roles and rename the default roles.
To create a new user role:
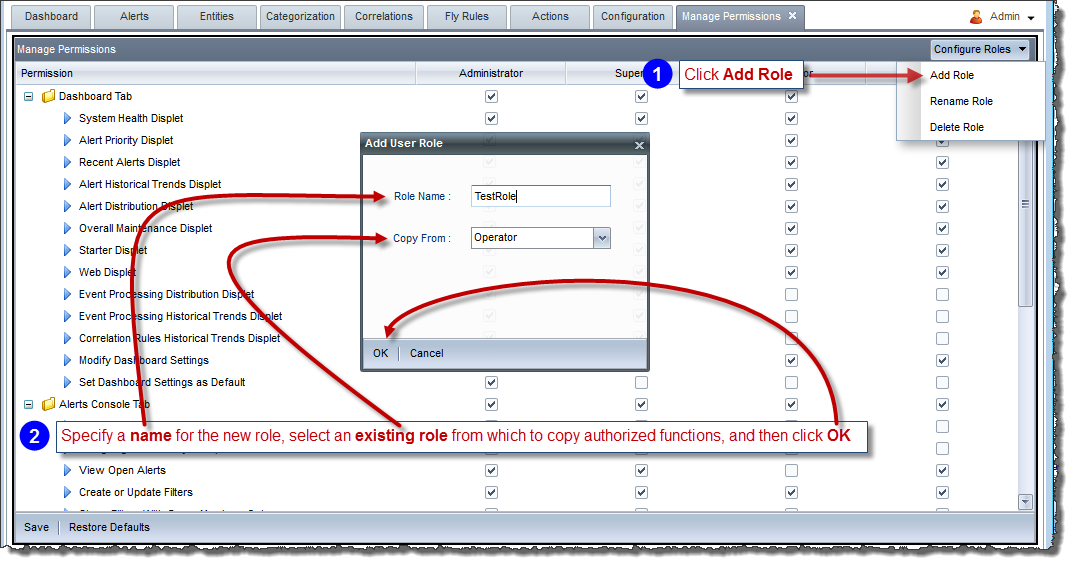
You can rename and delete user roles using the same page as you do for creating a role, except you choose Rename Role or Delete Role instead of Add Role, and then proceed as prompted by the resultant dialog box.
RightITnow ECM supports mixed authentication, including the following types of authentication:
RightITnow authentication - RightITnow ECM stores all usernames and passwords (encrypted) in the RightITnow ECM database
LDAP authentication - This version of RightITnow ECM supports OpenLDAP and Microsoft Active Directory
This version of RightITnow ECM supports Open LDAP and Microsoft Active Server.
To configure LDAP authentication:
Click the Configuration tab and then click Manage Connectors under the External Systems section, as shown here.
Follow the directions in the illustration below:
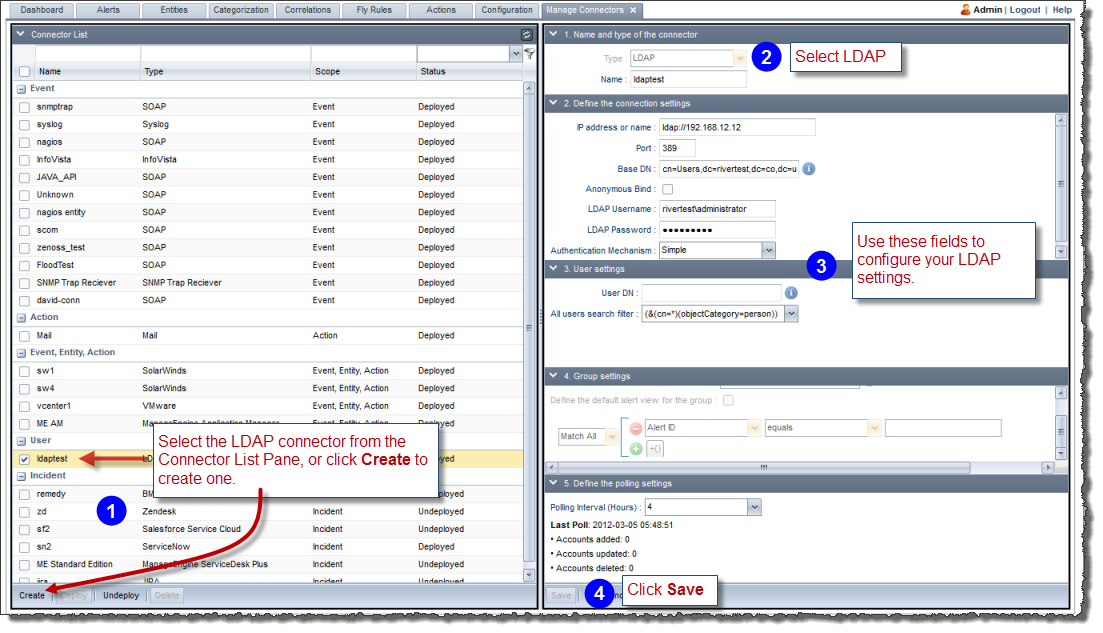
All Users Search Filter: The default value, (&(cn=*)(objectCategory=person)), is the search filter string that gets all the users excluding the directory names. This default value is specific to Active Directory. Other LDAP implementation may not require the (objectCategory=person) clause. RightITnow ECM searches the entire directory and all sub-directories, and then adds discovered users the results list of users.
You can configure how long a session stays idle before timing out.
To configure session timeout:
Access the session timeout settings by clicking the Configuration tab and then selecting Session Timeout from the Users and Authentication area, as shown above.
The Session Timeout Configuration tab appears.
Select a timeout period from the dropdown menu and then click Save.
RightITnow ECM allows you to set the default user preferences for all users. Each user may then customize the default settings.
To configure the user preferences defaults for all users:
The User Preferences Defaults page appears.
Use the fields shown below to configure
the defaults:
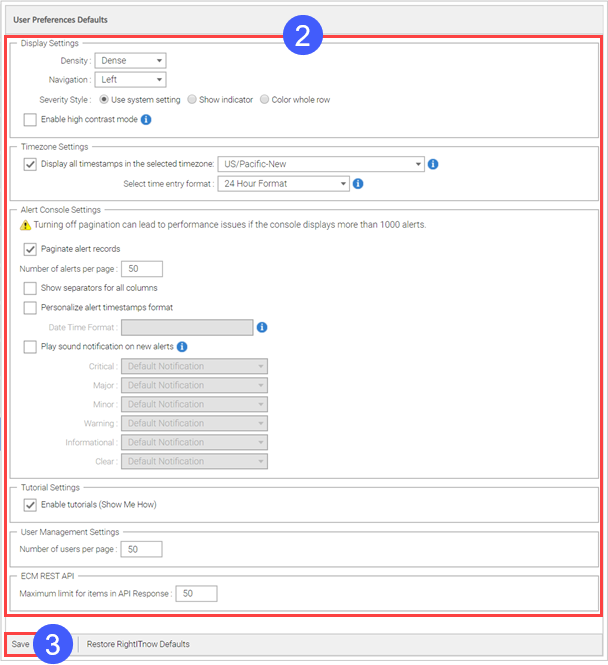
Click Save.