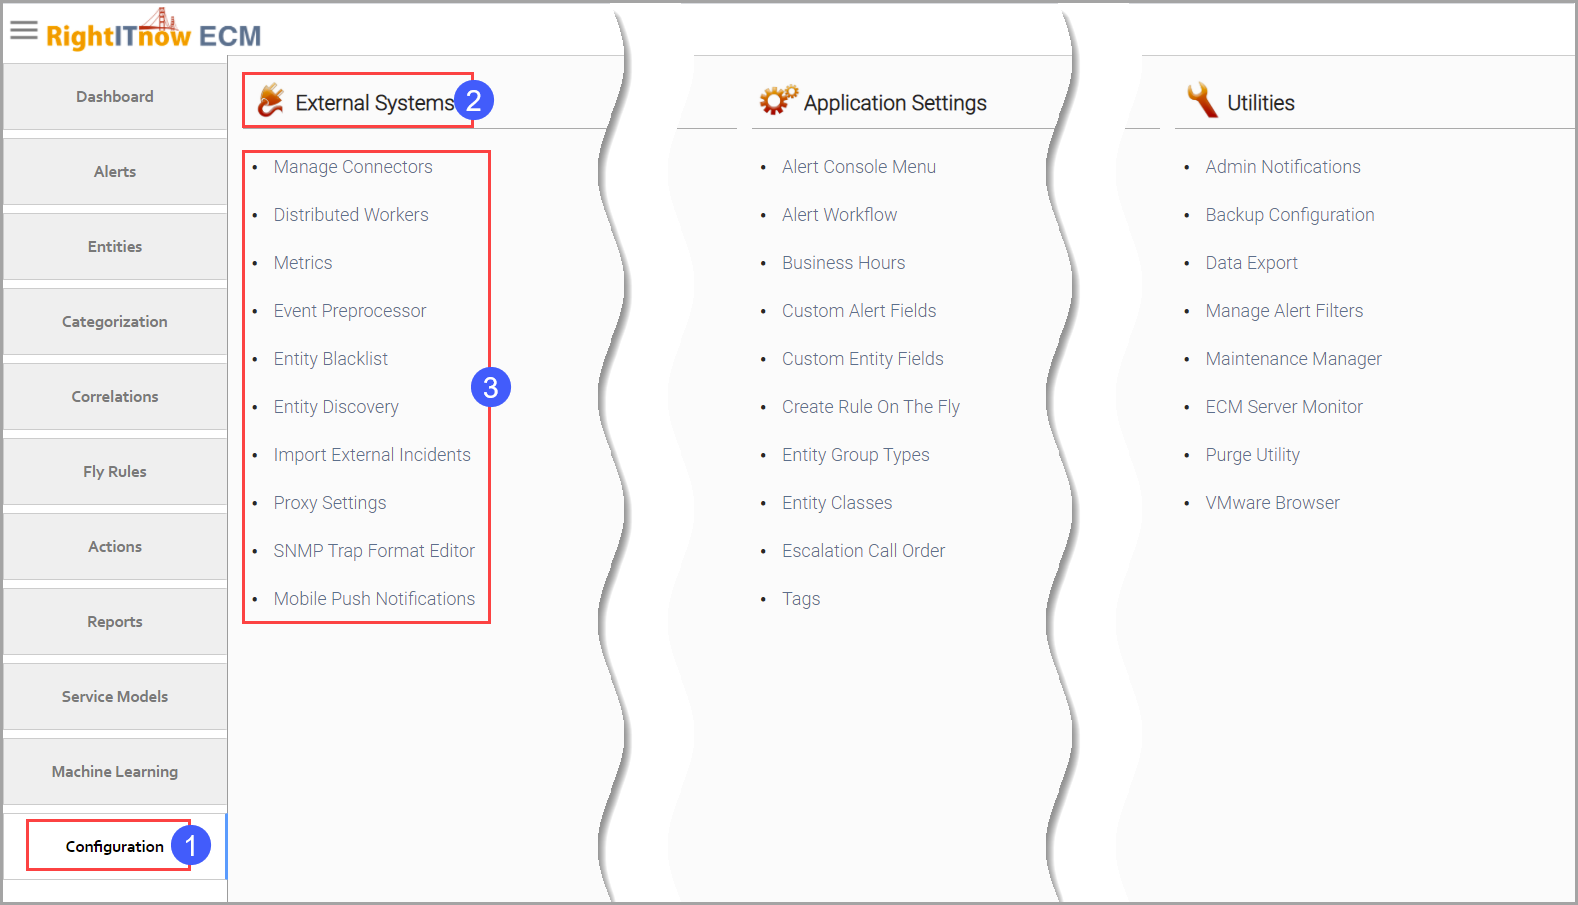
Click the Configuration tab to configure external systems, as shown below.
The connectors enable RightITnow ECM to communicate with external systems for various purposes:
collect events and entities
synchronize users
create tickets
send emails
Software and documentation for many of the connectors offered by RightITnow ECM are available from within RightITnow ECM. See Accessing Connector Documentation, Software, and Controls.
RightITnow ECM supports the following types of connectors:
Events
ActiveMQ - The ActiveMQ connector allows enterprise Java applications to forward events consumed from the queue or the topic to RightITnow via a third-party queue mechanism. This is designed for particularly high volume event input, or situations where more scalability, failover and high availability are required. The ActiveMQ connector acts as a client on an ActiveMQ queue hosted externally to the application. For information on setting up this connector, open the ActiveMQ instructions from the Getting Started dashboard displet, as described in Accessing Connector Documentation, Software, and Controls. For details on how to setup a standalone ActiveMQ system, refer to http://activemq.apache.org/getting-started.html.
Amazon Web Services (AWS) CloudWatch - Polls AWS every minute for changes to alarm states, as soon as one is noticed it raises an event in RightITnow ECM. Run a separate CloudWatch connector for every AWS region you want to monitor. The region is configurable in the settings pane by selecting the appropriate endpoint.
AWS open Distro for Elastic search
Check_MK
Google Cloud
Groundworks
Icinga 1 and 2
InfoVista - See Accessing Connector Documentation, Software, and Controls.
JDBC Event - Collects event data only
JDBC Legacy
ManageEngine Applications Manager 13.8
Microsoft Azure
Microsoft SCOM 2007 R2 and 2012 - See Accessing Connector Documentation, Software, and Controls for how to download these connectors.
Naemon
Nagios - See Accessing Connector Documentation, Software, and Controls.
New Relic - See Accessing Connector Documentation, Software, and Controls.
SNMP - See Accessing Connector Documentation, Software, and Controls.
ServiceNow CMDB (Event and Entity) - See Filtering the Polled ServiceNow CMDB Configuration Items (CIs) for how to filter polled CIs.
SolarWinds Orion NPM (Network Performance Monitor) and SAM (SolarWinds Server & Application Monitor). The SolarWinds connector discovers component names when polling, but ECM enriches a component only when it encounters an alert related to that component. See Accessing Connector Documentation, Software, and Controls.
Syslog - See Accessing Connector Documentation, Software, and Controls and Understanding the Syslog Connector Regex Settings.
SOAP - See Accessing Connector Documentation, Software, and Controls.
VMware 6.0 and 6.5
Zabbix
Zenoss 6- See Accessing Connector Documentation, Software, and Controls and Understanding the Zenoss Connector.
Systems
Alert Publisher - Allows end users to export alerts to an external JMS queue or topic, so that these alerts can be processed by their external systems. See the RightITnow Alert Publisher Tech Note available from the Getting Started displet of the Dashboard for complete details. It contains a link to a sample application using the connector. See Accessing Connector Documentation, Software, and Controls for how to use the Getting Started displet.
Amazon Web Services (AWS) - This is used for SMS functionality, providing the ability to send SMS messages to mobile phones. Once the AWS connector is configured and deployed, a new action, the AWS Simple Notification Service action will be enabled. RightITnow ECM accesses AWS through the Java library provided by Amazon, therefore the connector configuration only requires two pieces of information, the Access Key ID and the Secret Access Key.
LDAP
Mail - You need to configure this connector to enable the send email action.
Incident Management systems
ATLASSIAN JIRA - See Accessing Connector Documentation, Software, and Controls.
ManageEngine ServiceDesk Plus 9
BMC Service Desk (ARS 7.5)
Salesforce Service Cloud - The connecting user must have the API Only and Modify All Data permissions. Usually System Administrators have this permissions. The API is only available on the Enterprise Edition. If you have another edition, you may might need to contact Salesforce to enable the API. See Accessing Connector Documentation, Software, and Controls. You can stop the current poll of this connector. See Stopping the Current Salesforce Poll.
Serena - Connects to the IT Service Management component of Serena's Serena Business Manager (SBM). All components of SBM need to be installed. The connector creates an incident based on a RightITnow ECM alert and reflects the changes made on the incident to the alert.
ServiceNow® - When specifying the Field values language, use the ISO 639.2 two character code for languages, for example en - English, fr - French, es - Spanish, de - German. If you would like to use a proxy, you need to click the Use Proxy check box, and also setup the proxy as described in Configuring Proxy Settings. When setting the incident default values, you can select Imported Values as the Value Source and then use the Incident Value drop-down to choose the default from the imported values. This same technique is illustrated in the Create Incident action discussion. See Accessing Connector Documentation, Software, and Controls.
Zendesk
Custom Incident System - See Accessing Connector Documentation, Software, and Controls.
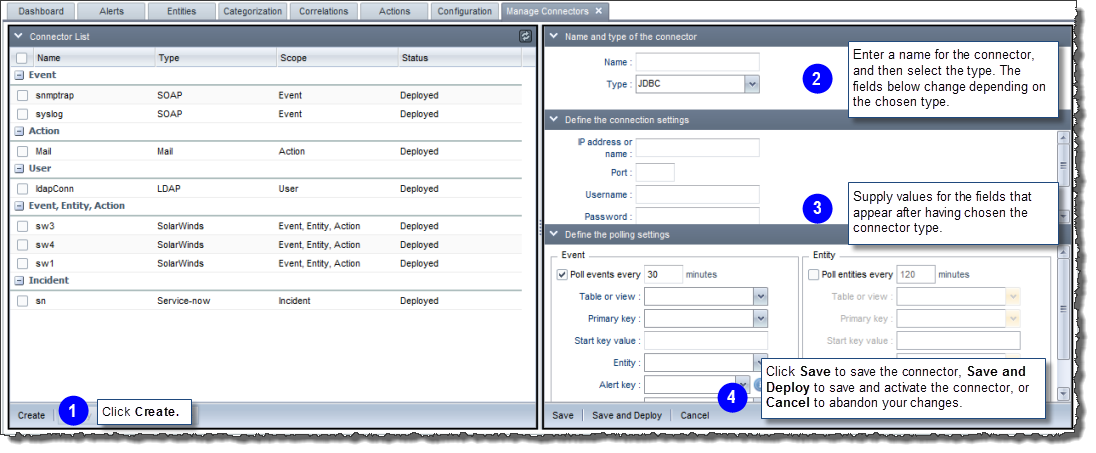
To configure a connector:
Check the Getting Started displet as described in Accessing Connector Documentation, Software, and Controls to obtain any documentation and software related to the connector you are installing.
Click the Configuration tab and then click Manage Connectors in the External Systems section. The Manage Connectors tab appears to the right of the Configuration tab.
Complete the steps illustrated below:
Note that you cannot create more than one Serena, ServiceNow®, Mail, or LDAP connector per installation.
You can use the Getting Started dashboard dislpet to find documentation, software, and controls for many of the connectors offered by RightItnow ECM.
To access connector documentation, software, and controls:
The Dashboard page appears:
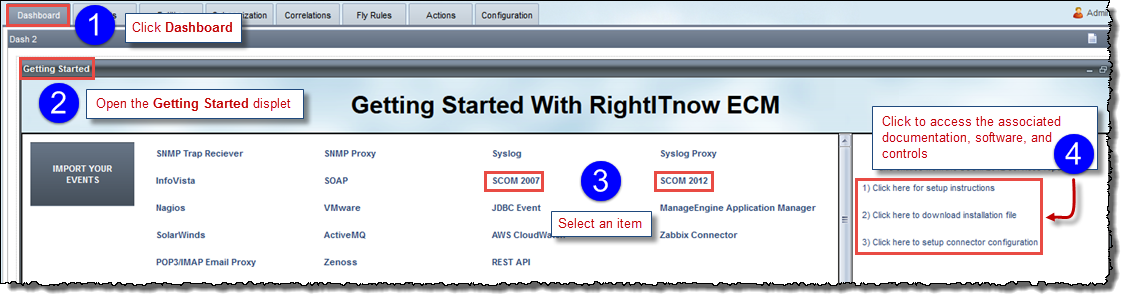
Open the Getting Started displet.
Select a connector.
Click the links in the right most pane to access the associated documentation, software, and controls.
Be aware that when you select an Incident Connector or the Amazon Web Services connector, you will need to validate the connection first, as shown in step one below:

When ECM receives events from a connector, the entire set of tokens received is persisted. For certain connectors, for example, the SNMP Trap Receiver, the token list can grow exponentially with each request. The tips below illustrate how you can manage large lists of connector tokens by discarding them, merging them using regex and paging through them with the paging controls.
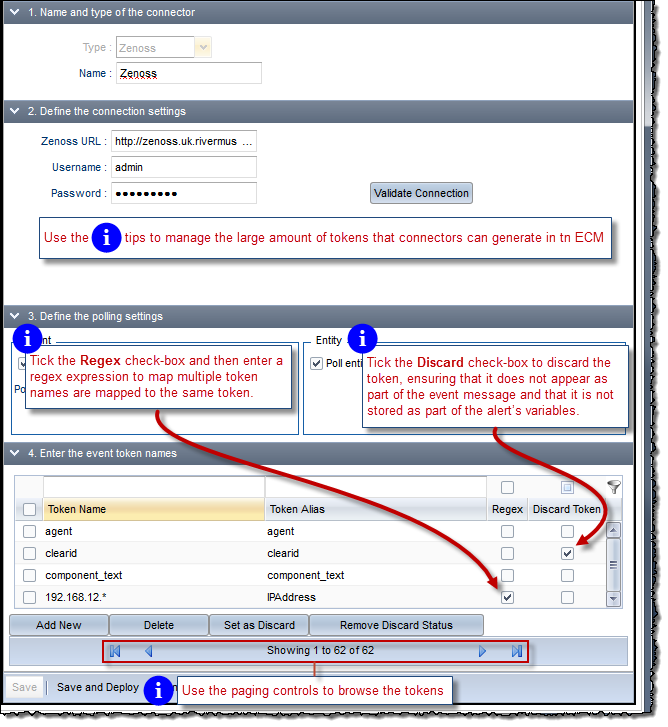
Discarding tokens: Ensures that the token does not appear as part of the event message. It is not stored as part of an alert’s variables, either. Selecting this option practically removes all references of this token from ECM.
Merging Tokens with regex: Maps multiple token names to the same token alias. Consider the example in the illustration above in which the Token Name regex 192.168.12.* and Token Alias of IPAddress:
Token 192.168.12.1 comes in with value v1
Token 192.168.12.2 comes in with value v2
Token 192.168.12.3 comes in with value v3
On processing, the event will have a single token IPAddress with a comma-separated value of v1, v2, v3.
Token handling is case-preserving and case-insensitive.
You can send in an event token with any case, for example, TokenA, tokenA, or TOKENA. RightITnow stores the connector token as it appears in the first event received. For example, if the first event sends a token as TokenA, then subsequent events can send tokenA or TOKENA and RightITnow ECM would list them under the column TokenA in the event table.
Categorization is not case sensitive to the token's label. For example, if a rule that contains a discriminator based only on TokenA and this rule encounters events with tokenA=x and TOKENA=x and TokenA=x, the rule would deduplicate these events to the same alert.
Custom alert field names are all lowercase. Therefore, if you want a custom alert field to pick up an event token value, the event token value name or alias must be all lowercase and correspond to the custom field name.
You can select the token to use in a filter, for example, a correlation rule, and it will work on the token case-insensitively.
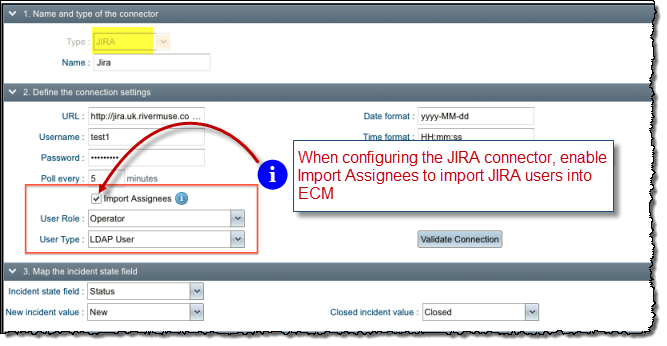
For incident connectors, you can use the polling filter in the 1. Name and Type of Connector section of the connector configuration screen to help select the tickets selected for updates during polling:

The JIRA connector can import JIRA users.
To configure the JIRA connector to import users:
To stop the current Salesforce connector poll:
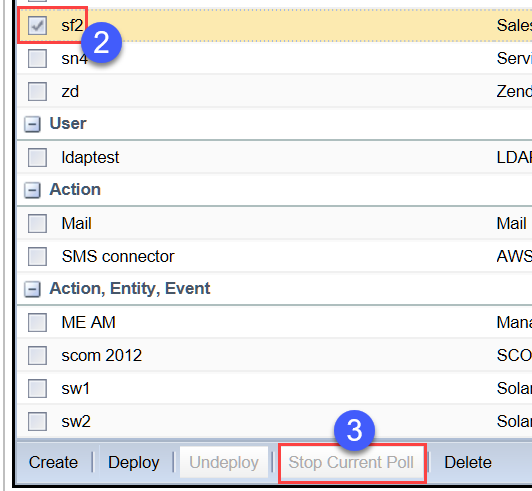
Select the desired Salesforce connector.
Click Stop Current Poll.
This section offers details about the event connectors.
In addition to specifying the CI types, you can filter the CIs being polled. For Example, to poll only CIs that are discovered via EventManagement, you could specify the filter as follows:
discovery_source=EventManagement
To filter polled CIs:
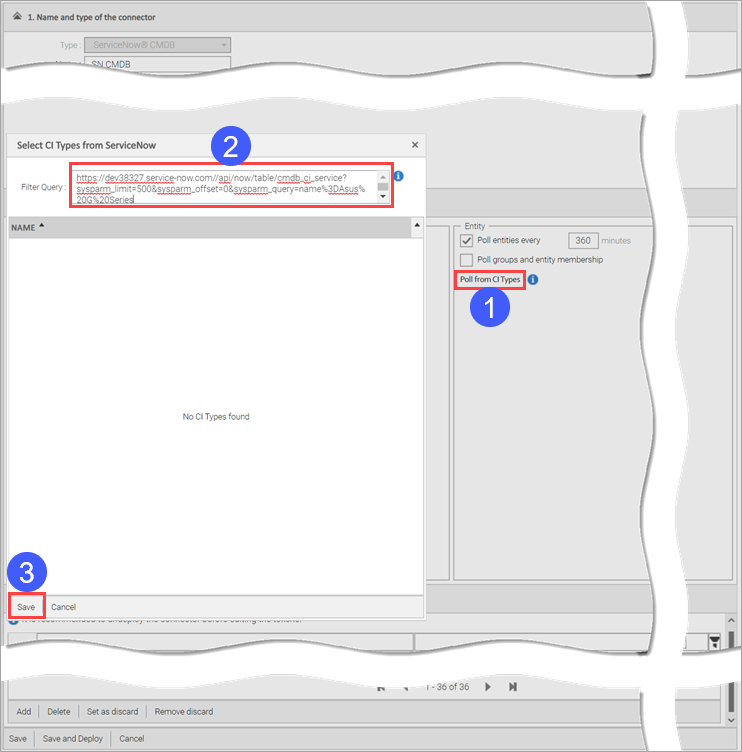
Special characters should be URL encoded, for example:
name%3DAsus%20G%20Series
class%3Dcomputer
https://dev38327.service-now.com//api/now/table/cmdb_ci_service?sysparm_limit=500&sysparm_offset=0&sysparm_query=name%3DAsus%20G%20Series
Symbol equals (=) must be added as %3D
Symbol space ( ) must be added as (%20)
Select the desired C1 types and click Save.
You can use the regex settings to specify and tweak the expected syslog message format.
The syslog regex settings appear as follows:
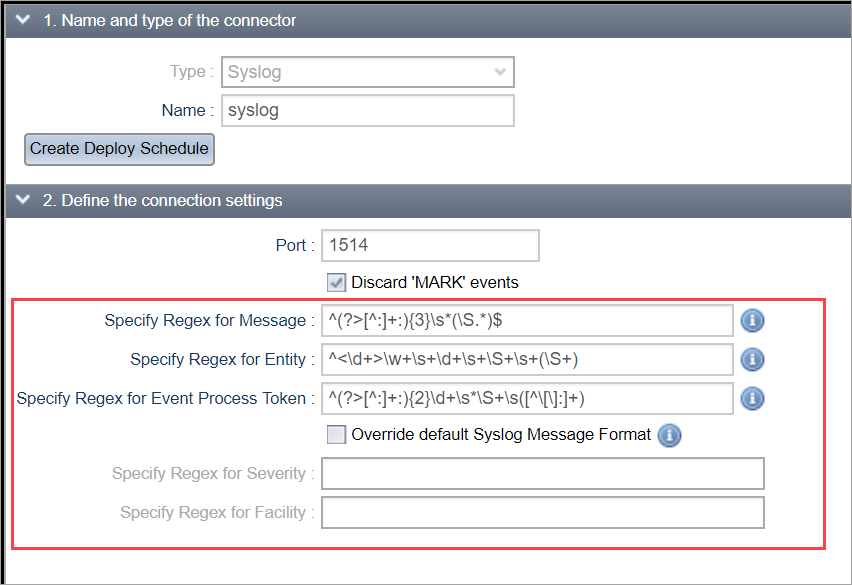
Specify Regex for Message
Specify regular expression to extract the Alert Message from the raw syslog message.
Default message pattern regex:
^(?>[^:]+:){3}\s*(\S.*)$
Raw Syslog Message:
<31>Nov 7 17:02:08 EDUServer.local com.apple.metadata.mdflagwriter[514]: Handle message /Users/devi/Library/Application Support/Google/Chrome/Local State
Extracted Message String:
Handle message /Users/devi/Library/Application Support/Google/Chrome/Local State
NOTE: To extract the entire raw syslog message into the Alert Message, specify the regex as:
(.*)
Specify Regex for Entity
Specify regular expressions to extract Entity name from the raw syslog message.
Default entity pattern regex:
^<\d+>\w+\s+\d+\s+\S+\s+(\S+)
Raw Syslog Message:
<11>Nov 10 12:02:21 ELM-MacBook-Pro.local Terminal[641]: CGSCopyDisplayUUID: Invalid display 0x41dc9d00
Extracted Entity String:
ELM-MacBook-Pro.local
Specify Regex for Event Process Token
Specify regular expressions to extract the process information from the raw syslog message.
Default process pattern regex:
^(?>[^:]+:){2}\d+\s*\S+\s([^\[\]:]+)
Raw Syslog Message:
2014-11-03T12:24:01 Stopped Printing Jobs
Extracted process String:
Printing Jobs
Override default Syslog Message Format
Enable this option to override the default message format.
The default Syslog message format includes a priority value at the beginning of the text.
The priority value ranges from 0 to 191 and is not space or leading zero padded.
The priority is enclosed in "<>" delimiters.
Example : <34>Oct 11 22:14:15 mymachine su: 'su root' failed for lonvick on /dev/pts/8
By default the severity and facility information are derived from the defined priority
If the incoming syslog messages do not adhere to this format, please enable the option to override the default format.
You can access the SolarWinds connector settings as described generally in Configuring Connectors. The SolarWinds connector discovers component names when polling, but ECM enriches a component only when it encounters an alert related to that component.
The SolarWinds connector can poll for alerts, events, entities and entity groups. It can also poll retroactive data. When the SolarWinds connector polls alerts, the description in RightITnow will be the name of the alert. To retrieve the description as it applies to the property that triggered the alert, add a NetPerfMon Event Log trigger action to the alert definition in SolarWinds, and RightITnow will pick up that event if it is set to poll events.
You can see the polling status on the Connector List. See Viewing Polling Status.
SolarWinds
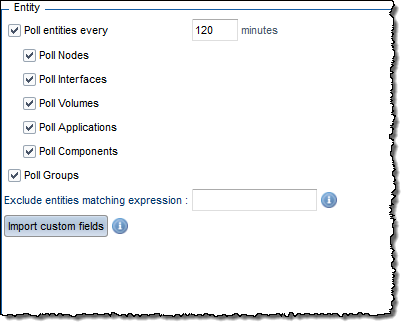
supports custom properties to be defined on Nodes, Interfaces and Volumes
(these can be defined and updated using the Custom Property Editor), and
ECM can import these as custom entity fields. You can configure the connector
to poll for custom entity fields on nodes, interfaces, volumes, applications,
components and even, entity groups.
When you click the  button in the SolarWinds
Connector Configuration screen, a dialog box appears where you select
the fields to import and optionally map
the fields to the entity description or owner.
button in the SolarWinds
Connector Configuration screen, a dialog box appears where you select
the fields to import and optionally map
the fields to the entity description or owner.
The ECM SolarWinds connector supports SolarWinds dynamic queries. When a SolarWinds group contains one or more dynamic queries, the ECM SolarWinds connector imports them as group enrichment filters, with the polled entities automatically assigned to the groups as per these applied enrichment filters.
To populate entity groups with SolarWinds
dynamic queries, use the button to identify the custom
entity fields in SolarWinds that are used in the dynamic queries and create
the fields and import their contents as part of the entity polling process.
When converting dynamic queries to group filters:
ECM automatically imports the custom fields used in the queries if they are not already present. To view these newly imported custom fields in other areas of ECM, refresh the Custom Entity Fields page.
If two connectors of the same type have an attribute of the same name and an entity with the same name, the connector which polled last overwrites custom fields from the entity. For example, consider two connectors, "Solarwinds1" and "Solarwinds2," both of which have an entity named "ServerA" with a custom property named "version" for "ServerA," with values 1 and 2, respectively.
Suppose that "Solarwinds1" polled 10 minutes ago and that "Solarwinds2" will poll entities in 10 minutes. Currently, the "ServerA" property "version" has a value of 1 from "Solarwinds1." After the "Solarwinds2" polls, the value will be 2.
ECM supports use of regular expressions to filter out entities imported from SolarWinds. Listed below are a few common examples and usages of regular expressions.
^[A-Za-z0-9-]+(\\.[A-Za-z0-9-]+)*(\\.uk\\.rightitnow\\.com)$
The above pattern filters out all entity names that end with the domain name uk.rightitnow.com.
Description of the pattern:
^ |
Indicates Start of the word |
[A-Za-z0-9-]+ |
Should start with string in the bracket [ ], must contain one or more as indicated by (+)
|
( |
Indicates start of a ‘group’ |
\\.[A-Za-z0-9-]+ |
|
)* |
Indicates that this group is optional |
( |
Indicates start of group 2 |
\\.uk\\.rightitnow\\.com |
Indicates that the string “.uk.rightitnow.com” should be present |
) |
Indicates End of group 2 |
$ |
Indicates End of line |
Strings that match the above pattern are:
Server1234.uk.rightitnow.com
Server.1234.uk.rightitnow.com
^ProCurve\\s+Switch\\s+2810-48G-2.*
The above pattern filters out all entities that start with ProCurve Switch 2810-48G-2
^ |
Indicates Start of the word |
ProCurve |
Indicates the String literal ‘ProCurve’
|
\\s |
Indicates a white space |
+ |
|
Switch |
Indicates the String literal ‘Switch’ |
\\s+ |
Indicates one or more white spaces |
2810-48G-2 |
Indicates that the string ‘2810-48G-2’ should be present |
.* |
Indicates any character(s) can be present |
Strings that match the above pattern are: ProCurve Switch 2810-48G-2G, ProCurve Switch 2810-48G-2G12345
^([0-9]{1,3}\\.[0-9]{1,3}\\.[0-9]{1,3}\\.[1-2]{2})$
The above pattern filters out all IP address that end in 11, 12 or 22
^ |
Indicates Start of the word |
( |
Indicates the start of the group |
[0-9]{1,3} |
Indicates a 1-3 digit numbers containing digits from 0-9 |
\\. |
|
[1-2]{2} |
Indicates a 2 digit number containing digits from 1-2 |
$ |
Indicates end of word |
Strings that match the above pattern are: 192.168.12.12, 198.163.555.11
For further reading, refer to http://docs.oracle.com/javase/tutorial/essential/regex/
When retrieving alerts and events from SolarWinds, the following tokens are added to the event in ECM, in addition to the standard mandatory tokens (see the Event SDK Developers Guide):
Token Name |
Purpose |
Applies To |
sw_id |
ID of the event or alert |
All objects |
sw_type |
sw_event for events or sw_alert for alerts |
All objects |
sw_object_id |
ID of the source (e.g. node) of the event or alert |
All objects |
sw_object_type |
Identifies the type of the source object. For alerts: · Node = Node · Interface = Interface · Volume = Volume · Application = APM: Application · Application Component = APM: Component · Group = Group · Hardware Sensor = Hardware Sensor For events: · Node = N · Interface = I · Volume = V · Application = AA · Application Component = AM · Group = C · Hardware Sensor = HWHS |
All objects |
sw_node_name |
The name of the node related to the event or alert |
All objects related to nodes |
sw_status |
The status of the node related to the event or alert |
All objects related to nodes |
sw_last_boot |
The last boot date of the node related to the event or alert |
All objects related to nodes |
sw_group_name |
The name of the group related to the event or alert |
Groups |
sw_group_status |
The status of the group related to the event or alert |
Groups |
sw_application_id |
The ID of the application related to the event or alert |
Applications and components |
sw_application_name |
The name of the application related to the event or alert |
Applications and components |
sw_application_status |
The status of the application related to the event or alert |
Applications and components |
sw_application_availability |
The availability of the application related to the event or alert |
Applications and components |
sw_component_id |
The ID of the application component related to the event or alert |
Components |
sw_component_name |
The name of the application component related to the event or alert |
Components |
sw_component_status |
The status of the application component related to the event or alert |
Components |
sw_component_availability |
The availability of the application component related to the event or alert |
Components |
sw_component_process_instance_count |
The process instance count of the application component related to the event or alert |
Components |
sw_component_process_name |
The process name of the application component related to the event or alert |
Components |
sw_component_user_description |
The user description of the application component related to the event or alert |
Components |
sw_component_user_notes |
The user notes of the application component related to the event or alert |
Components |
sw_component_threshold_statistic_critical |
The critical threshold statistic value of the application component related to the event or alert |
Components |
sw_component_threshold_statistic_warning |
The warning threshold statistic value of the application component related to the event or alert |
Components |
sw_component_windows_event_messages |
The windows event message of the application component related to the event or alert |
Components |
sw_sensor_unit |
The sensor unit related to the event or alert |
Hardware Sensors |
sw_sensor_name |
The sensor name related to the event or alert |
Hardware Sensors |
sw_sensor_value |
The sensor value related to the event or alert |
Hardware Sensors |
sw_sensor_status |
The sensor status related to the event or alert |
Hardware Sensors |
sw_sensor_message |
The sensor message related to the event or alert |
Hardware Sensors |
RightITnow ECM collects events via the vsphere SOAP API which is provided by VMware. Related VMware documentation can be found at http://www.vmware.com/support/developer/vc-sdk/.
RightITnow ECM polls for events periodically as configured in the Manage Connectors tab. The following sequence takes place at each poll:
RightITnow ECM builds an internal representation of the Inventory tree so that it can map VMware objects (VMs, Hosts, Resource Pools etc) to entities in RightITnow ECM, and to be able to associate any events found with the correct entity. This entity tree can be seen under the Configuration tab -> VMware Browser in RightITnow ECM, and should be nearly identical to the Hosts and Clusters Inventory of the vsphere client.
To collect events, RightITnow ECM uses the EventHistoryCollector from the vsphere API. The connector stores the timestamp of the latest event it polled every time a poll occurs, so that the next poll will filter the events by their timestamp, therefore starting from the latest event timestamp. RightITnow ECM processes events in batches of 25, ignoring any events that have to be excluded according to the connector's configuration (currently only UserLoginSessionEvent and UserLogoutSessionEvent can be excluded). The following processing is applied on each event:
The entity to which the events should be attached is identified. In vsphere, an event will be linked to many different objects and not just one, such as a datacenter, a host and a VM. In RightITnow ECM, we associate the event with just one entity. Therefore, we check all the objects with which an event is associated and attach the event to the "lowest" entity in the hierarchy tree. This list of prioritization is as follows:
VM
HOST
RESOURCE POOL
DATASTORE
DVS (distributed virtual switch)
NETWORK
DATACENTER
CONNECTOR (vcenter/esx host)
For example, RightITnow ECM would attach an event related to a VM running out of memory to the entity representing the VM, whereas RightITnow ECM would attach an event related to an expired license on the vcenter/esx server to the connector. Note that the value for each of these objects is stored in the event which is sent to RightITnow ECM, so categorization or correlation rules can still, for example, refer to the DATASTORE, even if the event was attached to the VM entity.
Once an event
is attached to an entity, RightITnow ECM populates the various
tokens for the event, which can then be seen in the event details
window for an alert in RightITnow ECM:
| Token | Description |
VMWARE_ENTITY_ID |
An ID that refers to the entity in vsphere, typically used to execute actions on a VM |
EVENT_TOKEN_ENTITY |
The name of the entity determined in the previous step |
EVENT_TOKEN_CONNECTOR_ENTITY |
This is the host/URL of the connector as configured on the connectors tab, which can be used to associate the connector with an entity in RightITnow |
EVENT_TOKEN_TIME |
The creation time of the event as reported by vsphere. |
EVENT_TOKEN_MESSAGE |
The fully formatted event message as reported by vsphere. |
EVENT_TOKEN_SEVERITY |
The severity of the event as reported by vsphere. Can be error, warning, info or user. By default these are respectively mapped to Critical, Warning, Informational, Informational in RightITnow via categorization rules. |
EVENT_TOKEN_TYPE |
The type of the event. There are hundreds of these, please refer to the vpshere API documentation. |
VMWARE_EVENT_USERNAME |
The username associated to an event, if it exists. |
EVENT_TOKEN_ENTITY_CLASS |
The entity type is determined when the entity tree is built. Currently all entities discovered via VMware are marked as VIRTUAL. |
EVENT_TOKEN_ENTITY_TYPE |
The entity type is determined when the entity tree is built. The following types are currently supported: FOLDER, DATACENTER, COMPUTE_RESOURCE, VIRTUAL_APP, VIRTUAL_MACHINE, RESOURCE_POOL, HOST_SYSTEM, NETWORK, DATASTORE, DISTRIBUTED_VIRTUAL_SWITCH, DISTRIBUTED_VIRTUAL_PORT_GROUP, CLUSTER, TEMPLATE, VIRTUAL_CENTER |
EVENT_TOKEN_MESSAGE |
RightITnow ECM interprets events referring to a VMware alarm changing its state differently than other events. The EVENT_TOKEN_MESSAGE is populated with the name of the alarm. These events are then processed by a special set of categorization and correlation rules which associate all the events for the same alarm to the same alert in RightITnow ECM, causing the alert to flip severities accordingly, and the list of events reflects the history of alarm state changes. Three additional tokens are also present in the event:
|
The Zenoss configuration pane appears below. You access it as described in Configuring Connectors.
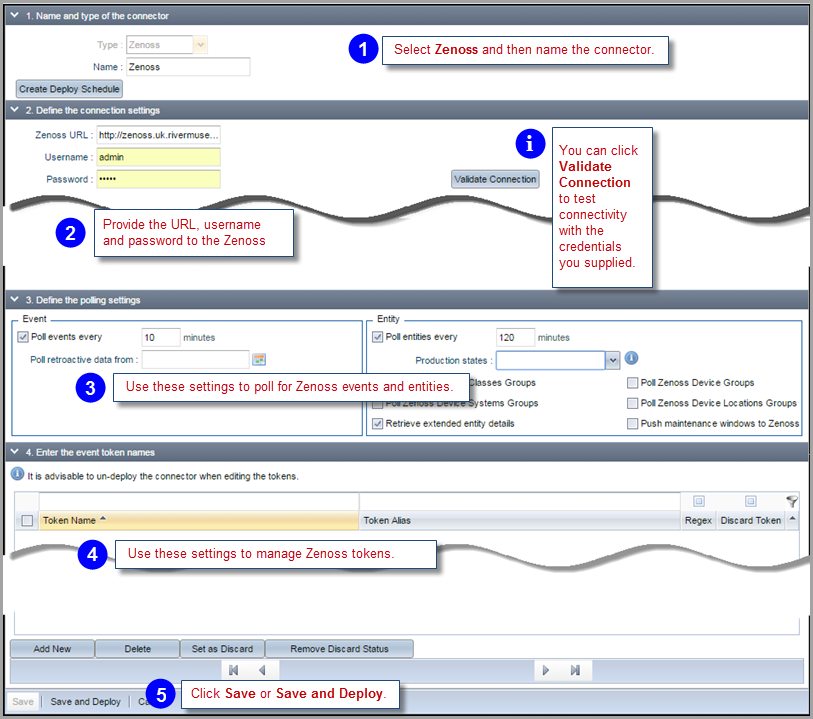
The Zenoss connector can be deployed to poll for events from Zenoss. Integration requires the following information:
The Zenoss connector polls based on the polling settings in section 3 of the configuration screen. The default is every 10 minutes. The first time you configure it, it can retrieve past events starting from a date you specify in the Poll retroactive data from field.
The Zenoss connector polls the following entity details:
And these additional fields if you tick the Retrieve extended entity details checkbox:
To display the values for these fields in the entity console, create a custom entity field with the same name.
You can see the polling status on the Connector List. See Viewing Polling Status.
The Zenoss connector can mirror maintenance windows in Zenoss when created in ECM. This is a synchronous operation performed when the following conditions are met.
If a maintenance window is later updated or removed in ECM, these changes will not be pushed to Zenoss.
The Zenoss connector includes a large number of tokens for each event which can be reviewed in section 4 once the connector has been deployed and performed its first successful retrieval of events. You may wish to rename these tokens to something more meaningful for you. See Managing Connector Tokens for tips on managing large lists of connector tokens.
For connectors that poll, you can view polling status in the Status column of the Connector List, as shown below:
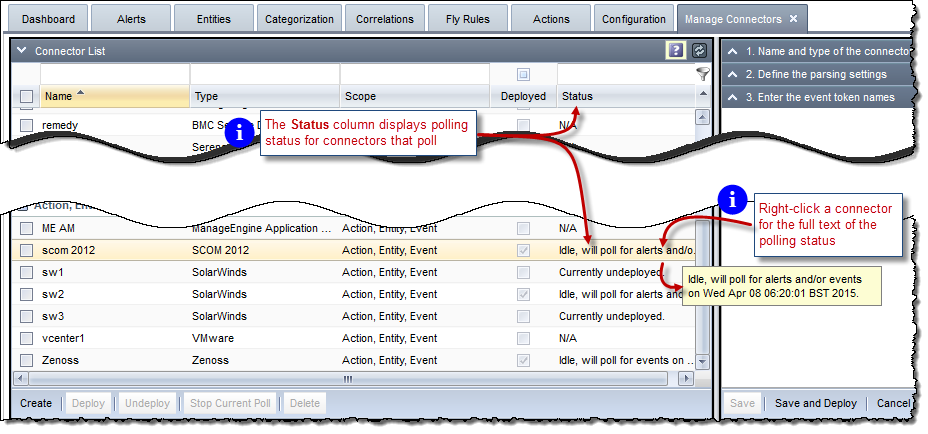
Polling status also includes information about any failed polling attempts.
The following fields appear when you select the LDAP connector type:
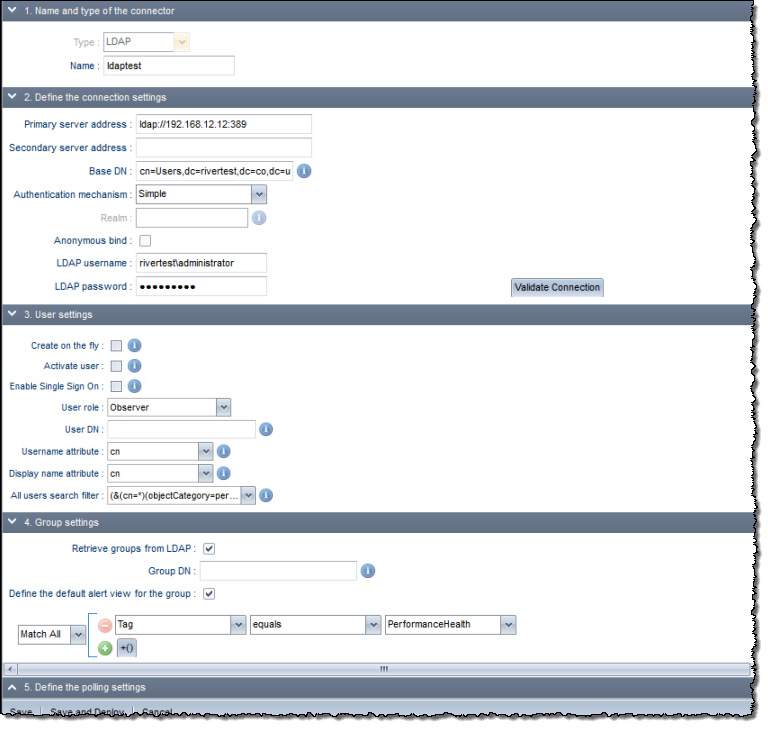
The following table describes how to enter values for many of these fields:
Field Name |
Example Value |
Mandatory |
Description |
Primary Server Address |
ldap://192.168.12.12:389 |
Yes |
The address of the server running the LDAP server including protocol (ldap or ldaps), hostname or IP and port number |
Secondary Server Address |
ldaps://ds1.acme.com:389 |
No |
Optional secondary server address is primary is unavailable |
Base DN |
Cn=Users,dc=acme,dc=co,dc=uk |
Yes |
The LDAP Base DN. Please note that the LDAP connector traverses the tree to find objects in nested directories. |
Authentication Mechanism |
Simple, CRAM-MD5, Digest-MD5 |
If bind is not anonymous |
Depends on what transmission mechanism the configured LDAP server expects of the credentials. |
Realm |
rivertest |
Yes if Digest-MD5 |
Realm is used by Digest-MD5 authentication, typically the domain name |
Anonymous Bind |
Web form checkbox, not selected by default |
No |
To be selected if the connector is to connect anonymously to the LDAP server during installation and subsequent polling. |
LDAP Username |
Administrator |
If bind is not anonymous |
The identifier username to be used to connect to the LDAP server. |
LDAP Password |
LDAP secret Admin password |
If bind is not anonymous |
The password to be used to connect to the LDAP server. |
True |
Yes |
Tick box to indicate accounts should be imported immediately or auto-created when user logs in for the first time |
|
Activate user |
Tickbox true/false |
Yes |
Should users be automatically activated when created (always true when create account immediately is set) |
Enable Single Sign On |
Tickbox true/false |
No |
Enables or disables single sign on |
User role |
Observer (list of roles) |
Yes |
Role user should be assigned when created |
User DN |
ou=Users |
No |
Optional DN added to the base DN to specify where users should be retrieved. If not specified all users from the base DN are retrieved. |
Username attribute |
Dropdown of LDAP fields used for username |
Yes |
Default is uid, dropdown allows selection of cn or samAccountName or entering of any field name |
Display name attribute |
displayName |
Yes |
LDAP attribute to use when populating the user's display name, displayName or cn are common choices |
All Users Search Filter |
(&(cn=*)(objectCategory=person)) |
Yes |
The values can differ and they enable the connector to find the user objects, as an example :- objectCategory=person ensures that the directory names found in Active Directory are not listed as user objects. |
Retrieve groups from LDAP |
Tickbox true/false |
No |
Determines whether to retrieve groups from LDAP |
Retrieve Subgroups |
Tickbox true/false |
No |
When encountering a group containing a subgroup, also retrieve those users. Not available when creating users on the fly |
Group DN |
ou=Groups |
No |
Optional DN added to the base DN to specify where groups should be retrieved. If not specified, all groups from the base DN are retrieved |
Group search filter |
(|(objectClass=groupOfNames)(objectClass=group)) |
No |
LDAP filter used to control which groups are retrieved |
Define the default alert view for the group |
Match All Tag equals PerfomanceHealth |
No |
If specified, determines the default alert view for the group |
Polling Interval |
Length of time in hours |
Yes |
Time interval that must elapse between polling |
The ability to deploy and undeploy connectors allows you to create libraries of connectors and deploy them at will. To deploy or undeploy a connector, click the checkmark adjacent to the connector you wish to deploy or undeploy, and then click the Deploy or Undeploy button at the bottom of the Connector List pane.
You can schedule the deployment and un-deployment of connectors other than SOAP connectors. This allows you to take connectors online and offline very conveniently.
To configure the deployment schedule:
Click the Configuration tab and then click Manage Connectors in the External Systems section. The Manage Connectors tab appears to the right of the Configuration tab.

The Scheduling window appears.
Use the Scheduling window to configure the schedule:
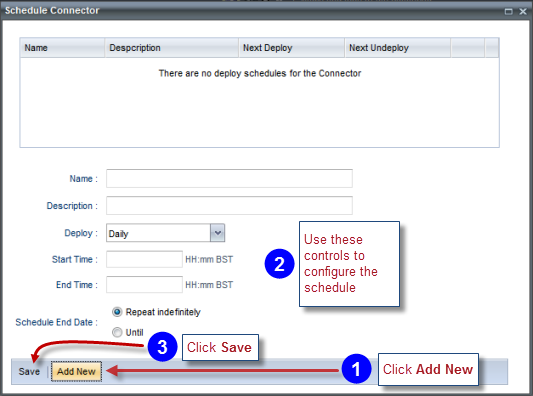
The Start Time is when the connector will be deployed, and the End Time when it will be undeployed.
Documentation coming soon.
RightITnow ECM can automatically enrich new entities discovered through events or connector polling. The DNS enricher attempts to resolve the IP addresses of an entity identified by its hostname. The SNMP enricher probes the SNMP service about the entity. You can configure RightITnow ECM to check entity aliases in addition to the primary entity name when performing a lookup for an alert.
To configure entity discovery:
Select the Entity Discovery configuration settings by clicking the Configuration tab and then selecting Entity Discovery from the External Systems settings, as shown above.
The Entity Discovery Configuration tab appears.
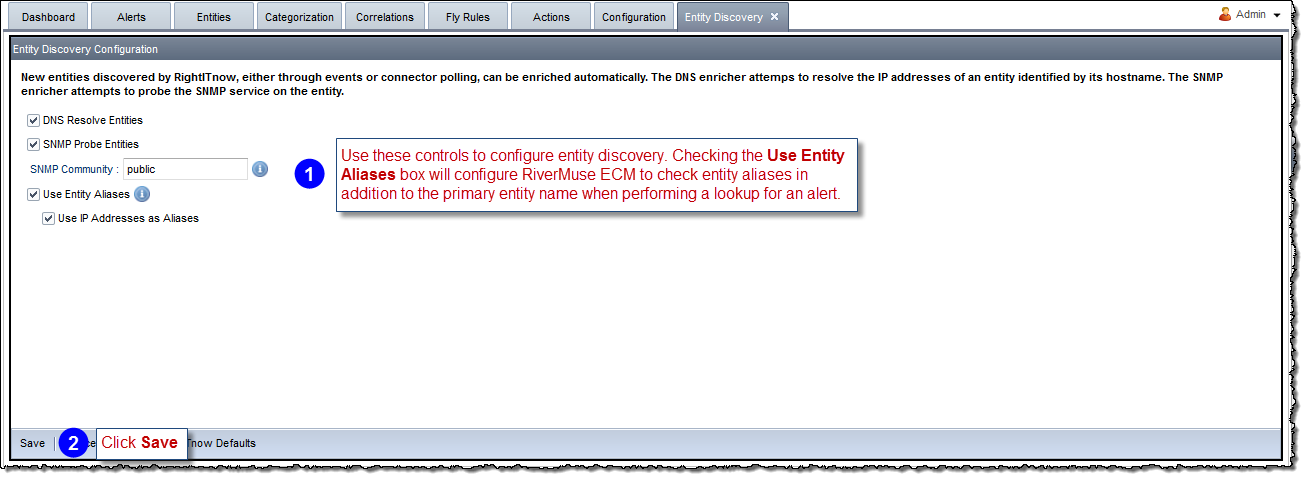
Note: The Use Entity Aliases feature is most useful when the DNS enricher is enabled because the DNS enricher will try to discover IP addresses for an entity.
You can configure ECM to use an entity's IP address as an alias for the entity. When ECM encounters an event with entity={entity ip address of one of the existing entities}, ECM links the event to the entity identified by the IP address, incrementing the alert count for this entity in the Entity grid.
To enable this functionally, enable following options in the Entity Discovery tab:
ECM can import tickets from the JIRA and Salesforce external ticketing systems.
To import external incidents from JIRA and Salesforce:
Deploy a JIRA or Salesforce connector as described in Configuring Connectors.
Select the Import External Incidents configuration settings by clicking the Configuration tab and then selecting Import External Incidents from the External Systems settings, as shown above.
The Import External Incidents tab appears.
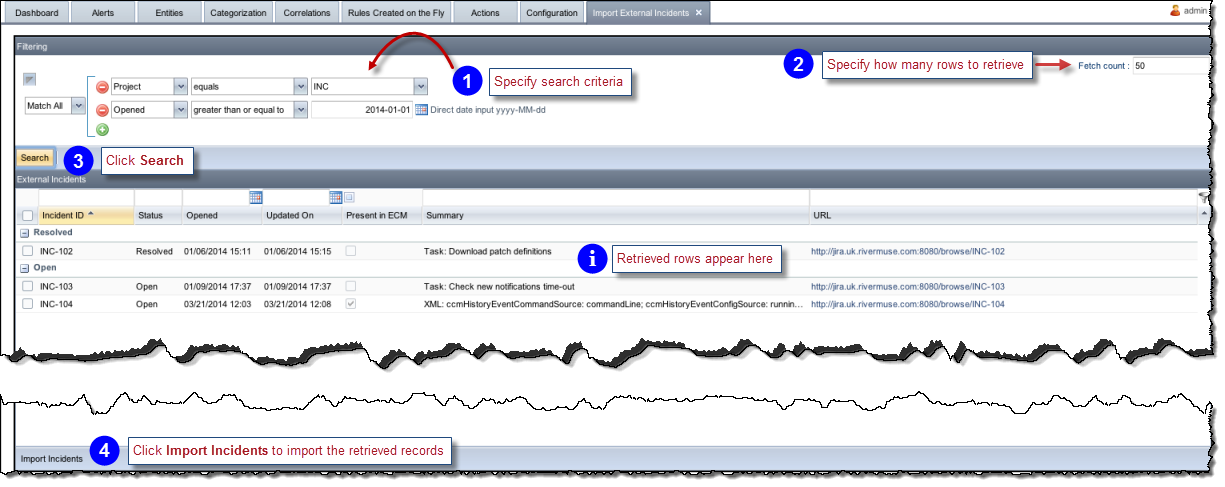
You can import a range of Sales force tickets, rather than just one specified ticket.
To import a range of Salesforce tickets, follow the instructions in Importing External Incidents, and in the Filtering fields, specify search criteria like the following:
These settings would import Salesforce tickets within the range of 00001156 and 00001170.
You can configure a proxy for use with the ServiceNow® connector.
To configure a proxy for ServiceNow®:
Access the proxy settings by clicking the Configuration tab and then selecting Proxy Settings from the External Systems settings, as shown above.
The Proxy Settings tab appears.
Specify the proxy URL, port, and authentication credentials, if needed, and then click Save. You can click the Test Settings button at the bottom of the tab to validate your settings.
Ensure that you click the Use Proxy check box when setting up your ServiceNow® connector.
RightITnow offers a couple of ways to capture and display SNMP traps:
SNMP traps consist of a detailed set of trap variables that can be very difficult to read. The SNMP Trap Format Editor formats the trap content into a readable format.
The first thing you need to do to use the SNMP Trap Format Editor is to load MIBs.
To load MIBs:
The SNMP Trap Format Editor appears.
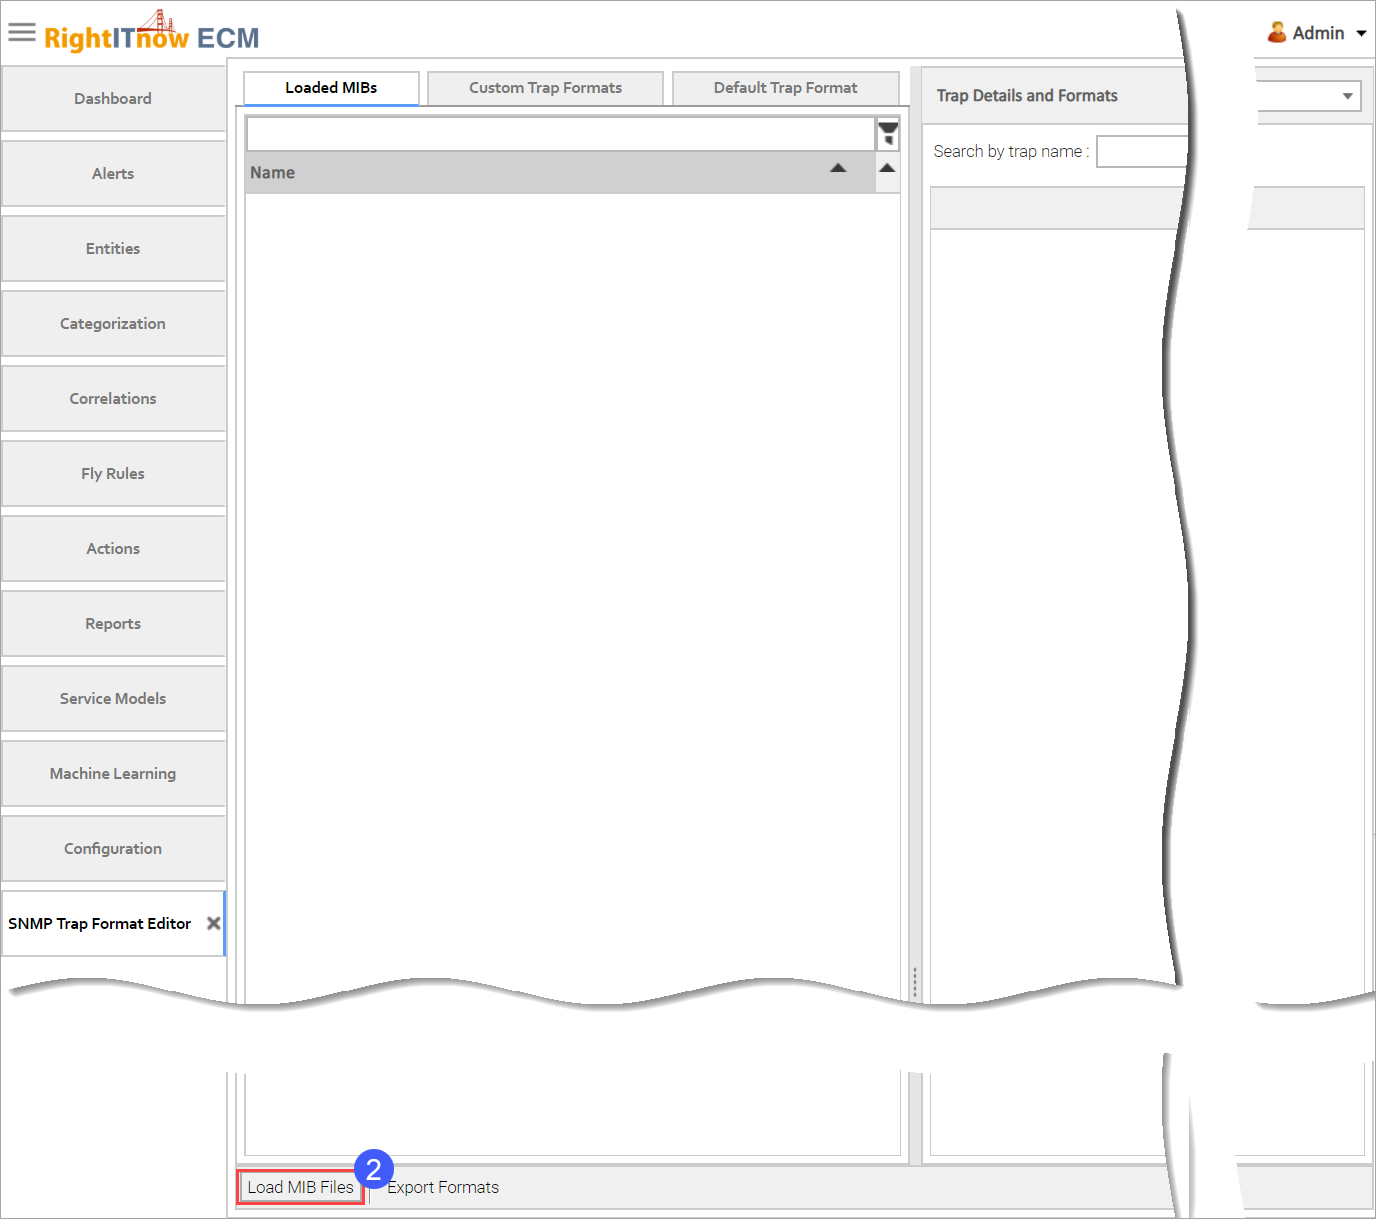
Click Load
MIB Files.
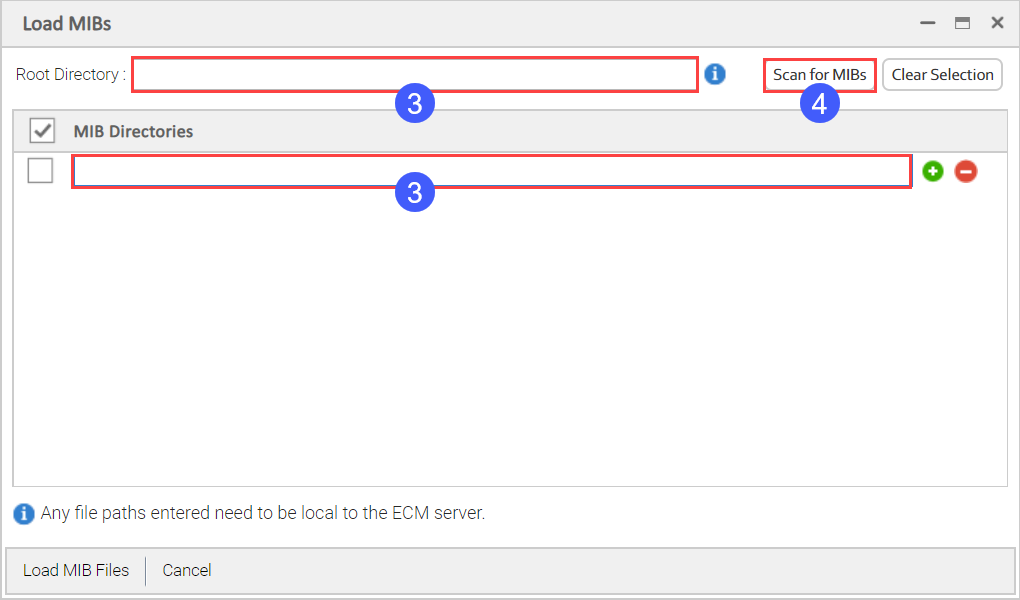
Enter a root directory from which to scan for files, or double-click to manually enter the MIB folder locations.
Click Scan for MIBs.
Once the files load, the MIB files are listed as shown below:

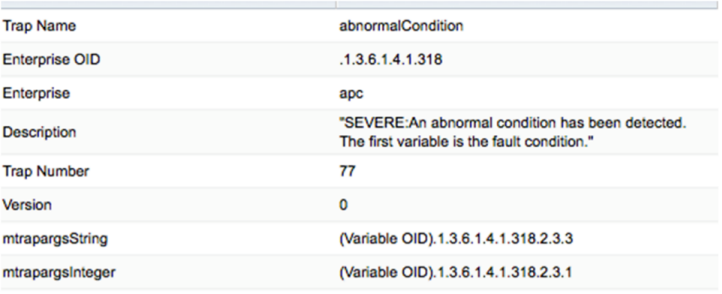
When you select a trap in the Trap Definitions pane, the following type of information appears in the right-hand pane:
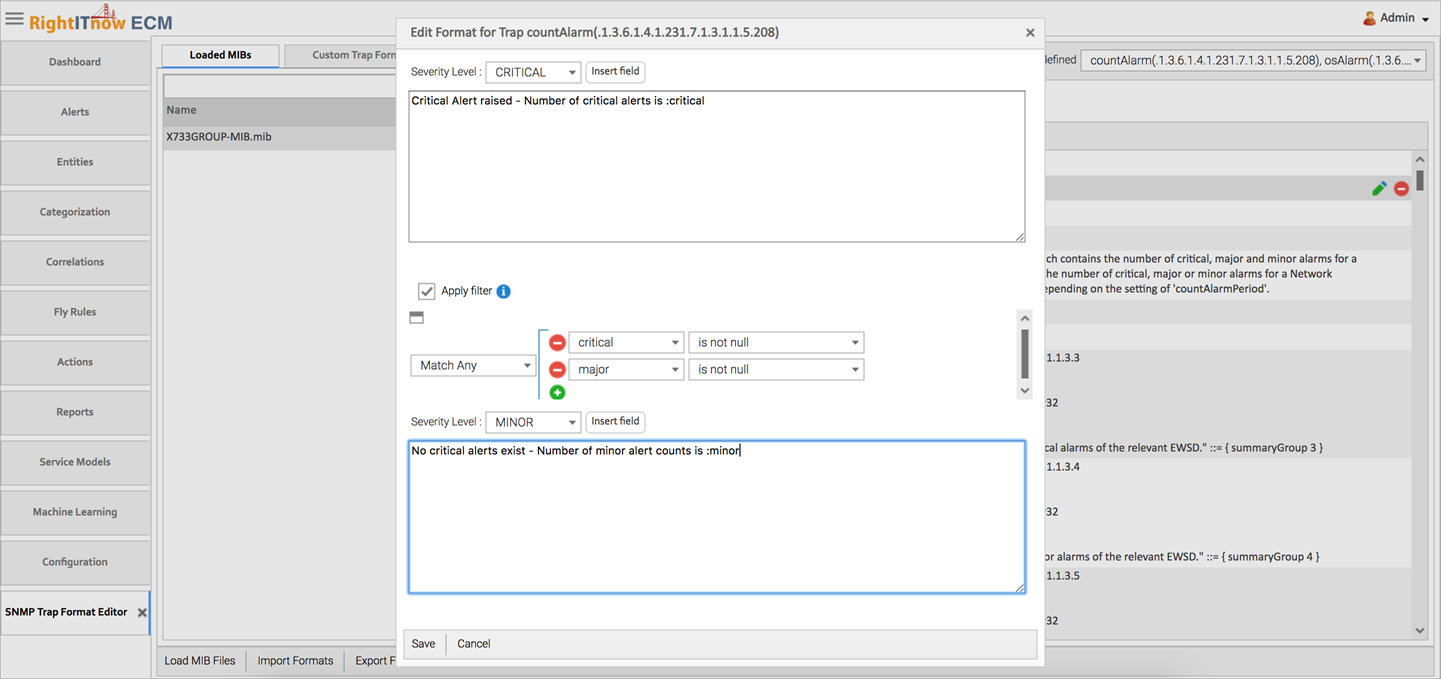
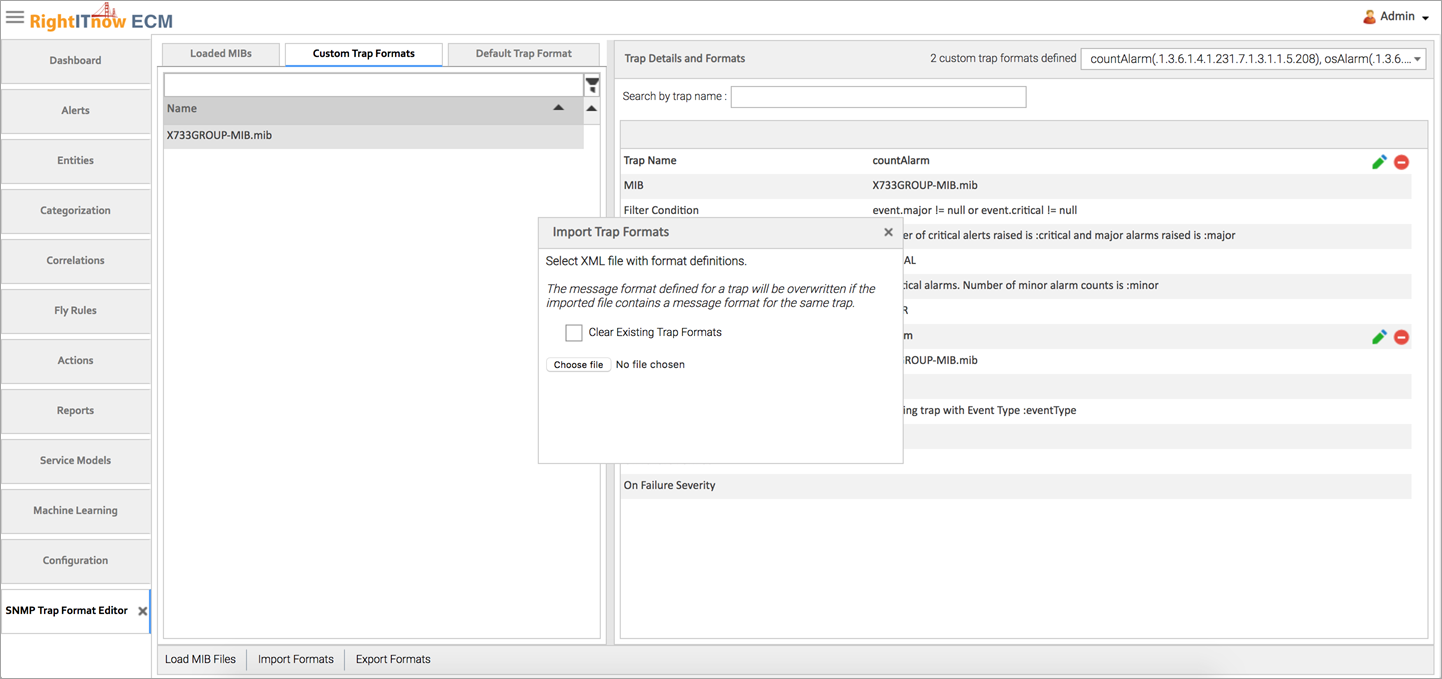
1) You can create a custom trap format by clicking on the edit icon of a trap definition. If required, you can define a conditional clause can be defined on the basis of which the message format for the incoming SNMP trap is determined. In the example below, the condition checks for the presence of Major or Critical alarms and accordingly determines the required message format.
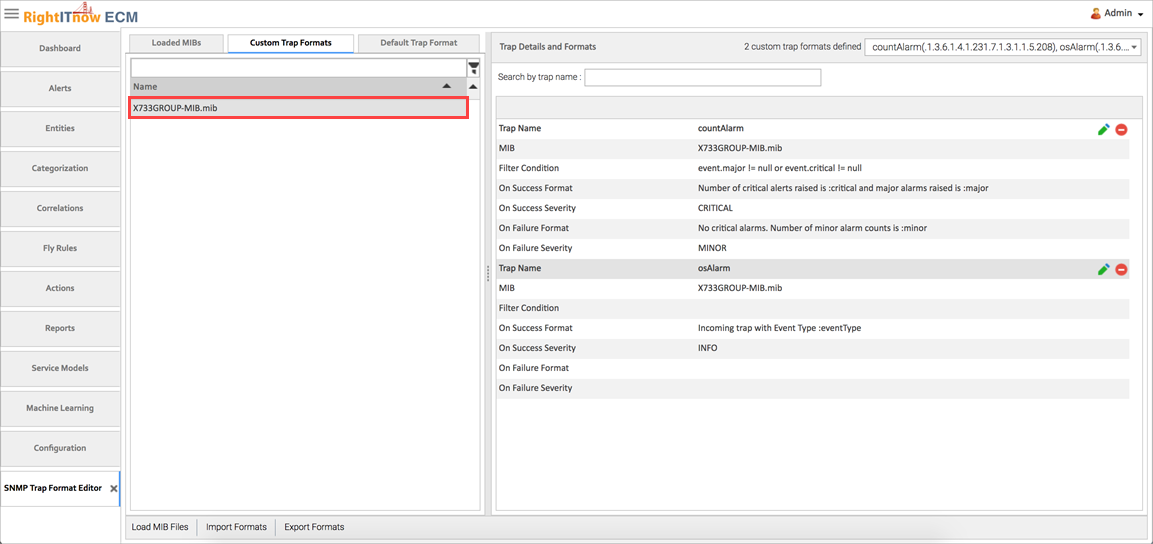
The custom trap formats appear on the Custom Trap Formats Tab:
To edit an existing TrapFormat.XML file, specify the location of the desired format file, and then follow the directions in the section, Creating and Editing a Trap Format.
You can define default trap formats for all traps which do not have a trap format defined, and for all traps which cannot be translated.
To define default trap formats:
The SNMP Trap Format Editor appears.

Click the Default Trap Format tab.
Click the Edit icon.
Use the drop-down menu to select a value.
Click Insert Field. Repeat steps 4 and 5 until you have added all desired fields.
Click Save.
You can use exported trap formats with the SNMP Proxy utility to format the SNMP Traps to the required message formats.
To export formats:
Click Export
Formats.
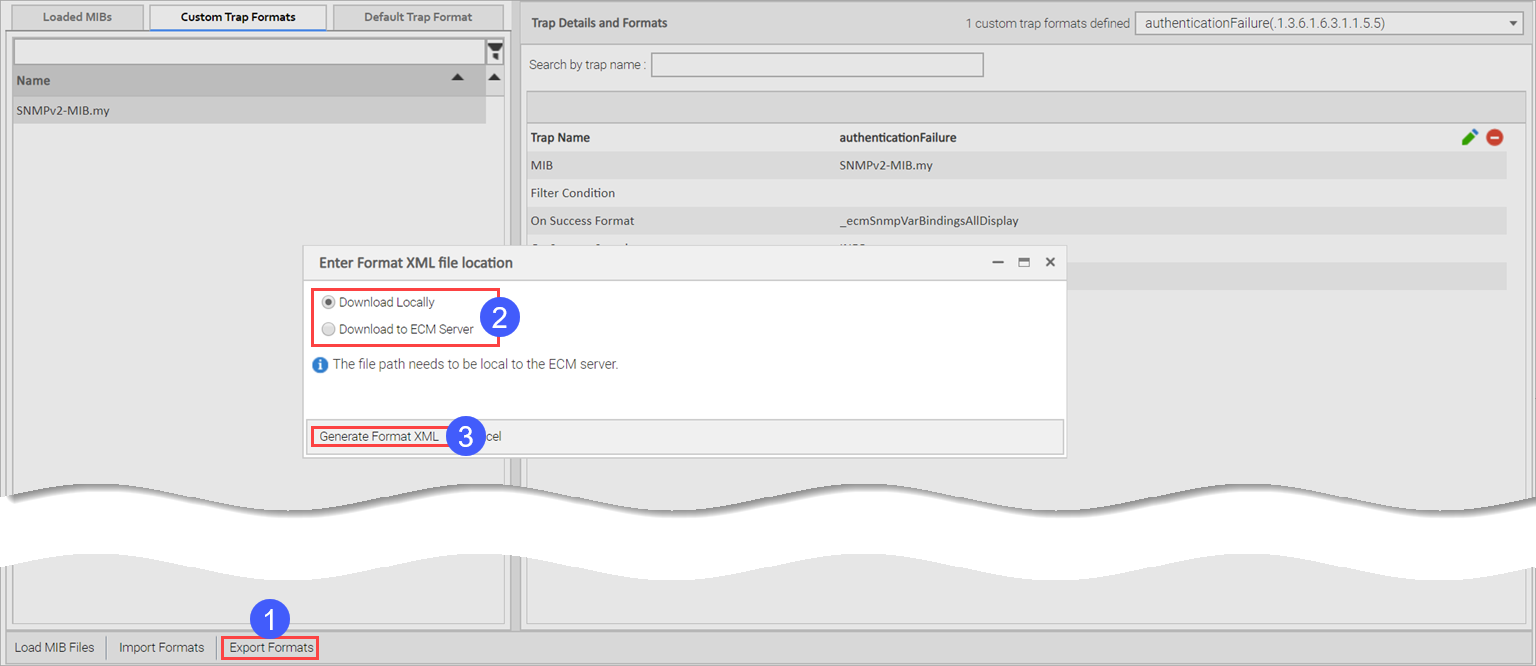
Select whether to download locally or to the ECM server.
Click Generate Format XML.