
Click the Configuration tab to configure the application settings, as shown below:
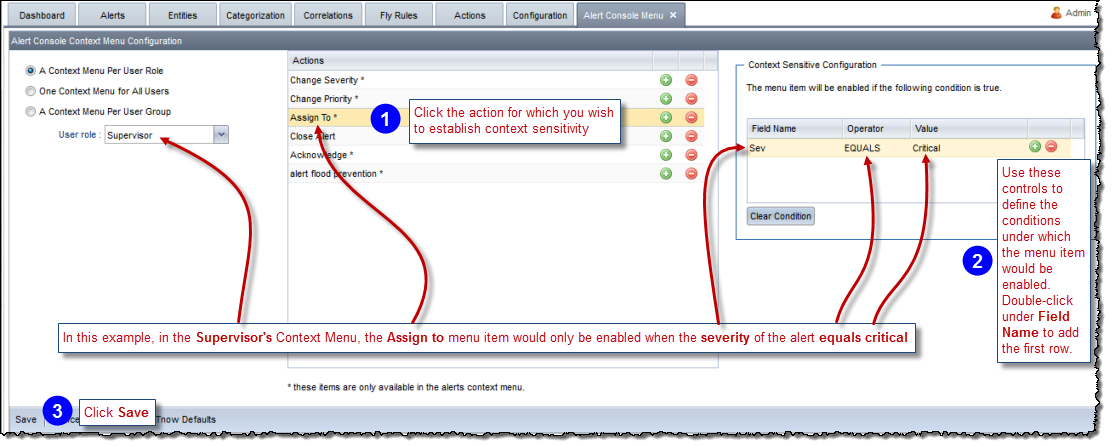
The Alert Console Context Menu contains all the actions available from the Alert console for a selected alert, shown below:

The first three actions listed in the menu will always be present. You can add more actions of your choosing to this menu so that they are also available from the Alerts console, as described below.
To configure the Alert Console Context Menu:
Select the Alert Console configuration settings by clicking the Configuration tab and then selecting Alert Console Menu from the Application Settings area, as shown above.
The Alert Console Menu Tab appears.
Complete the steps illustrated below:

The asterisked actions are only available from the alert console because they are UI related. When using a context menu per user group, if a user belongs to more than one user group, then the context menu for that user contains all the menu items available to all the groups to which the user belongs.
You can also define actions with a context sensitive condition per menu item, allowing for different context sensitive configurations for the same action in different context menus for different roles:
You can change the default alert workflow and associated behaviors. See Understanding the Default Alert Workflow for details about the default behaviors.
To configure alert workflow and associated behaviors:
Select the Alert Workflow configuration settings by clicking the Configuration tab and then selecting Alert Workflow from the Application Settings area, as shown above.
The Alert Workflow Configuration tab appears.
Configure the behaviors as described in the following sections.
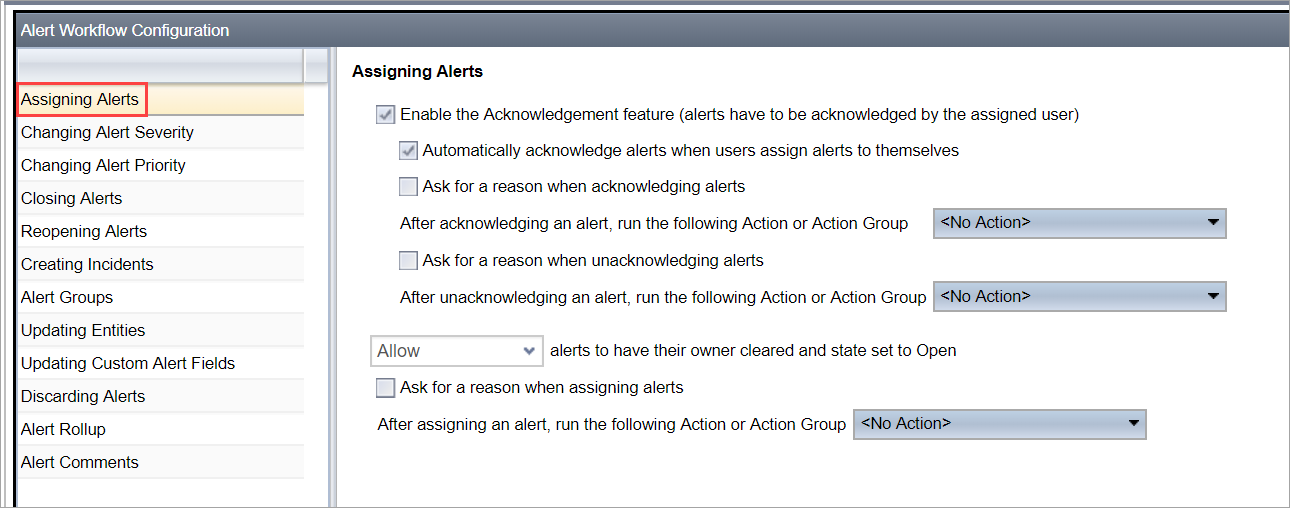
To configure workflow for assigning alerts:
Access the Alert Workflow settings as described above.
Click Assigning Alerts, use the controls to configure the associated settings, and then click Save at the bottom left of the page:
To configure workflow for changing alert severity:
Access the Alert Workflow settings as described above.
Click Changing Alert Severity, use the controls to configure the associated settings, and then click Save at the bottom left of the page:

To configure workflow for changing alert priority:
Access the Alert Workflow settings as described above.
Click Changing Alert Priority, use the controls to configure the associated settings and then click Save at the bottom left of the page:

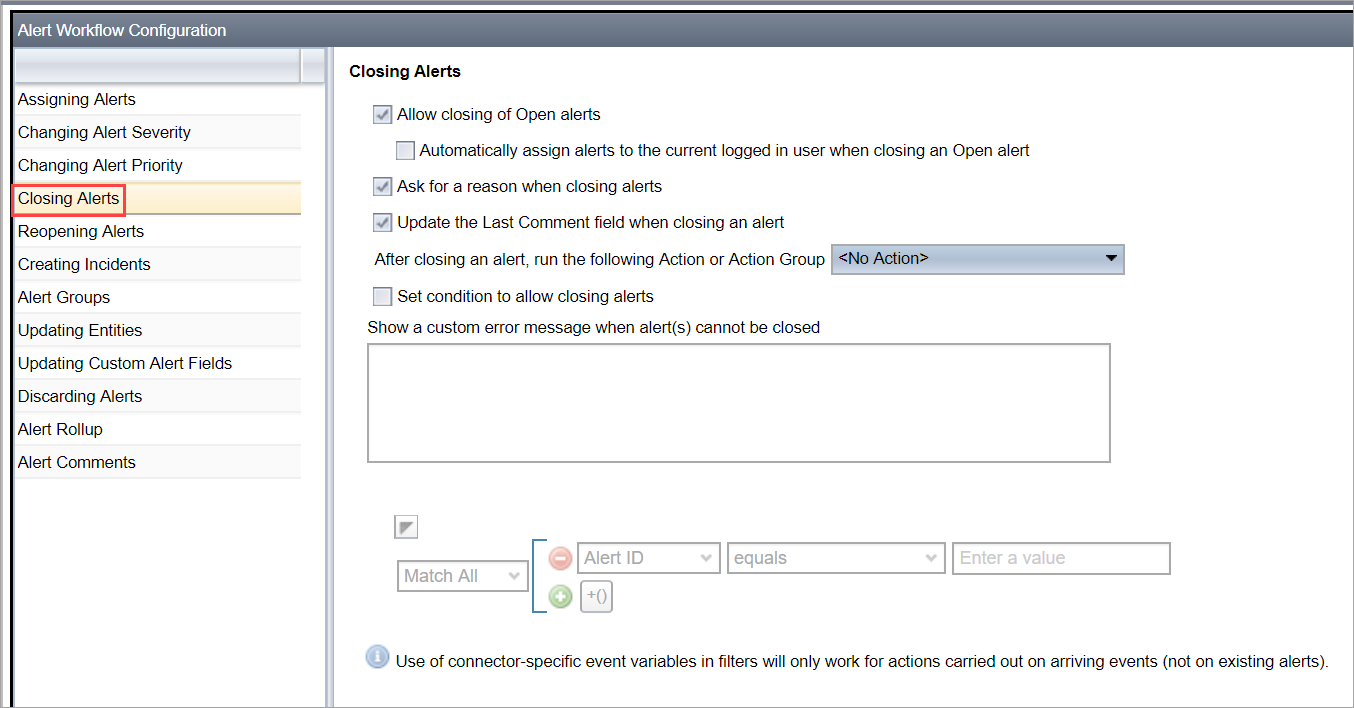
To configure workflow for closing alerts:
Access the Alert Workflow settings as described above.
Click Closing Alerts, use the controls to configure the associated settings and then click Save at the bottom left of the page:
You can reopen closed alerts on which you would like to perform actions
or action groups. The following diagram illustrates the setting and the
effect on matching closed alerts:
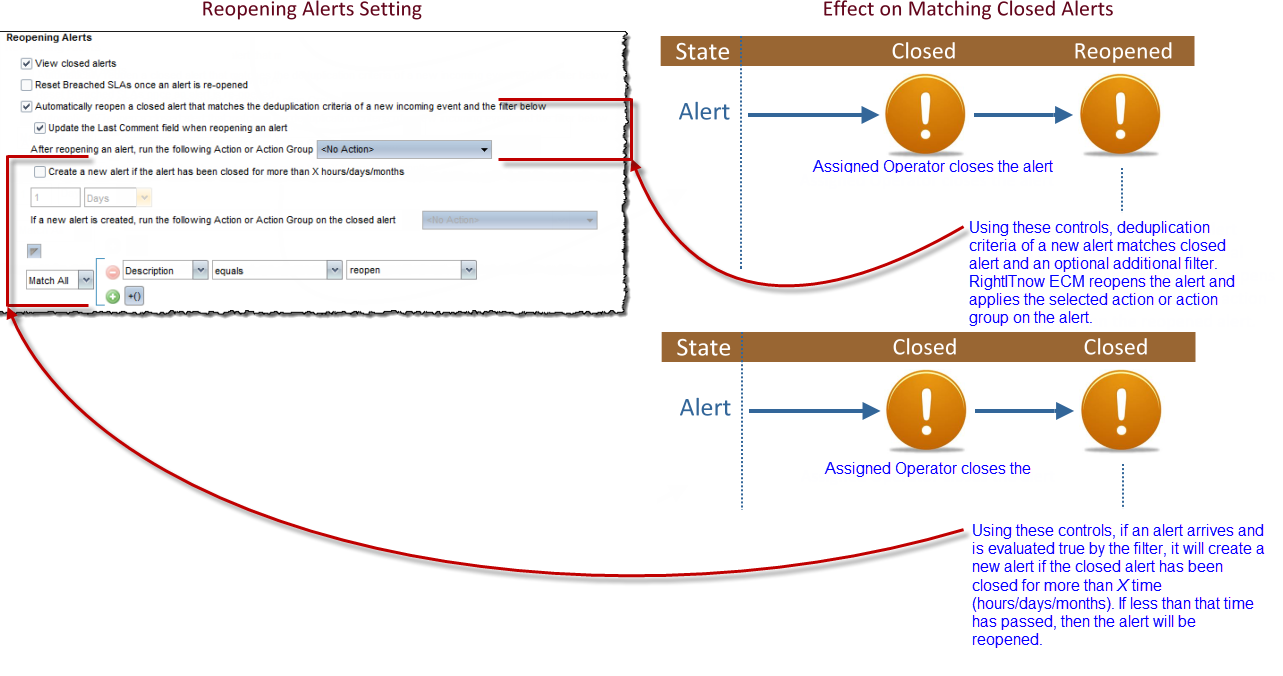
Note: Users cannot reopen alerts from the Alerts console if the option Automatically reopen a closed alert that matches the deduplication criteria of a new incoming event and the filter below has not been checked. Also, if the option Create a new alert if the alert has been closed for more than X hours/days/months creates a new alert, then users will not be able to reopen the triggering closed alert from the Alerts console.
To configure workflow for reopening alerts:
Access the Alert Workflow settings as described above.
Click Reopening Alerts, use the controls to configure the associated settings and then click Save at the bottom left of the page:

The View Closed Alerts check box above turns on and off the View Closed Alerts button on the bottom right of the Alerts Console:
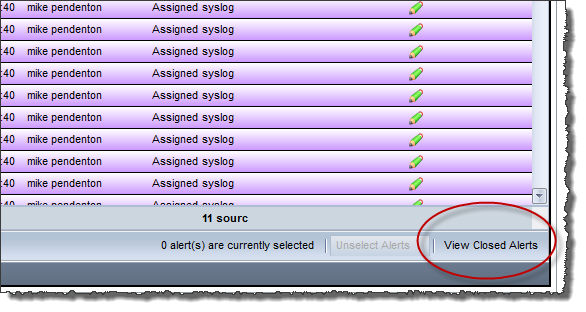
See Viewing_Closed_Alerts for more information.
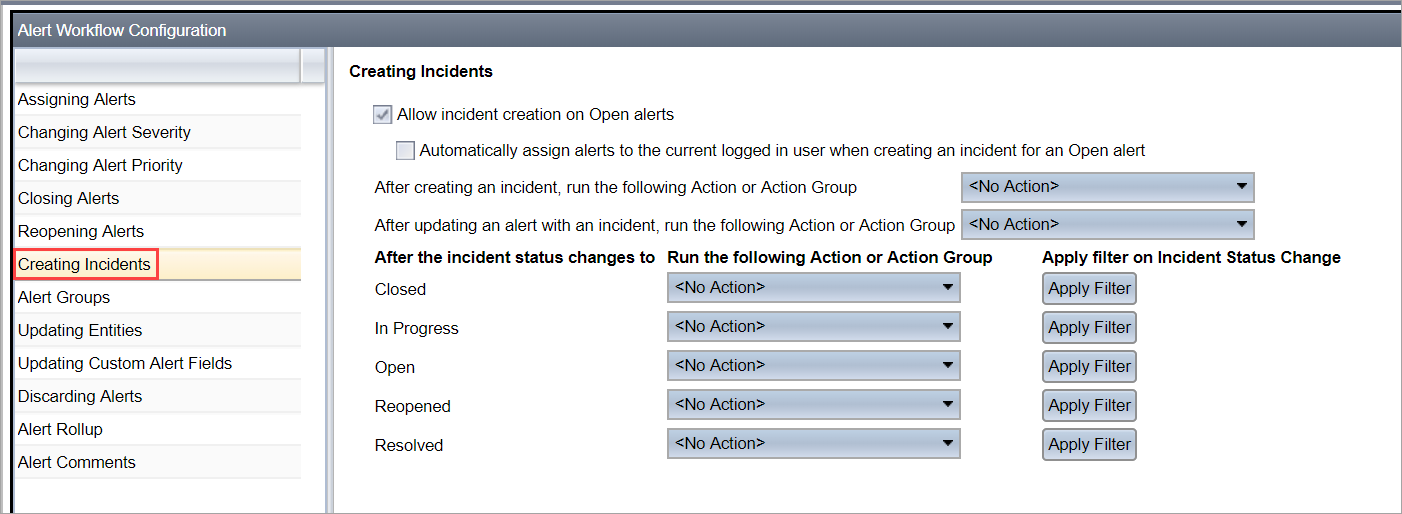
To configure workflow for creating incidents:
Access the Alert Workflow settings as described above.
Click Creating Incidents, use the controls to configure the associated settings and then click Save at the bottom left of the page:
To configure workflow for alert groups configuration:
Access the Alert Workflow settings as described above.
Click Alert Groups, use the controls to configure the associated settings and then click Save at the bottom left of the page:

To configure workflow for updating entities:
Access the Alert Workflow settings as described above.
Click Updating Entities, use the controls to configure the associated settings and then click Save at the bottom left of the page:

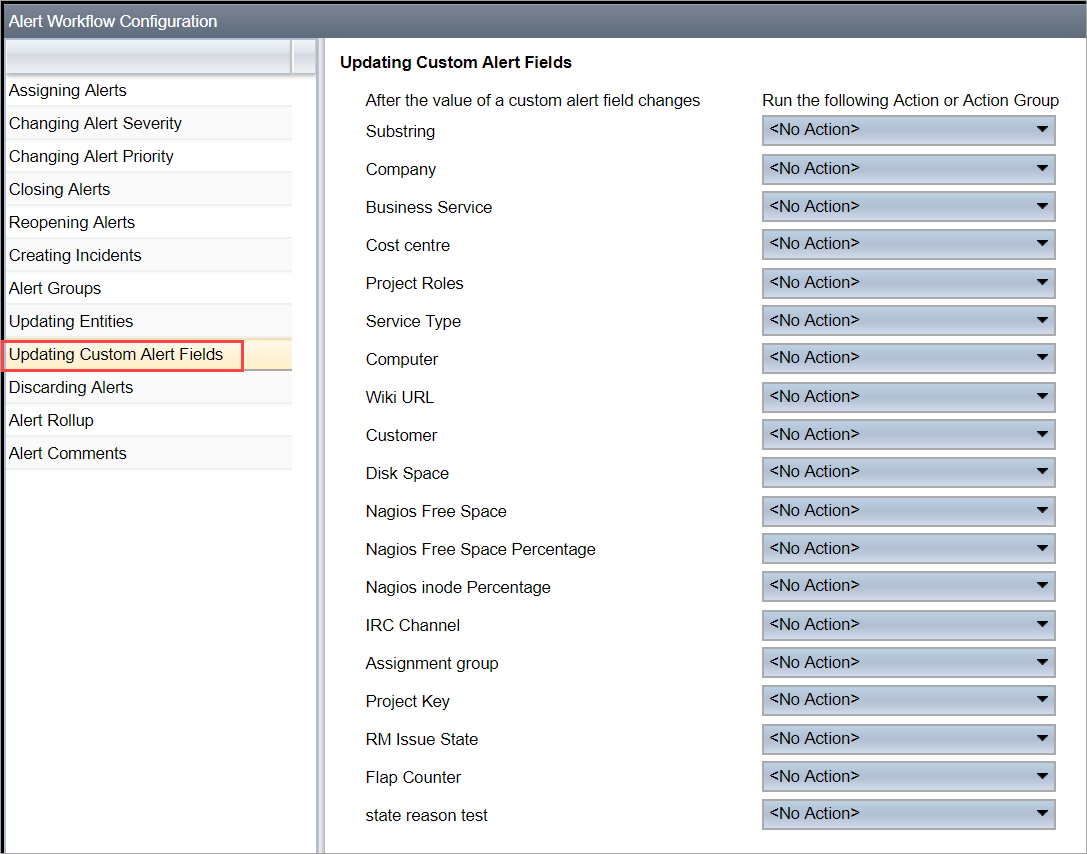
To configure workflow for updating custom alert fields:
Access the Alert Workflow settings as described above.
Click Updating Custom Alert Fields, use the controls to configure the associated settings and then click Save at the bottom left of the page:
You can configure ECM to discard alerts matching a pattern of your choosing.
To configure the workflow for discarding alerts:
Access the Alert Workflow settings as described above.
Click Discarding Alerts, use the controls to configure the associated settings and then click Save at the bottom left of the page:

You can configure ECM to allow you to use the Alerts Console to "merge" a number of alerts and pick one to act as the main or parent alert.
To configure alert rollup:
Access the Alert Workflow settings as described above.
Click Alert Rollup, use the controls to configure the associated settings and then click Save at the bottom left of the page:
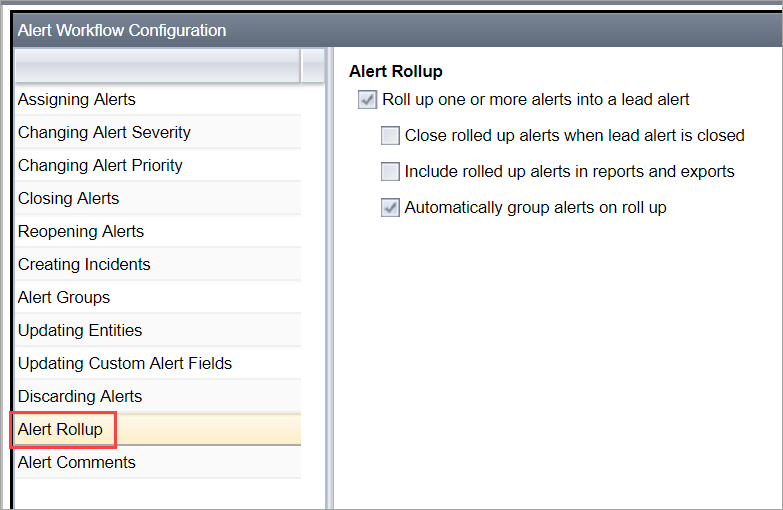
Roll up one or more alerts into a lead alert: Turns on the alert rollup feature (default is OFF)
Close rolled up alerts when lead alert is closed: Whether to close rolled up alerts or unroll them when a lead alert is closed. (default is close them).
Include rolled up alerts in reports and exports: Whether to include or exclude rolled up alerts in reports and exports (default is exclude). If included, a column will be added to the CSV with the ID of the lead alert.
Automatically group alerts on roll up: Whether to automatically create alert groups when rolling up (default is OFF and requires alert grouping to be ON)
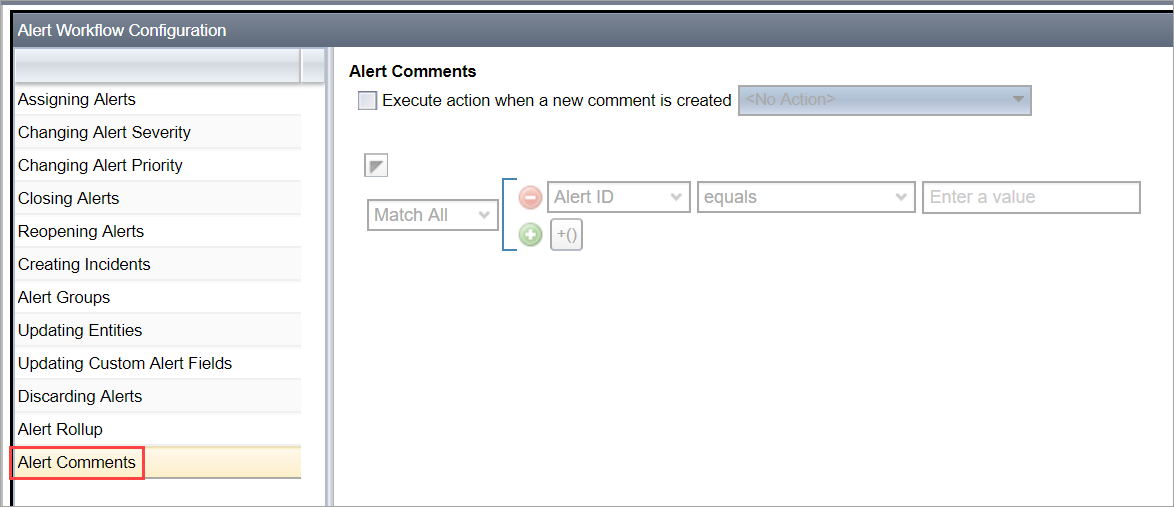
You can configure ECM to execute an action when a new comment is created.
To configure alert comments:
Access the Alert Workflow settings as described above.
Click
Alert Comments, use the controls to configure the associated
settings and then click Save
at the bottom left of the page:
An issue that arises from concurrent usage of the system is that a user might update a stale alert, that is, an alert that has changed before the user refreshes the alerts console. This issue can also arise when correlation or SLA rules perform actions on alerts.
RightITnow ECM marks an alert is marked as stale if any of the following happens:
If an event de-duplicates against an alert or the event purging mechanism removes some events from an alert, the alert will NOT be marked as stale.
An option exists in the workflow that will inform users when they are attempting to update a stale alert, and give them the option to either cancel and refresh the console, or to ignore the warning and update the alert anyway.
To configure the stale alert warning:
Click the Configuration tab at the top of the RightITnow ECM screen.
Click Alert Workflow Configuration in the Application Settings section. The Alert Workflow Configuration tab appears.
Configure the stale alert warning as shown below:

You can create custom alert fields that appear on the Alerts Console as column headings:

You can create 32 fields, 10 indexed and 22 non-indexed.
To create custom alert fields:
Select the Custom Alert Fields configuration settings
by clicking the Configuration
tab and then selecting Custom Alert
Fields from the Application
Settings area, as shown above.
The Custom Alert Fields tab
appears.
Use the Custom Alert Fields controls to create the custom fields:

You can create 20 custom fields, and 10 of those custom fields may be indexed. Queries on indexed custom fields run faster. Indexed custom fields have a maximum length of 254 characters. You may change an existing custom field from indexed to non-indexed and vice versa without losing the data it currently has. When changing a custom field from non-indexed to indexed, ECM truncates fields longer than 254 characters.
Note: When updating the indexed option, the data needs to be stored differently in the database in a mass update, so, if possible, perform this operation when the events sent to ECM is stopped or the rate of events per second is very low.
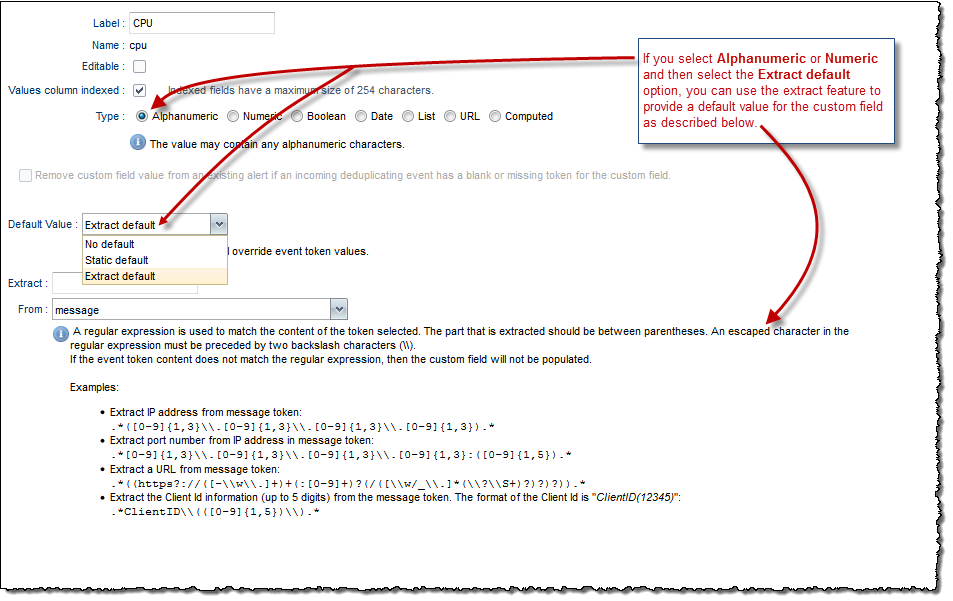
If you select an URL type in step 3 of the screen shot above, specify a valid URL (either passed in from an event, or extracted from another field such as alphanumeric). The URL will be hyperlinked in the Alerts console, with a new tab or page opened when the user clicks the URL.
You can also click the following option to remove the custom field value in the alert if an event arrives in which the custom field token is missing, null or empty:

Note: In some cases, you can use an extract function to provide default values, as described below:
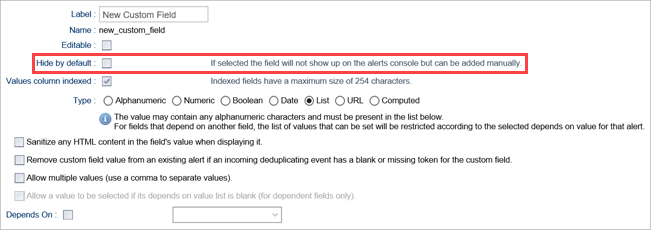
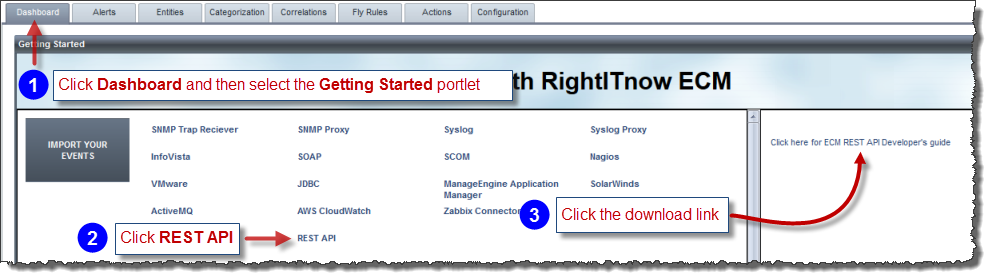
RightITnow ECM 4.6 introduced the ability
to hide custom fields from the Alerts Console but allow you to add them
manually:
You can map incident fields into RightITnow as custom alert fields. The only fields that can be imported from incident systems are the ones that can only take values from a list. Free text fields cannot be imported. The created custom fields share the same name as the field in the incident system and are of type List. If the field is dependent from another field in the incident system, both fields are imported and the relationship is preserved.
To import incident fields as custom alert fields:
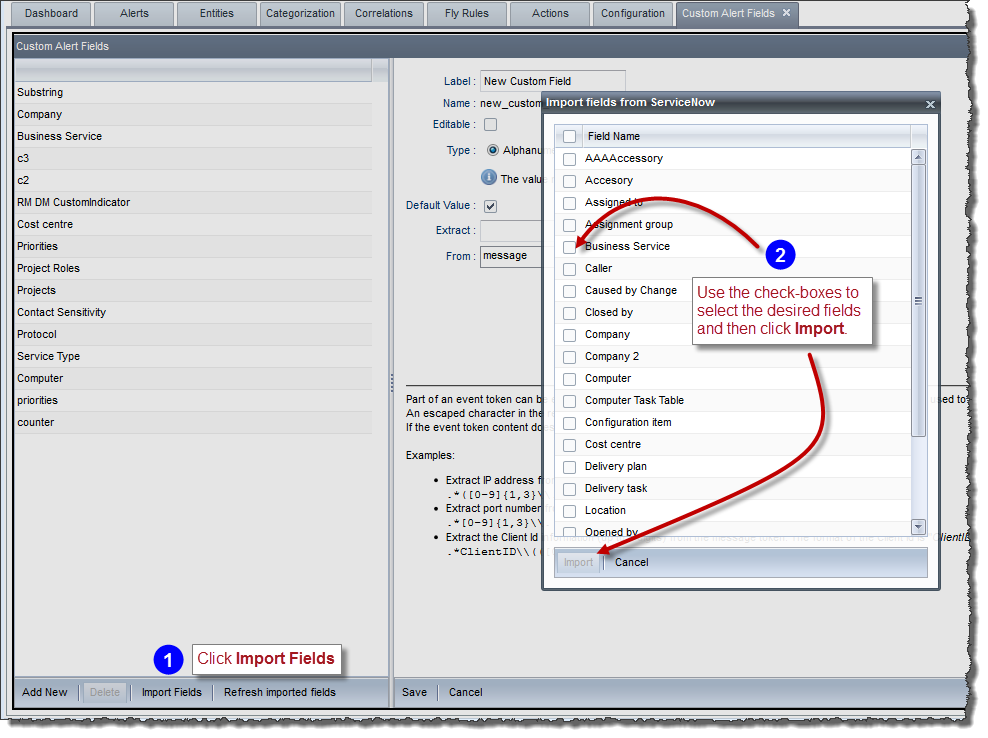
Should the values from the custom list fields you have already imported
change in the external system, you can refresh the values within RightITnow
ECM by clicking Refresh imported fields:
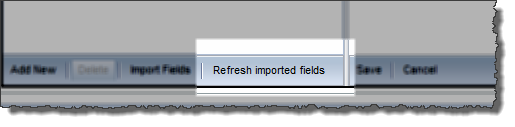
This action refreshes all imported fields, not just the ones associated with the currently selected custom field.
To rename a custom alert field, select the field you wish to rename, type the new name in the Name field, and then click Save. if you rename a custom field, you must manually update the corresponding condition filter and de-duplication criteria using the Categorization tab to reflect the new names. This also applies to any Correlations rules and Actions that refer to the renamed field.

When deleting a custom field, ECM prompts you whether it should clear the existing values of that custom field.
Note: If you choose to clear the values, then ECM performs a mass update on the table to set the values of the column that was used for the alert custom field to NULL, so, if possible, perform this operation when the events sent to ECM is stopped or the rate of events per second is very low.
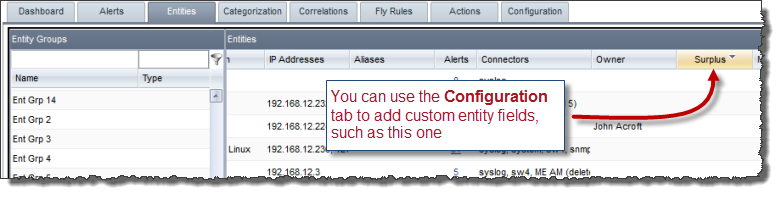
You can create custom Entity fields that appear on the Entity tab as column headings:
You can create 32 fields, 10 indexed and 22 non-indexed.
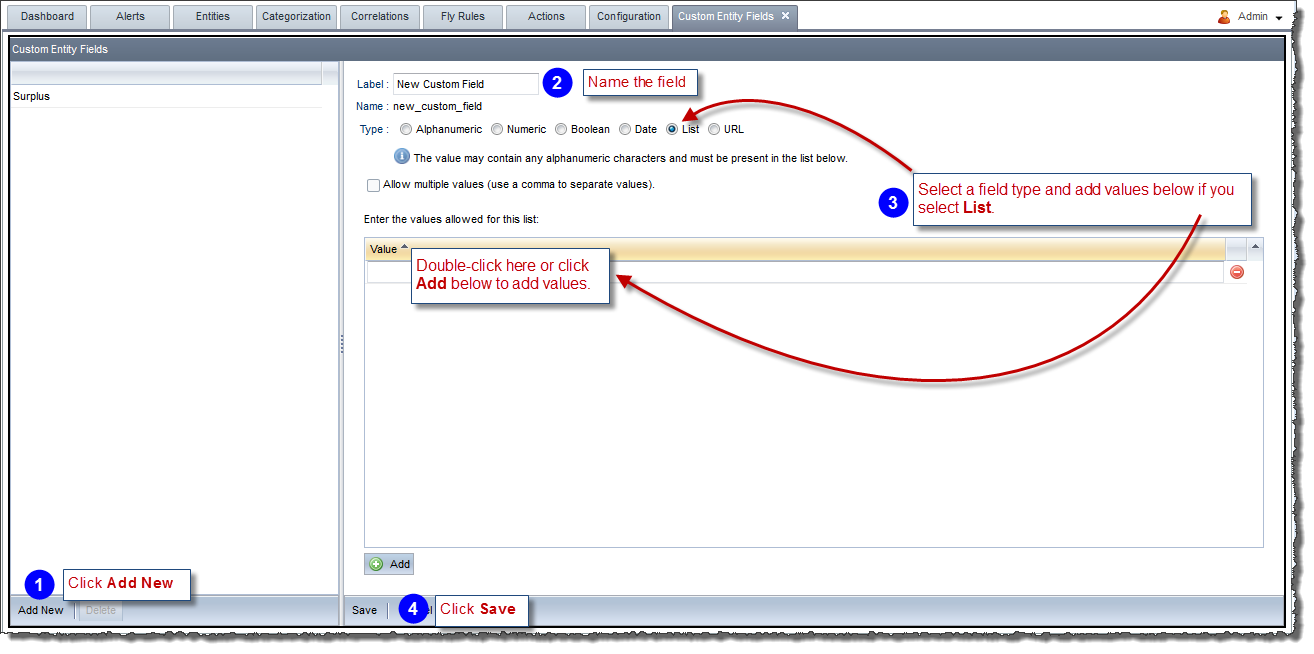
To create custom Entity fields:
Select the Custom Entity Fields configuration settings by clicking the Configuration tab and then selecting Custom Entity Fields from the Application Settings area, as shown above.
The Custom Entity Fields tab appears.
Use the Custom Entity Fields controls to create the custom fields:
You can interact with custom entity fields in the following ways:
RightITnow ECM provides the very powerful ability for your operators to build rules on the fly from the Alerts menu. See Creating Rules on the Fly for how to create rules on the fly and Modifying Rules Created on the Fly for how to modify the rules you create on the fly. This section describes how to modify this feature's default behavior.
To configure the Create Rules on the Fly feature:
Select the Create Rule on the Fly configuration settings by clicking the Configuration tab and then selecting Create Rule on the Fly from the Application Settings area, as shown above.
The Create Rule on the Fly tab appears.
Follow the directions in the illustration below:
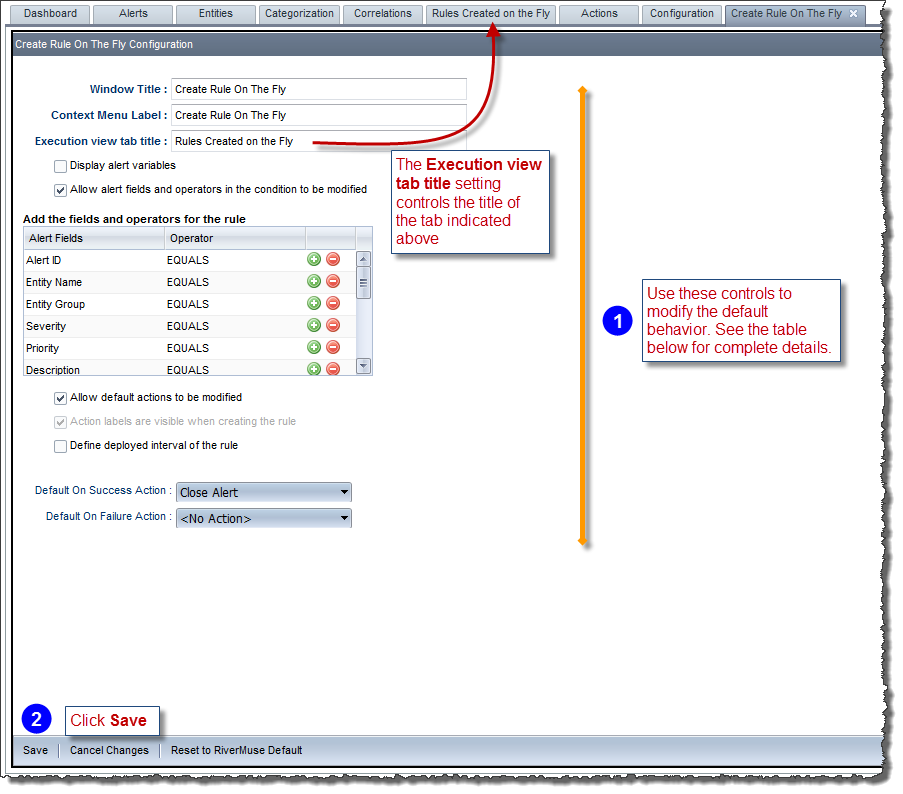
The following table describes the options illustrated above.
Setting |
Description |
Window Title |
Enter a window title for the dialog window that will allow operators to create rules on the fly when they select the option from the Context menu. |
Context Menu Label |
Enter a label for the command on the Context menu used to create a rule on the fly, highlighted below:
|
Execution view tab title |
Controls the title of the tab indicated in the image above. You turn this tab on for various users using the permissions controls. |
Display alert variables |
Used to toggle displaying alert variables in the condition builder. |
Allow alert fields and operators in the condition to be modified |
Used to toggle allowing operators to customize the pre-populated fields. |
Add fields and operators for the rule |
Used these controls to add fields and operators to the rule that when matched, will fire the rule. |
Allow default actions to be modified |
Used to allow or disallow operators to pick different actions at run time. |
Action labels are visible when creating the rule |
Toggles whether to display which actions are performed. |
Default On Success Action |
Use this control to select the default action to execute after successfully firing the rule. |
Default On Failure Action |
Use this control to select the default action to execute after unsuccessfully firing the rule. |
You can configure entity group types to be displayed and assigned to entity groups in the Entity console.
To configure the entity group types:
Select the Entity Group Types configuration settings by clicking the Configuration tab and then selecting Entity Group Types from the Application Settings area, as shown above.
The Entity Group Types tab appears.
Follow the directions in the illustration below:
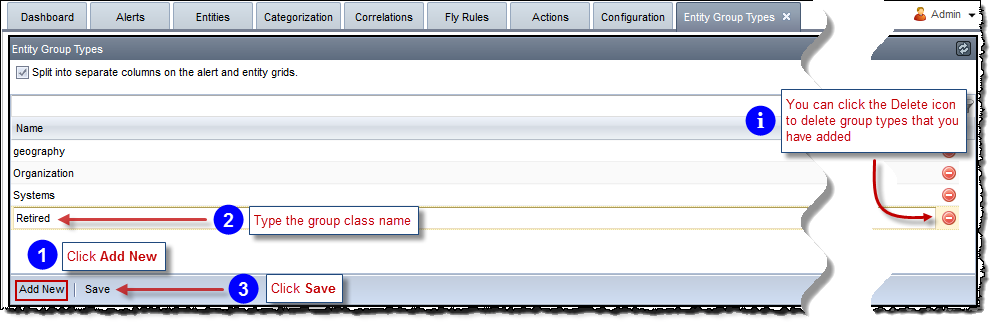
Note: Do not use underscores in the group type name.
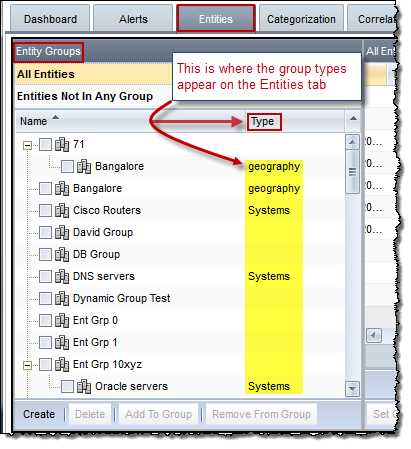
You can configure ECM to display each entity group type in its own column in the Alerts and Entities Consoles. The columns look like this:

Any groups that do not have a type assigned will appear under a general Entity Groups column.
To display entity group types in separate columns:
Select the Entity Group Types configuration settings by clicking the Configuration tab and then selecting Entity Group Types from the Application Settings area, as shown above.
The Entity Group Types tab appears.
Follow the directions in the illustration below:
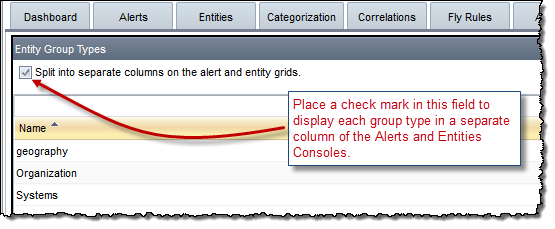
Click Save.
You can configure entity classes to be displayed and assigned to entities in the Entity console.

To configure the entity classes:
Select the Entity Classes configuration settings by clicking the Configuration tab and then selecting Entity Classes from the Application Settings area, as shown above.
The Entity Classes tab appears.
Follow the directions in the illustration below:
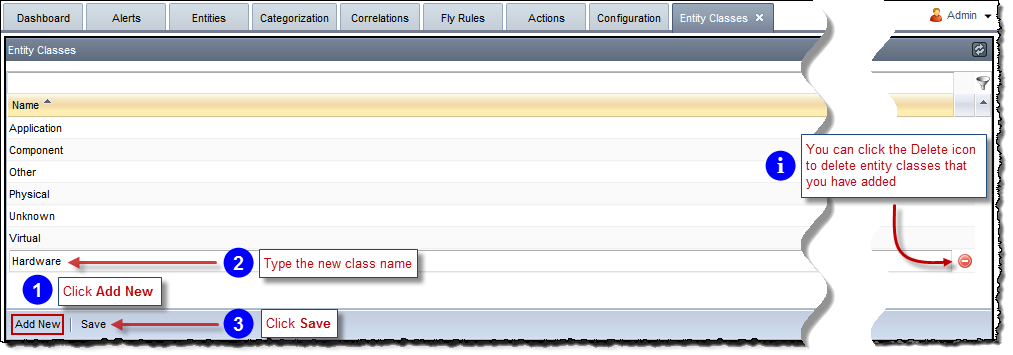
After you click Save, ECM prompts you to click OK to refresh ECM and apply the settings.
Click OK.
An escalation call order defines a certain order to control the flow of assigning an alert, across a set of users & user groups.
To create an Escalation Call Order:
The Escalation Call Order tab appears.
Use this tab to create an escalation call order as described below:
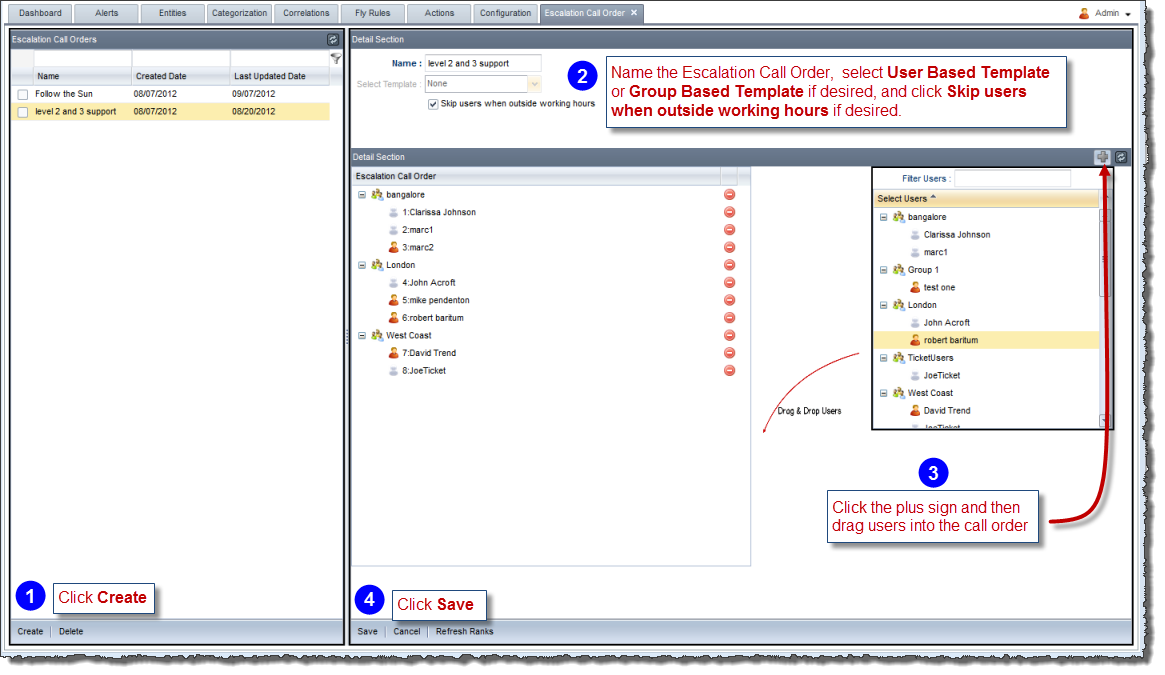
As can be seen in the screen shot above, an option to "Skip Users when outside working hours" is provided while creating Escalation Call Orders. Selecting this option would check if the user is available before assigning. If user is not available, the next available user down the Call Order list is assigned.
A user’s workdays, time zone and business hours are defined in the Manage Users screen.
Once the escalation call order is created, it can be integrated with actions as follows:
Use this action from the Alert Console, or in an SLA as case maybe. See Managing SLAs.
