Click the Alerts tab to view, assign, annotate, alter severity, and close alerts. You can configure RightITnow ECM to play a sound anytime a new alert is encountered by the system. See Configuring Your User Preferences.
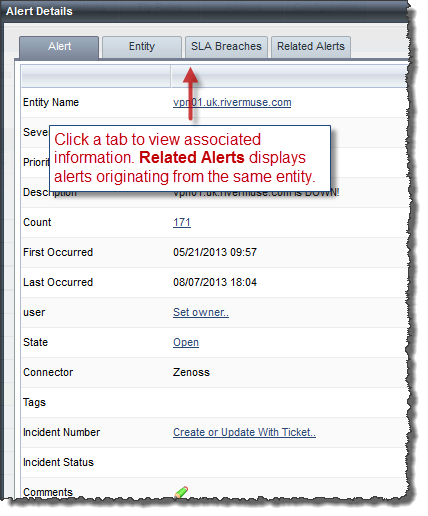
You can sort, group, and filter the Alerts table as described in Viewing and Manipulating Tabular Data and Sorting and Filtering by Date. If you would like to view additional details about a specific alert, then select the alert and click the Additional Details pane near the bottom of the page, or double-click the alert to invoke the Alert Details window:
You can configure the fields that appear in the Alert Details window and pane. See Configuring the Alert Details Window Grid Layout.
You can view the details of a single alert by URL. This could be helpful when working in a team on a single alert because you could send the direct link to the alert information in the form of an URL.
The format of the URL is:
<ECM URL>/rightitnow/?alertid=n#Alerts
n is the alert ID.
You can also use the support filter id parameter or the filter name in the URL to open the alerts console with alerts from a particular saved filter. For example, the following URL opens the Alerts Console with the filter named test applied:
<ECM URL>/rightitnow/?filter=test#Alerts
If Alert Rollup is enabled (see Configuring Alert Rollup for how to enable Alert Rollup), you can select a number of alerts and pick one to act as the lead alert. This alert appears in the alerts console, but the other alerts do not. You can expand the lead alert to see the alerts that you rolled up into it. When filtering the console, the lead alerts are returned but any rolled up alerts are not.
To roll up alerts:
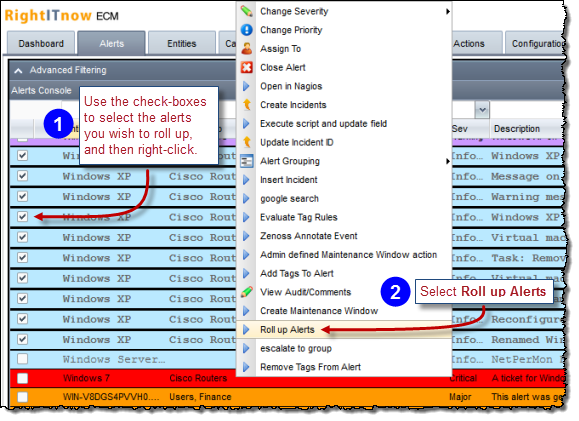
The Select Lead Alert window appears.
Select the lead alert and then click Select as lead Alert:

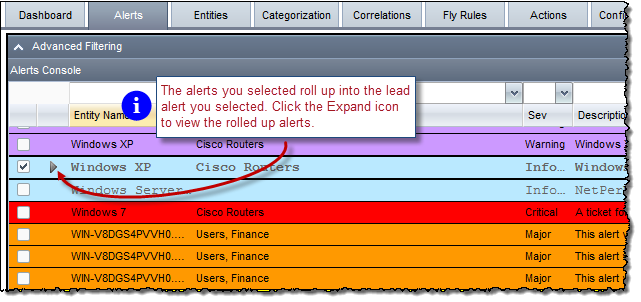
ECM rolls up the selected alerts into the select lead alert:
Restrictions:
Dashboard Displets:
The dashboard displets that display a count of alerts (e.g. System Health) are not be affected by rolled up alerts. The Alerts Displet displays lead alerts, but you must navigate to the alerts console to expand the alert and see its rolled up alerts.
Rules and Actions:
Integration with Alerts Groups:
An option in the Alert workflow enables automatic group creation when alerts are rolled up – a new group will be created and the all the rolled up alerts as well as the lead alert will be placed in it. The group name will be the ID of the lead alert (this can be renamed through the grouping side panel).
Closing Rolled Up Alerts
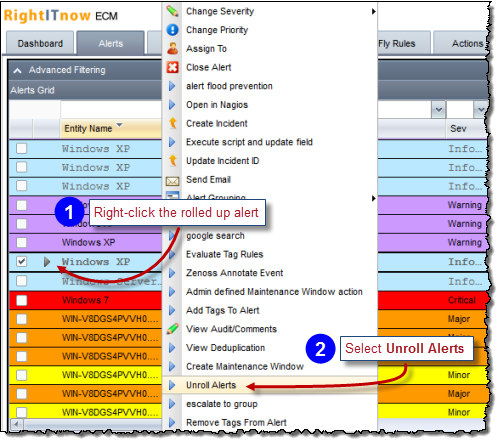
To unroll alerts, right-click the rolled up alert and then select Unroll Alerts:
You can view alerts in full-screen mode:

To collapse full-screen mode:

You can configure the full-screen row colors to be different than collapsed mode if desired.
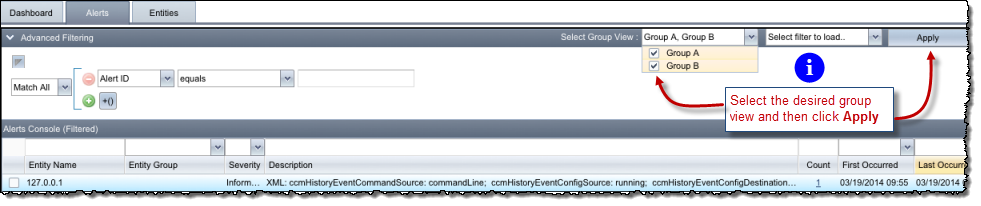
If a user belongs to two or more user groups which have filters (alert views) defined, the Alerts Console allows the user to choose which group's view to see:
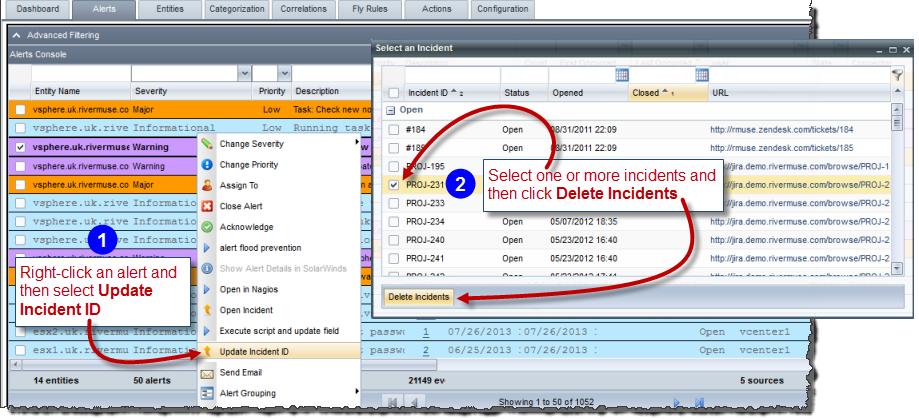
To remove one or more incidents from an alert:
You need the Delete Incidents permission to use this feature. See Managing Permissions.
The paged alert filters that you
create and save from the alerts console are available as RSS feeds. Access
the feed by clicking the RSS icon ![]() in the
alerts console filter pane as shown below:
in the
alerts console filter pane as shown below:

RightITnow ECM returns feeds in RSS 2.0 format. You can control the look of the RSS Feeds by configuring the RSS feed template. The feed’s channel elements are derived from the filter’s specifications and each item in the feed represents an alert. The following tables illustrate these mappings.
RSS Channel Mapping
RSS Element |
RightITnow ECM Field |
title |
Filter name and the number of alerts in the feed |
description |
Filter description |
link |
A link which redirects to the ECM alerts console and applies the filter |
pubDate |
The last occurred time of the most recent alert in the feed |
RSS Item Mapping
RSS Element |
RightITnow Field |
title |
Alert entity |
description |
Alert description |
link |
A link which redirects to the ECM alerts console, applies the filter, selects this particular alert and opens the alert details popup for it |
author |
The owner of the alert if it is assigned |
category (list) |
List with one item, the alert severity |
pubDate |
The last occurred time of the alert |
You access RSS feeds in RightITnow ECM by providing an URL that points to the desired feed. You can use the following parameters in the feed URL. Some are required and others are not, but serve to further customize the feed.
Name |
Use |
auth |
This is an authentication token that identifies the user, used to check if the user has access to the filter. |
feed |
The name or ID of the feed (i.e. the name or ID of the saved alert filter). Defaults to using the ID. If more than 1 filter exists with the same name, the private filter for this user will be used. |
limit |
Returns only this number of alerts, sorted according to the sorting specified on the filter (or by the most recent if sorting was not saved on the filter). |
closedOnly |
Optional parameter, if set to true will retrieve only closed alerts that match the filter. If false or missing will apply to non-closed alerts. |
http://localhost:8080/rivermuse/api/rss/feed/{auth}/{feed}/{limit}/{closedOnly}
http://localhost:8080/rivermuse/api/rss/feed/038658ad953cbe48cfc6dd330a0ba37b4ade16a9/2/50
http://localhost:8080/rivermuse/api/rss/feed/038658ad953cbe48cfc6dd330a0ba37b4ade16a9/Critical%20Alerts/50
http://localhost:8080/rivermuse/api/rss/feed/038658ad953cbe48cfc6dd330a0ba37b4ade16a9/Critical%20Alerts/100/true
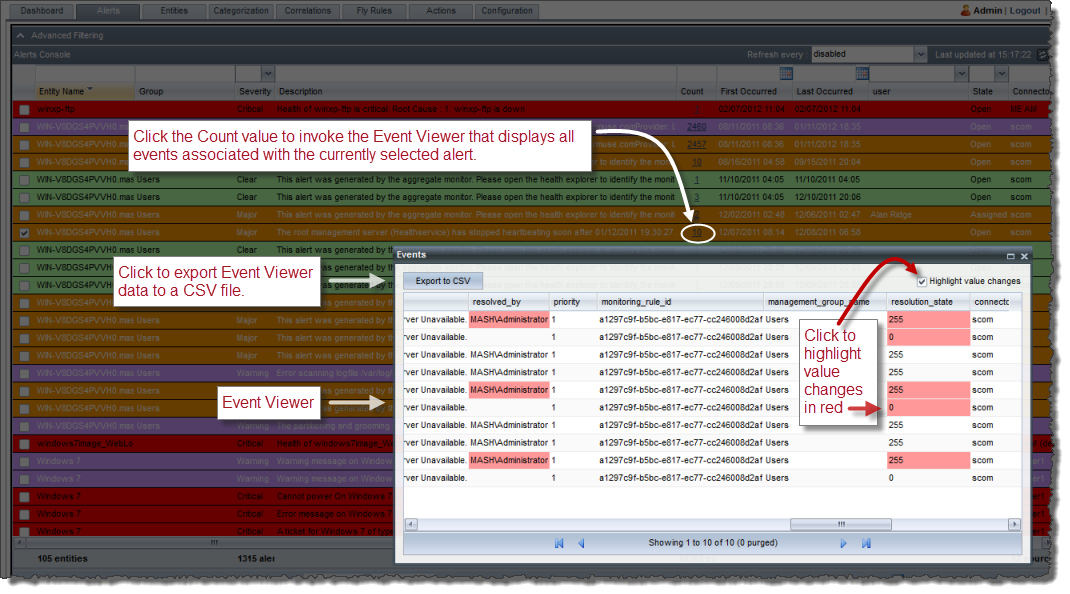
To export alerts data to a CSV file:

Note: If you do not select any alerts, RightITnow ECM exports all alerts in the dataset.
You can hide or show the columns that appear in the Alerts Console to customize the view to the needs of your organization:
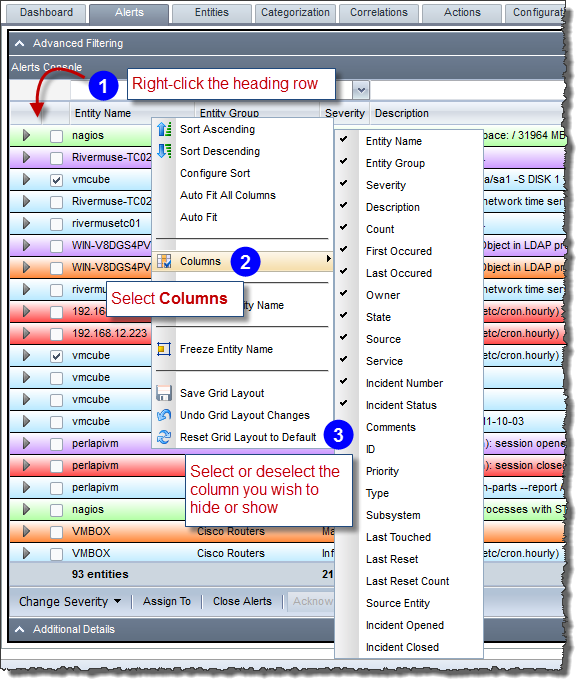
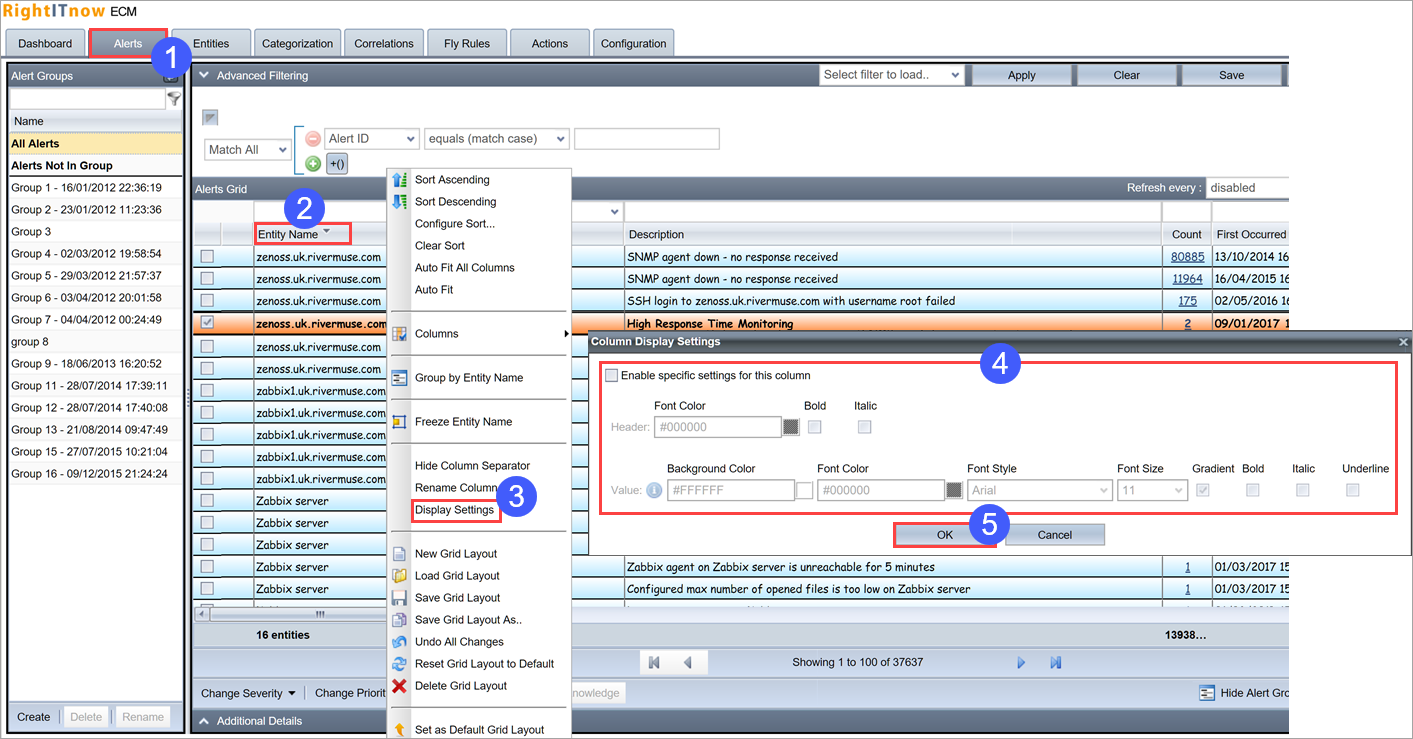
You can configure display properties per column. For example, you may want to configure the Entity Name column to display entity names in boldface.
To configure column display properties:
If you are an Administrator, you may rename alert fields and the corresponding Alerts Console columns as follows:
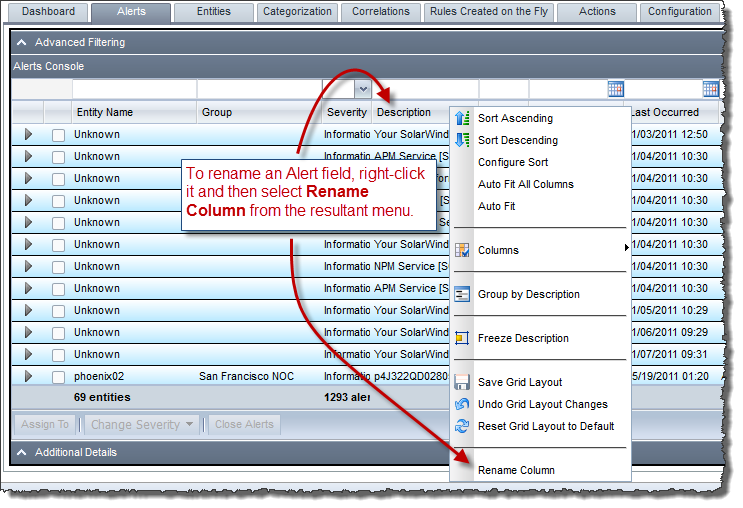
You cannot rename custom alert fields from the Alerts Console. Instead, you can rename them using the Custom Alert Fields tab as described in Renaming Custom Alert Fields.
You can save multiple grid layouts and keep them to yourself, or share them with everyone, or specific groups.
To save a grid, configure the grid to your liking, and then:
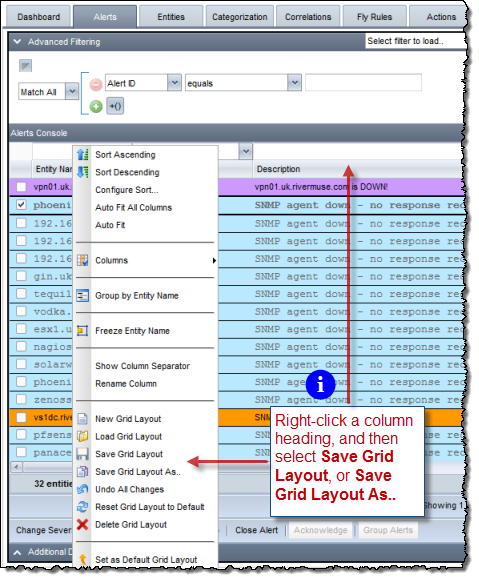
Then supply a name and select the distribution on the resultant dialog box:

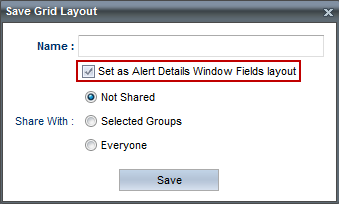
You can configure the grid layout of the Alert Details window. To configure the Alert Details window grid layout, follow the instructions in Saving Multiple Grid Layouts, making sure to click the Set as Alert Details Window Fields layout option, as shown below:
To enforce a common grid layout for all users, configure the grid to your liking, and then:
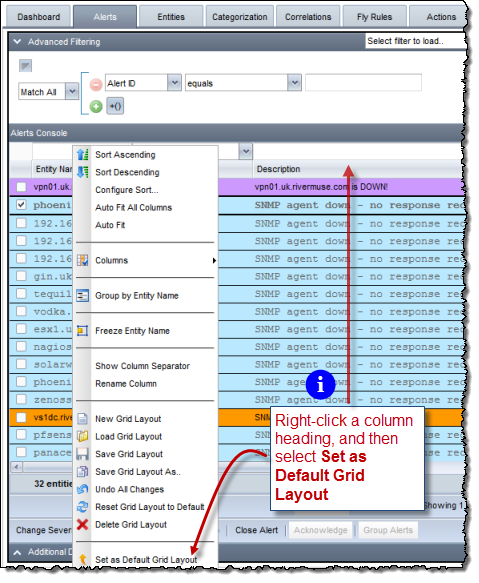
The Set as Default Grid setting saves the current settings as a default for all other users. If you do not see the option, then you may need the permission to access the button. By default, only Admins have this permission. Also, there is another permission, by default available only to Admins, that allows users to change the settings enforced by the Set as Default Grid setting. See Managing Permissions.
To view the events associated with alerts:
You can view the audit records for an individual alert by clicking the
![]() in the alert's row in the Alerts Console's Comment
column.
in the alert's row in the Alerts Console's Comment
column.
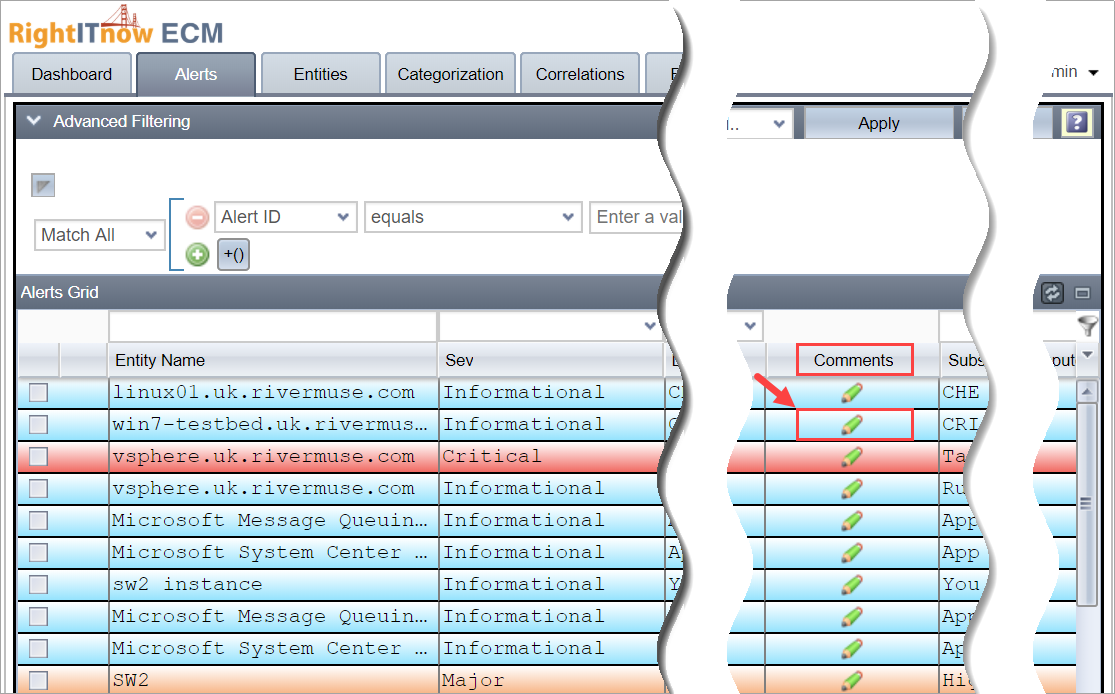
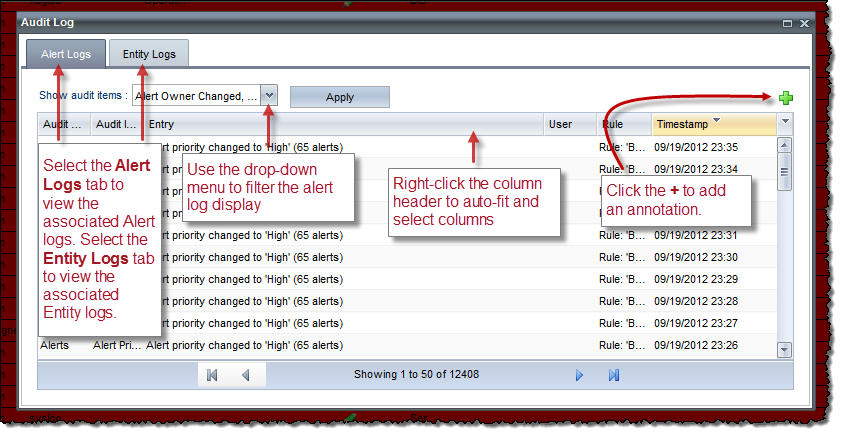
This invokes an Alert log window.
You can enter your own comment for the alert by clicking the ![]() :
:
Note: You can click an URL in an audit record to visit that URL.
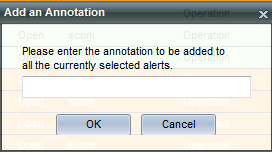
If you select multiple alerts, and then click the ![]() ,
then the smaller annotation box appears:
,
then the smaller annotation box appears:
Note: The Alerts Console's Last Comment column displays the last user comment added on the alert. See Hiding_and_Showing_Columns if you do not see the Last Comment column in the Alerts Console.
See Viewing the RightITnow ECM Audit Log for instructions on how to see the entire RightITnow ECM audit log.
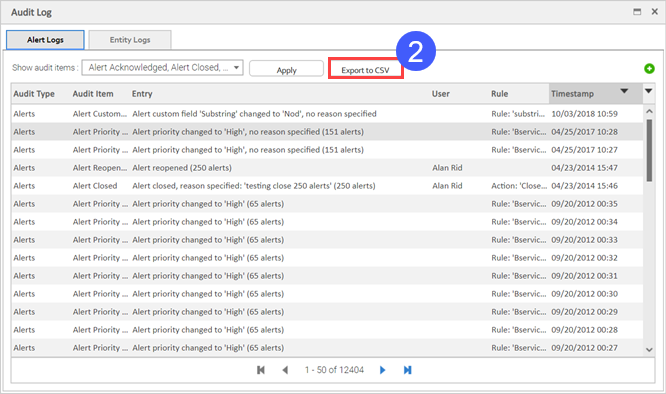
You can export an alert's audit records.
To export an alert's audit records:
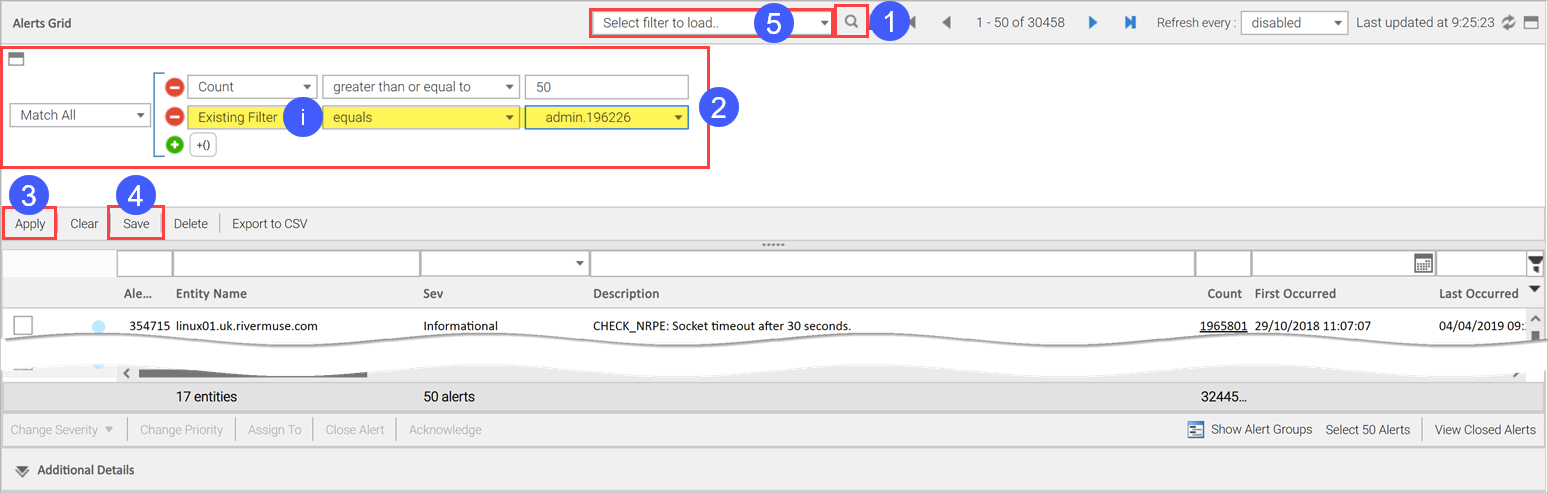
If you need more filtering controls, you can use the Advanced Filtering pane to quickly build complex queries intuitively, and then save them as named filters that you can load later.
To perform advanced filtering:
 |
Notice in the screen shot that you can add existing filters to the filter builder. |
To include a condition in the Filter Builder that searches lead or rolled up alerts, use the Has Nested Alerts and Lead Alert ID conditions, respectively:
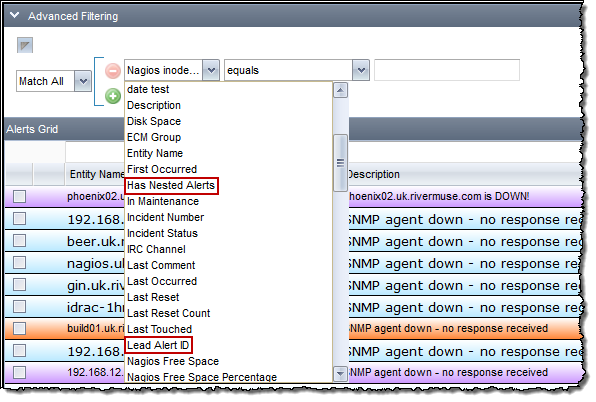
See Rolling Up Alerts for information about lead and nested alerts.
When you save a filter as described in Performing Advanced Filtering, a dialog box appears that you can use to share the filter with others and save the current sort:
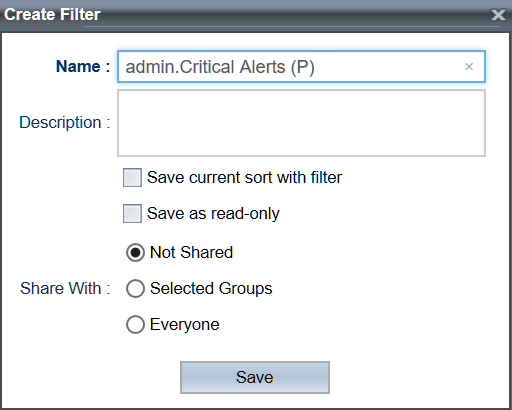
The following rules apply to viewing shared filters:
The admin (SUPER_USER role) user can see all filters and can change any filter to be private, making the admin the owner of the filter
All other users see the filters they have created, even if they have shared them with other groups of which they are not members. with everyone, and with the groups of which they are members.
Only the user that created a shared filter and the admin can change a shared filter to private.
To change a shared filter to private, re-save it and use the resultant dialog box above to select Not Shared.
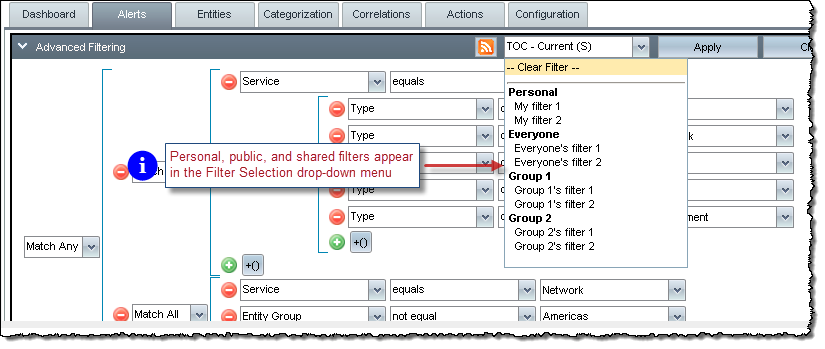
Personal, public, and shared filters appear in the Filter Selection drop-down menu:
To use a regular expression (regex) in the advanced filter builder of the alerts console, select the "matches expression" operator and enter a JavaScript compatible regex. A regex can also be used in the inline filter on the grid.
The following fields support regex: entity, entity group, description, connector, connector entity, tags, ticket number
Some regex examples:
[0-9]{1,3}\.[0-9]{1,3}\.[0-9]{1,3}\.[0-9]{1,3} - to match any IP address
[a-zA-Z0-9\-\.]+\.(com|org|net) - to match URLs ending in .com, .org or .net
Note: You can use REGEX in the non-paged alerts console, but not in the paged alerts console.
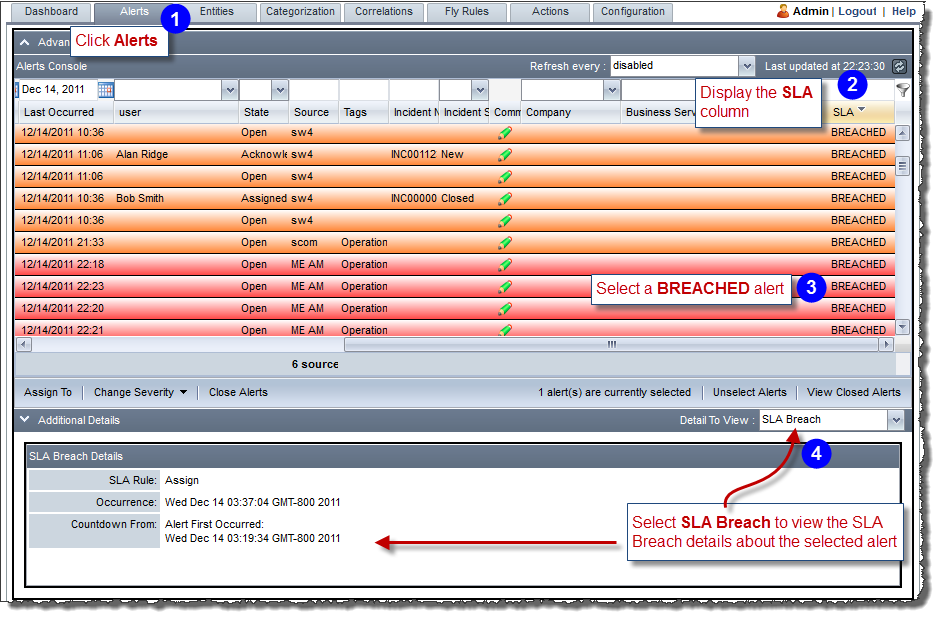
RightITnow ECM offers SLA tracking functionality. See Managing Service Level Agreements for an overview.
To view SLA information:
Right-click an alert to invoke the Alert Console Context Menu that offers you all the actions you can take on the selected alert:
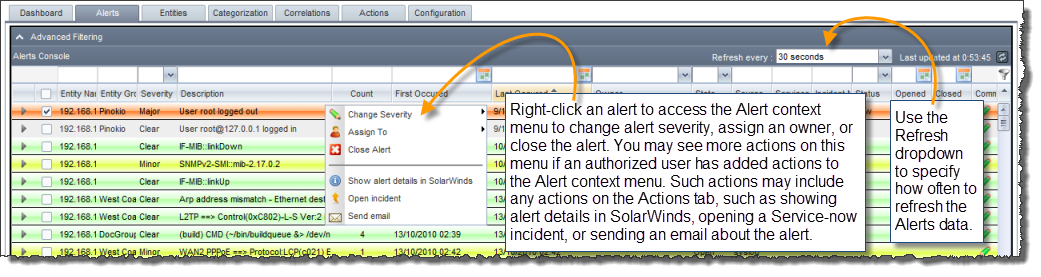
You will notice that the Alert Console Context Menu is context sensitive in that only the available commands are activated and the unavailable options are greyed out.
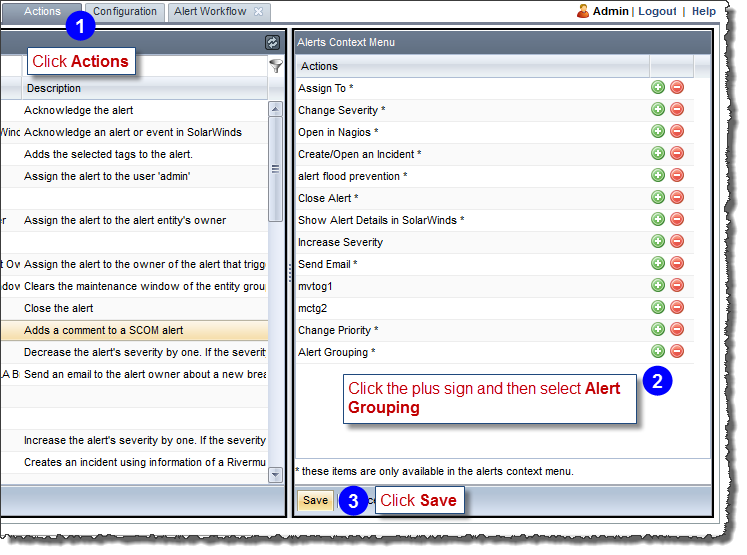
See Configuring the Alert Console Context Menu for instructions about how to add more actions to the Alert Context menu.
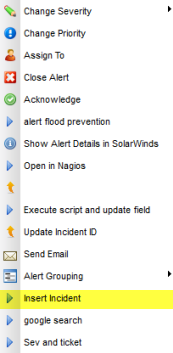
The Insert Incident command highlighted below on the Alert Context menu creates an incident in ServiceNow®:
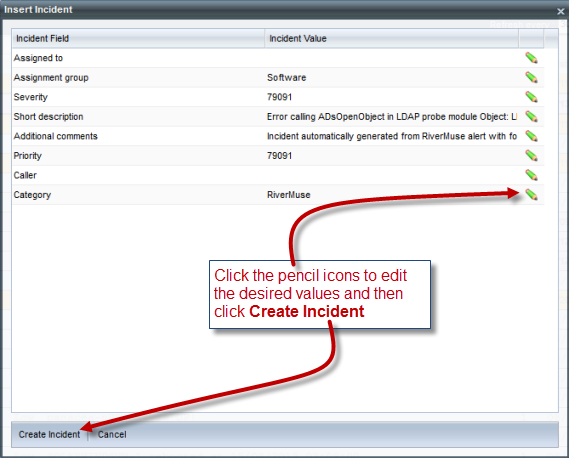
If you configured the associated Create Incident action to allow for modifying current values before inserting the incident, then the following widow appears after selecting Insert Incident:
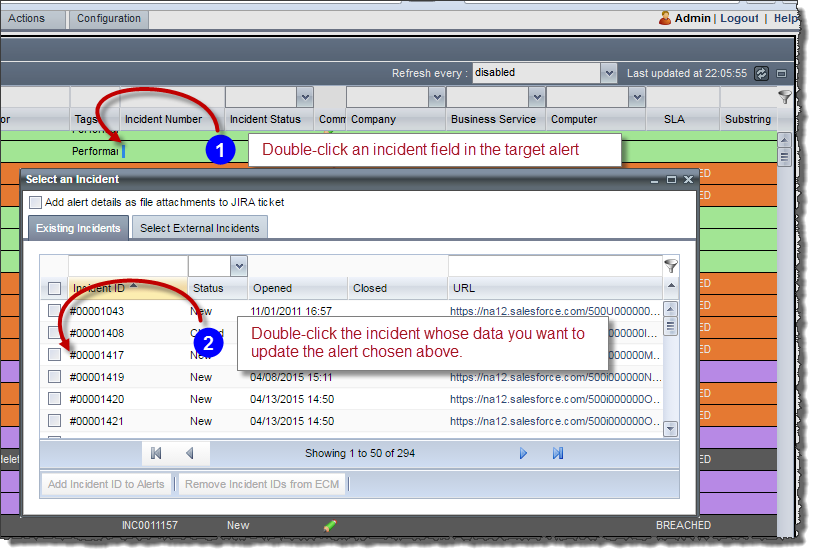
You can update the incident ID attached to an alert with an existing incident ID, and even automatically execute an action after the update. An alert can only be associated with one incident, whereas an incident can be associated with one or many alerts.
To update an alert with an incident:
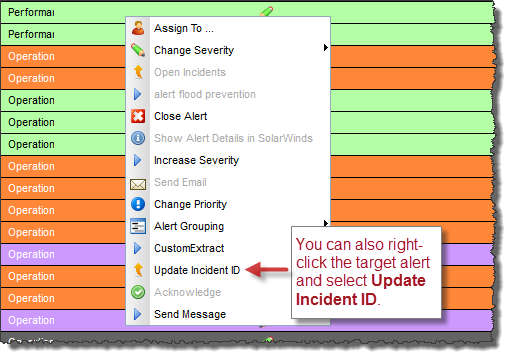
Instead of double-clicking the alert, as shown above, you may also use the Alert Context menu:
For JIRA, SalesForce, ServiceNow® and Custom Incident Connector incidents, after you invoke the Update With Incident ID action on an alert, ECM updates the corresponding incident's description with the text:
The following RightITnow ECM alert(s) have been
assigned to this ticket on <DATE> <Alert ID>
For JIRA, ECM adds a new comment for each Alert that has been updated with this Incident ID. Similarly when you invoke the Remove Incident from Alert command, ECM updates the incident with an explanatory message.
The Update Incident ID action is also available in Alert Groups. In this context, it overwrites all the incident IDs with the one you have selected.
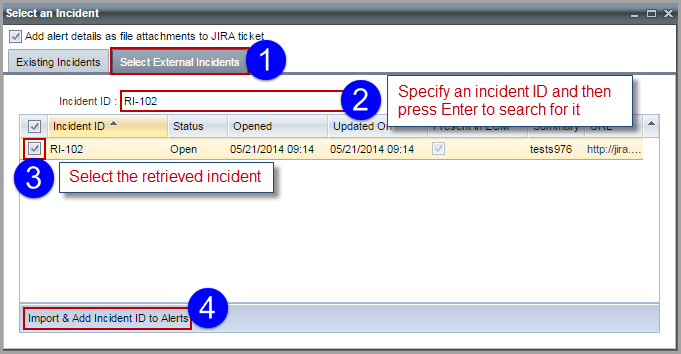
You can update alerts with external incidents.
To update an alert with an external incident:
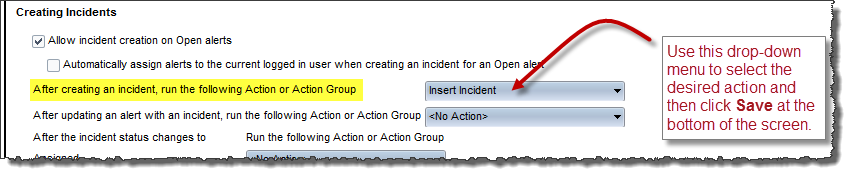
You can configure the system to execute an action after updating an alert with an incident:
To configure the system to execute an action after updating an alert with an incident:
Click the Configuration tab at the top of the RightITnow ECM screen.
Click Alert Workflow in the Application Settings section. The Alert Workflow Configuration tab appears.
Configure the behaviors as shown below:
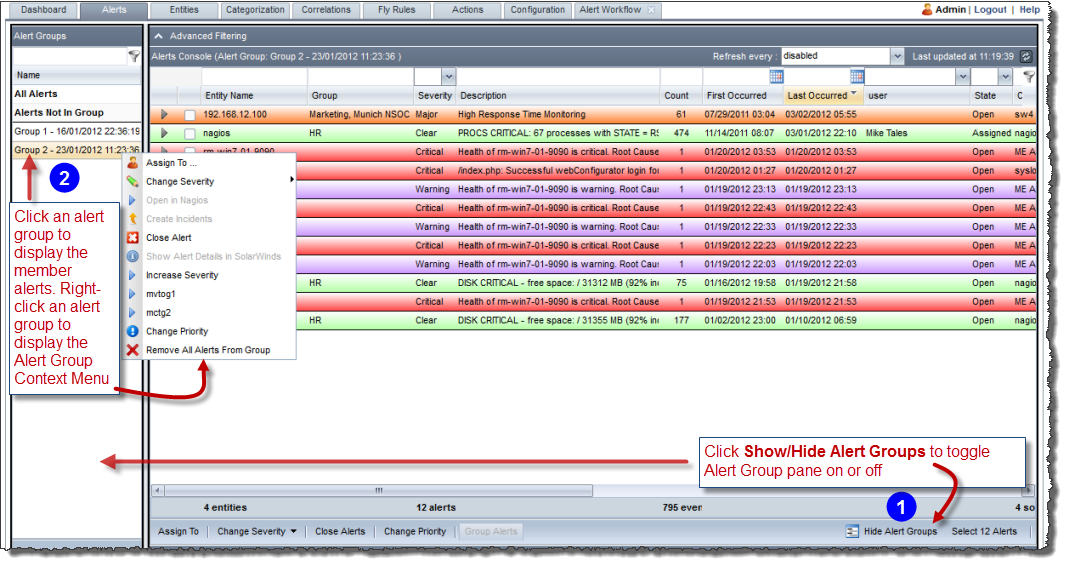
You can group alerts and take action on them collectively.

To view alert groups, toggle on the Alert Groups pane and use the Alert Groups Context menu to act upon all alerts in the selected Alert Group as described below:
This section describes how to create an alert group manually. You can also create an alert group automatically using the Move to Alert Group action with Correlation rules.
To create an alert group:
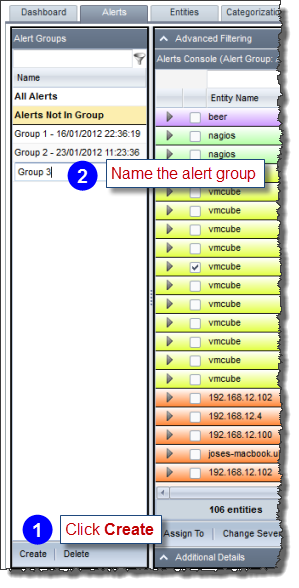
Note: An alert group must have a unique name.
This section describes how add an alert to an alert group manually. You can also add alerts to alert groups automatically using the Move to Alert Group action with Correlation rules.
To add an alert to an alert group:
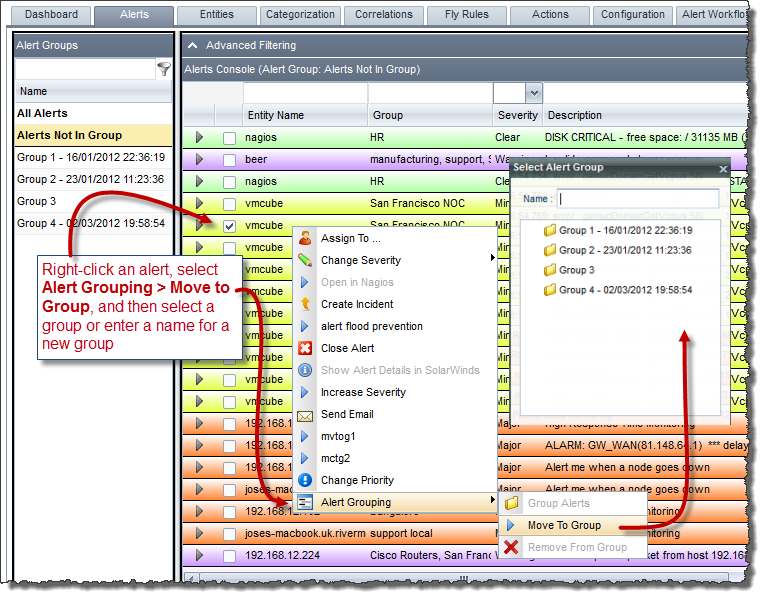
Note: Add multiple alerts at once by selecting multiple alerts, and then selecting Group Alerts from Alert Context Menu's Alert Grouping sub-menu. Also, an alert may only belong to one group.
You can use the Alerts console to automatically create correlation rules on the fly based on value of an incoming alert. This is very useful if many similar alerts are flooding in, and you want to act immediately on them from the Alerts console without having to go elsewhere in the system to create rules to handle the incoming flood.
To create rules on the fly:
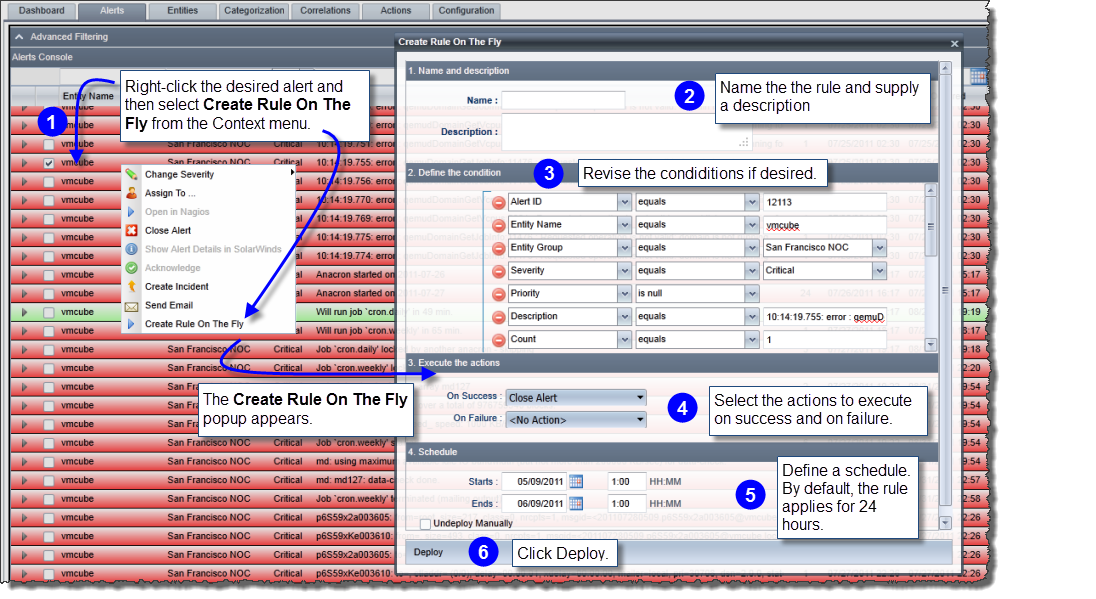
In the example above, we have deployed a rule that automatically closes any alerts for the next 24 hours whose conditions match those shown in step three of the screenshot above.
If you have access to the Correlations tab, you can modify the rule that you created on the fly. See Modifying Rules Created on the Fly for more information.
If you have access to the Configuration tab, you can modify the default behavior of the Create Rule on the Fly function to match your business processes. See Configuring Create Rule on the Fly for more information.
The following diagrams illustrate the default RightITnow ECM alert workflow when a supervisor assigns an alert and when an operator assigns an alert to self.
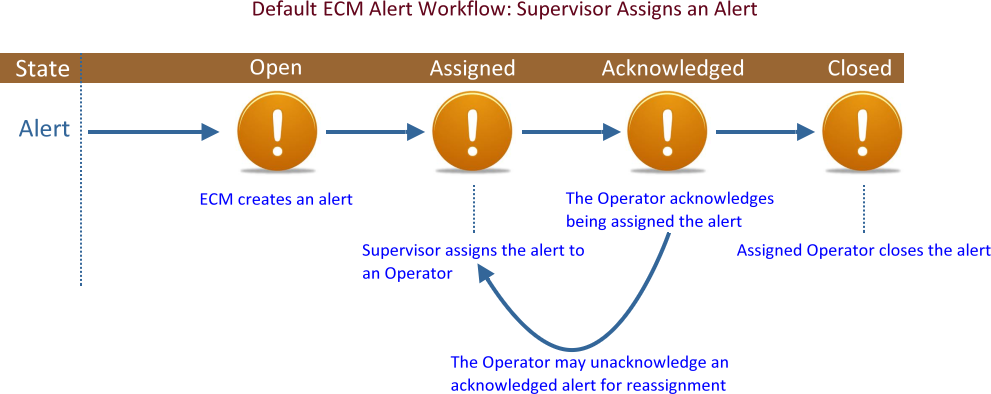
Notes: You can acknowledge and unacknowledge alerts using the corresponding buttons at the bottom of the Alerts Console, or by using the right-click Context menu. Supervisors can only assign alerts to operators in their groups, and an administrator can assign alerts to anyone and close any alert. You can modify this default behavior. See Managing Permissions for more information.
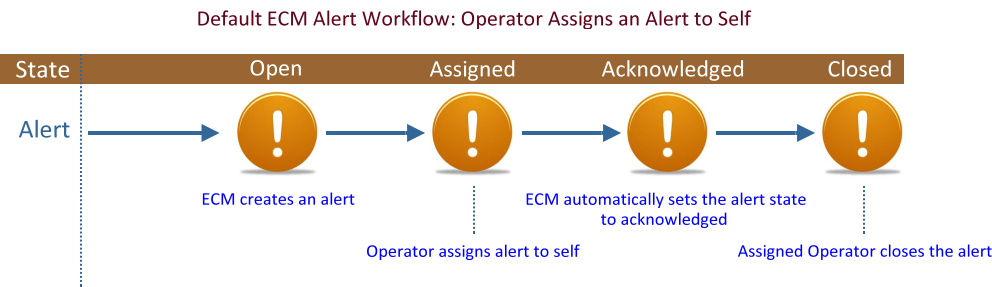
Note: By default, when operators assign alerts to themselves, RightITnow ECM automatically sets the alert state to acknowledged. You can turn off this behavior. In fact, you can configure RightITnow ECM to skip the acknowledgement step altogether. See Configuring Alert Workflow Behavior for more information.
By default:
Alerts may have their owner cleared and state set to Open
An Open alert may not have its severity changed
Open alerts may not be closed
The user closing an alert must provide a reason for doing so
Incidents may not be created on open alerts
However, you may relax each and every one of the foregoing default behaviors. See Configuring Alert Workflow Behavior for more information.
RightITnow ECM affords you the ability to act on multiple alerts at once.
To act on multiple alerts:
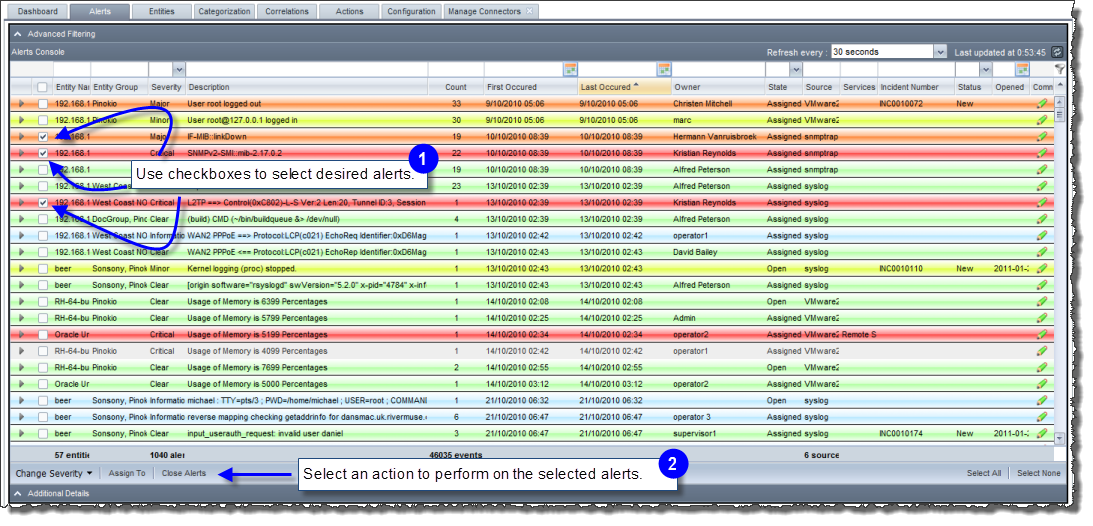
You can also use the check-boxes adjacent to the alerts in conjunction with the commands at the bottom of the alerts table to accomplish some of the same actions.
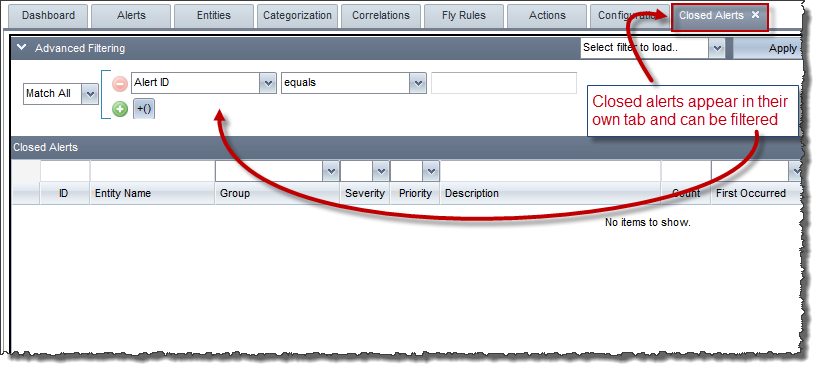
By default, the Alerts Console displays current alerts. If the ability to view and reopen closed alerts is turned on in the system, you may also view and reopen closed alerts by clicking the View Closed Alerts button at the bottom right of the Alerts Console.
Ensure that you have applied filtering when opening the Closed Alerts Console, otherwise, ECM prompts you with a message, "Please apply filtering to view closed alerts." Applying a filter which returns no alerts displays the message, "No items to show," in the empty grid.
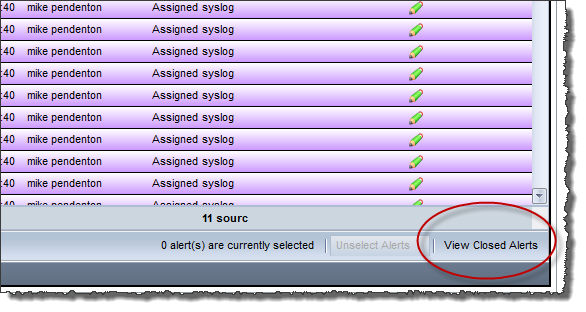
The Closed Alerts tab appears: